HP Xw5000 hp workstation xw5000 Technical Reference (309233-001 10/02) - Page 42
Hard Drive Rails, Storing the Drive Rails, Do
 |
UPC - 613326803318
View all HP Xw5000 manuals
Add to My Manuals
Save this manual to your list of manuals |
Page 42 highlights
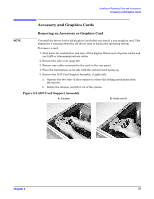
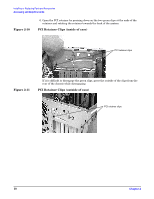
5. Place your fingers on the colored release clips on the sides of the drive, and squeeze inward. Pull gently just enough to release the drive rail latches. Figure 2-15 Hard Drive Rails 6. Grasp the hard drive with your hand and pull out. The drive rails are not screwed on to the drive. Do not hold the drive by the rails when it is not installed in a drive bay, because you could drop and damage the drive. 7. Remove the rails from the drive and insert them into the slots in the drive bay for storage. Store the drive in a static bag. Figure 2-16 Storing the Drive Rails
-
 1
1 -
2
-
3
-
4
-
5
-
6
-
7
-
8
-
9
-
10
-
11
-
12
-
13
-
14
-
15
-
16
-
17
-
18
-
19
-
20
-
21
-
22
-
23
-
24
-
25
-
26
-
27
-
28
-
29
-
30
-
31
-
32
-
33
-
34
-
35
-
36
-
 37
37 -
 38
38 -
 39
39 -
 40
40 -
 41
41 -
 42
42 -
 43
43 -
 44
44 -
 45
45 -
 46
46 -
 47
47 -
48
-
49
-
50
-
51
-
52
-
53
-
54
-
55
-
56
-
57
-
58
-
59
-
60
-
61
-
62
-
63
-
64
-
65
-
66
-
67
-
68
-
69
-
70
-
71
-
72
-
73
-
74
-
75
-
76
-
77
-
78
-
79
-
80
-
81
-
82
-
83
-
84
-
85
-
86
-
87
-
88
-
89
-
90
-
91
-
92
-
93
-
94
-
95
-
96
-
97
-
98
-
99
-
100
-
101
-
102
-
103
-
104
-
105
-
106
-
107
-
108
-
109
-
110
-
111
-
112
-
113
-
114
-
115
-
116
-
117
-
118
 |
 |
¹º¿·½ÀÀ¾ºÁ¸³²¸ÂÃÄÀ½¶¾ºÁ¸±½²·¿¸½º´ Ŷ¶Ã¿¿³²¾Ã¿
Í·³ÅºÕ³¸È¾µ
ÂÆÇÈÉÊ˲±
´±
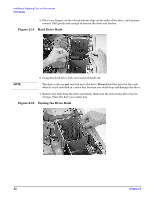
5. Place your fingers on the colored release clips on the sides of the drive, and squeeze
inward. Pull gently just enough to release the drive rail latches.
Figure 2-15
Hard Drive Rails
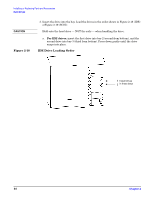
6. Grasp the hard drive with your hand and pull out.
½ÅÄâ
The drive rails are
not
screwed on to the drive.
Do not
hold the drive by the rails
when it is not installed in a drive bay, because you could drop and damage the drive.
7. Remove the rails from the drive and insert them into the slots in the drive bay for
storage. Store the drive in a static bag.
Figure 2-16
Storing the Drive Rails