HP Xw5000 hp workstation xw5000 Technical Reference (309233-001 10/02) - Page 52
Power Supply Mounting Screws, Removing the Power Supply, from the chassis.
 |
UPC - 613326803318
View all HP Xw5000 manuals
Add to My Manuals
Save this manual to your list of manuals |
Page 52 highlights
5. Remove the four screws located on the rear of the chassis that secure the power supply unit in position. Figure 2-27 Power Supply Mounting Screws Figure 2-28 6. Push the supply unit forward until it is clear of the mounting hooks and remove it from the chassis. Removing the Power Supply
-
 1
1 -
2
-
3
-
4
-
5
-
6
-
7
-
8
-
9
-
10
-
11
-
12
-
13
-
14
-
15
-
16
-
17
-
18
-
19
-
20
-
21
-
22
-
23
-
24
-
25
-
26
-
27
-
28
-
29
-
30
-
31
-
32
-
33
-
34
-
35
-
36
-
37
-
38
-
39
-
40
-
41
-
42
-
43
-
44
-
45
-
46
-
 47
47 -
 48
48 -
 49
49 -
 50
50 -
 51
51 -
 52
52 -
 53
53 -
 54
54 -
 55
55 -
 56
56 -
 57
57 -
58
-
59
-
60
-
61
-
62
-
63
-
64
-
65
-
66
-
67
-
68
-
69
-
70
-
71
-
72
-
73
-
74
-
75
-
76
-
77
-
78
-
79
-
80
-
81
-
82
-
83
-
84
-
85
-
86
-
87
-
88
-
89
-
90
-
91
-
92
-
93
-
94
-
95
-
96
-
97
-
98
-
99
-
100
-
101
-
102
-
103
-
104
-
105
-
106
-
107
-
108
-
109
-
110
-
111
-
112
-
113
-
114
-
115
-
116
-
117
-
118
 |
 |

¹º¿·½ÀÀ¾ºÁ¸³²¸ÂÃÄÀ½¶¾ºÁ¸±½²·¿¸½º´ Ŷ¶Ã¿¿³²¾Ã¿
¿²À¾³ºÁ½½ÃÄ
ÂÆÇÈÉÊ˲±
µ±
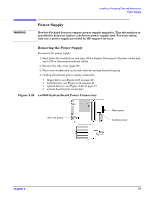
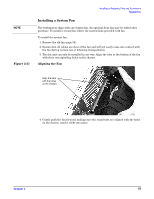
5. Remove the four screws located on the rear of the chassis that secure the power
supply unit in position.
Figure 2-27
Power Supply Mounting Screws
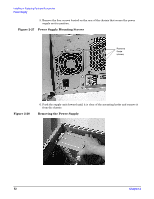
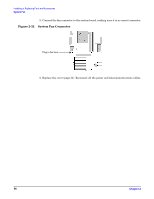
6. Push the supply unit forward until it is clear of the mounting hooks and remove it
from the chassis.
Figure 2-28
Removing the Power Supply
¼¶Ü´Æ¶²
ºÀ¶½¶²
½¿·¶µ½