HP Xw5000 hp workstation xw5000 Technical Reference (309233-001 10/02) - Page 43
Installing a Hard Drive, Attaching Rails to a new Drive
 |
UPC - 613326803318
View all HP Xw5000 manuals
Add to My Manuals
Save this manual to your list of manuals |
Page 43 highlights
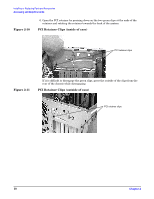
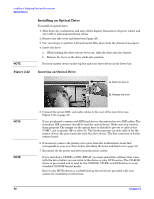
Figure 2-17 Installing a Hard Drive To install a hard drive: 1. If you are replacing a drive, remove the existing drive (page 41) in the slot you want to use. 2. Connect rails to the new drive: a. If the rails are stored in the drive bay, place your fingers on the colored release clips located on the sides of the drive bay, and squeeze in. Pull gently to remove the rails (Figure 2-16 on page 42). b. If the rails are attached to an old drive, remove them from the drive. c. Attach the rails onto the new drive by inserting the metal clips on the drive rails into the holes in the side of the drive. Attach the rear clip first, then attach the front clip. Attaching Rails to a new Drive
-
 1
1 -
2
-
3
-
4
-
5
-
6
-
7
-
8
-
9
-
10
-
11
-
12
-
13
-
14
-
15
-
16
-
17
-
18
-
19
-
20
-
21
-
22
-
23
-
24
-
25
-
26
-
27
-
28
-
29
-
30
-
31
-
32
-
33
-
34
-
35
-
36
-
37
-
 38
38 -
 39
39 -
 40
40 -
 41
41 -
 42
42 -
 43
43 -
 44
44 -
 45
45 -
 46
46 -
 47
47 -
 48
48 -
49
-
50
-
51
-
52
-
53
-
54
-
55
-
56
-
57
-
58
-
59
-
60
-
61
-
62
-
63
-
64
-
65
-
66
-
67
-
68
-
69
-
70
-
71
-
72
-
73
-
74
-
75
-
76
-
77
-
78
-
79
-
80
-
81
-
82
-
83
-
84
-
85
-
86
-
87
-
88
-
89
-
90
-
91
-
92
-
93
-
94
-
95
-
96
-
97
-
98
-
99
-
100
-
101
-
102
-
103
-
104
-
105
-
106
-
107
-
108
-
109
-
110
-
111
-
112
-
113
-
114
-
115
-
116
-
117
-
118
 |
 |

¹º¿·½ÀÀ¾ºÁ¸³²¸ÂÃÄÀ½¶¾ºÁ¸±½²·¿¸½º´ Ŷ¶Ã¿¿³²¾Ã¿
Í·³ÅºÕ³¸È¾µ
ÂÆÇÈÉÊ˲±
´³
Installing a Hard Drive
To install a hard drive:
1. If you are replacing a drive, remove the existing drive (page 41) in the slot you want
to use.
2. Connect rails to the new drive:
a.
If the rails are stored in the drive bay, place your fingers on the colored release
clips located on the sides of the drive bay, and squeeze in. Pull gently to remove
the rails (Figure 2-16 on page 42).
b.
If the rails are attached to an old drive, remove them from the drive.
c.
Attach the rails onto the new drive by inserting the metal clips on the drive rails
into the holes in the side of the drive. Attach the rear clip first, then attach the
front clip.
Figure 2-17
Attaching Rails to a new Drive
¼Å¾Ó²À´Ó¶½
¼¶Å·²¿Ó¾Ò²ÑźºÅ¿À²ä¾·½ºÔ
Ï·´»º²¿Ó¾Ò