HP Xw5000 hp workstation xw5000 Technical Reference (309233-001 10/02) - Page 46
Table 2-1, SCSI IDs, For IDE drives, Used
 |
UPC - 613326803318
View all HP Xw5000 manuals
Add to My Manuals
Save this manual to your list of manuals |
Page 46 highlights
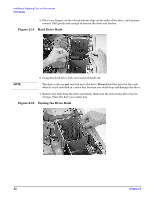
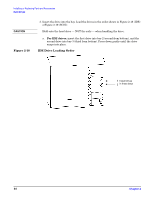
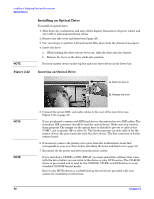
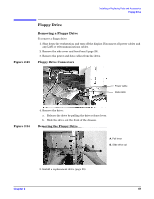
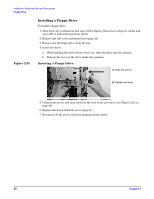
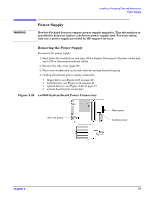
Table 2-1 4. Connect the drive cables: a. Connect the power cable to the hard drive (see Figure 2-14 on page 41). b. For IDE drives, connect the IDE cable to the drive. If you purchased a system with IDE hard drives, the system has two IDE cables. Connect the primary IDE connector to the hard drives. Use the secondary IDE connector for optical drives. Make sure you connect them properly. The jumper on the hard drive is should be pre-set to cable select (CSEC), not to master (M) or slave (S). The black connector on each cable is for the master device; the gray connector is for the slave device. The blue connector is for the system board. c. For SCSI drives, set the SCSI ID and connect the SCSI cable to the drive. See the documentation provided with your new drive to determine the jumper settings required to set the SCSI ID. Using the jumpers provided, set the SCSI ID on the jumper block located on the drive. There is no need to terminate the SCSI chain. The supported SCSI cable includes an attached hardware terminator. SCSI IDs SCSI ID 0 1-4 5-6 7 8-15 Used By First SCSI hard drive Optional additional SCSI hard drives Unused SCSI controller Unused 5. Replace the workstation cover (page 31) and reconnect all power cables and any LAN or telecommunications cables. 6. Start the workstation and check the to verify the new configuration. by pressing when prompted
-
 1
1 -
2
-
3
-
4
-
5
-
6
-
7
-
8
-
9
-
10
-
11
-
12
-
13
-
14
-
15
-
16
-
17
-
18
-
19
-
20
-
21
-
22
-
23
-
24
-
25
-
26
-
27
-
28
-
29
-
30
-
31
-
32
-
33
-
34
-
35
-
36
-
37
-
38
-
39
-
40
-
 41
41 -
 42
42 -
 43
43 -
 44
44 -
 45
45 -
 46
46 -
 47
47 -
 48
48 -
 49
49 -
 50
50 -
 51
51 -
52
-
53
-
54
-
55
-
56
-
57
-
58
-
59
-
60
-
61
-
62
-
63
-
64
-
65
-
66
-
67
-
68
-
69
-
70
-
71
-
72
-
73
-
74
-
75
-
76
-
77
-
78
-
79
-
80
-
81
-
82
-
83
-
84
-
85
-
86
-
87
-
88
-
89
-
90
-
91
-
92
-
93
-
94
-
95
-
96
-
97
-
98
-
99
-
100
-
101
-
102
-
103
-
104
-
105
-
106
-
107
-
108
-
109
-
110
-
111
-
112
-
113
-
114
-
115
-
116
-
117
-
118
 |
 |