HP Xw5000 hp workstation xw5000 Technical Reference (309233-001 10/02) - Page 69
Installing a New Heatsink, with the holes in the system board.
 |
UPC - 613326803318
View all HP Xw5000 manuals
Add to My Manuals
Save this manual to your list of manuals |
Page 69 highlights
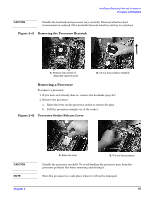
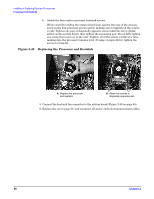
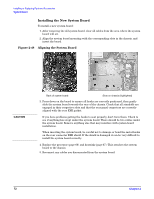
Installing a New Heatsink To install a new heatsink: 1. Use alcohol and a soft cloth to clean all of the thermal grease residue or thermal pad adhesive from the processor (Figure 2-44 on page 67). Allow the alcohol on the processor and heatsink to dry completely before installation. 2. Carefully push the system board back against the rear of the chassis, making sure the processor heatsink mounting holes in the system board line up with the threaded standoffs in the chassis. 3. Replace the processor and heatsink: a. Place the heatsink on top of the processor and align the four mounting screws with the holes in the system board. b. Attach the four captive processor heatsink screws. Tighten one pair of diagonally opposite screws until the screw shank settles on the system board, then tighten the remaining pair. See Caution and Figure 2-46 on page 68. 4. Connect the heatsink fan connector to the system board (Figure 2-40 on page 64). 5. Replace the cover (page 31) and reconnect all the power and telecommunications cables.
-
 1
1 -
2
-
3
-
4
-
5
-
6
-
7
-
8
-
9
-
10
-
11
-
12
-
13
-
14
-
15
-
16
-
17
-
18
-
19
-
20
-
21
-
22
-
23
-
24
-
25
-
26
-
27
-
28
-
29
-
30
-
31
-
32
-
33
-
34
-
35
-
36
-
37
-
38
-
39
-
40
-
41
-
42
-
43
-
44
-
45
-
46
-
47
-
48
-
49
-
50
-
51
-
52
-
53
-
54
-
55
-
56
-
57
-
58
-
59
-
60
-
61
-
62
-
63
-
 64
64 -
 65
65 -
 66
66 -
 67
67 -
 68
68 -
 69
69 -
 70
70 -
 71
71 -
 72
72 -
 73
73 -
 74
74 -
75
-
76
-
77
-
78
-
79
-
80
-
81
-
82
-
83
-
84
-
85
-
86
-
87
-
88
-
89
-
90
-
91
-
92
-
93
-
94
-
95
-
96
-
97
-
98
-
99
-
100
-
101
-
102
-
103
-
104
-
105
-
106
-
107
-
108
-
109
-
110
-
111
-
112
-
113
-
114
-
115
-
116
-
117
-
118
 |
 |