HP Xw5000 hp workstation xw5000 Technical Reference (309233-001 10/02) - Page 94
Optical Drive Problems, in the IDE Secondary Master or IDE Secondary Slave field. - workstation audio drivers
 |
UPC - 613326803318
View all HP Xw5000 manuals
Add to My Manuals
Save this manual to your list of manuals |
Page 94 highlights
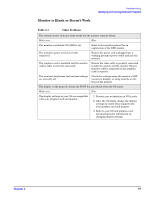
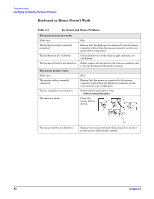
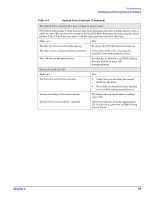
Optical Drive Problems • Check that a CD (or DVD) is inserted in the drive. • Ensure all cables (data, power, and audio) have been properly connected both to the drive and to the system board as described on page 48. • Verify that the drive has been detected in the Setup program Advanced menu by displaying the IDE Devices as described on page 79. You should see a drive declared in the IDE Secondary Master or IDE Secondary Slave field. • If you intend to boot from the optical drive, place the device before the hard disk drive in the boot order as described on page 82. The workstation does not boot from CD-ROM or DVD drive. Make sure... How The CD or DVD boot is enabled through the HP Setup utility. Run the Setup Program and enable booting to removable media and verify boot order settings. See "Boot Menu" on page 82. A bootable CD is in the optical drive. Insert a bootable CD in the drive. CD or DVD devices are not detected or driver is not loaded. Make sure... How The drive is connected and configured properly. See "Installing an Optical Drive" on page 48. Movie will not play in the DVD drive. Make sure... How The decoder software is installed properly. Install decoder software. See the hp workstation xw5000 Getting Started Guide. You can't eject a CD. Make sure... How The disc is properly seated in the drive. Turn off workstation and insert a thin metal rod into the emergency eject hole and push firmly. Slowly pull the tray out from the drive until the tray is fully extended, then remove the CD.
-
 1
1 -
2
-
3
-
4
-
5
-
6
-
7
-
8
-
9
-
10
-
11
-
12
-
13
-
14
-
15
-
16
-
17
-
18
-
19
-
20
-
21
-
22
-
23
-
24
-
25
-
26
-
27
-
28
-
29
-
30
-
31
-
32
-
33
-
34
-
35
-
36
-
37
-
38
-
39
-
40
-
41
-
42
-
43
-
44
-
45
-
46
-
47
-
48
-
49
-
50
-
51
-
52
-
53
-
54
-
55
-
56
-
57
-
58
-
59
-
60
-
61
-
62
-
63
-
64
-
65
-
66
-
67
-
68
-
69
-
70
-
71
-
72
-
73
-
74
-
75
-
76
-
77
-
78
-
79
-
80
-
81
-
82
-
83
-
84
-
85
-
86
-
87
-
88
-
 89
89 -
 90
90 -
 91
91 -
 92
92 -
 93
93 -
 94
94 -
 95
95 -
 96
96 -
 97
97 -
 98
98 -
 99
99 -
100
-
101
-
102
-
103
-
104
-
105
-
106
-
107
-
108
-
109
-
110
-
111
-
112
-
113
-
114
-
115
-
116
-
117
-
118
 |
 |
