HP Z210 HP Z210 CMT Workstation Maintenance and Service Guide - Page 104
Installing an expansion card,
 |
View all HP Z210 manuals
Add to My Manuals
Save this manual to your list of manuals |
Page 104 highlights
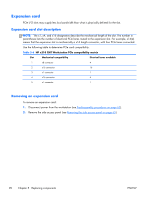
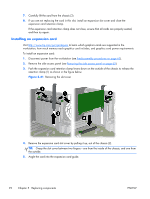
7. Carefully lift the card from the chassis (3). 8. If you are not replacing the card in this slot, install an expansion slot cover and close the expansion card retention clamp. If the expansion card retention clamp does not close, ensure that all cards are properly seated, and then try again. Installing an expansion card Visit http://www.hp.com/go/quickspecs to learn which graphics cards are supported in the workstation, how much memory each graphics card includes, and graphics card power requirements. To install an expansion card: 1. Disconnect power from the workstation (see Predisassembly procedures on page 62). 2. Remove the side access panel (see Removing the side access panel on page 65). 3. Push the expansion card retention clamp levers down on the outside of the chassis to release the retention clamp (1) as shown in the figure below. Figure 5-31 Removing the slot cover 4. Remove the expansion card slot cover by pulling it up, out of the chassis (2). TIP: Grasp the slot cover between two fingers-one from the inside of the chassis, and one from the outside. 5. Angle the card into the expansion card guide. 92 Chapter 5 Replacing components ENWW
-
 1
1 -
2
-
3
-
4
-
5
-
6
-
7
-
8
-
9
-
10
-
11
-
12
-
13
-
14
-
15
-
16
-
17
-
18
-
19
-
20
-
21
-
22
-
23
-
24
-
25
-
26
-
27
-
28
-
29
-
30
-
31
-
32
-
33
-
34
-
35
-
36
-
37
-
38
-
39
-
40
-
41
-
42
-
43
-
44
-
45
-
46
-
47
-
48
-
49
-
50
-
51
-
52
-
53
-
54
-
55
-
56
-
57
-
58
-
59
-
60
-
61
-
62
-
63
-
64
-
65
-
66
-
67
-
68
-
69
-
70
-
71
-
72
-
73
-
74
-
75
-
76
-
77
-
78
-
79
-
80
-
81
-
82
-
83
-
84
-
85
-
86
-
87
-
88
-
89
-
90
-
91
-
92
-
93
-
94
-
95
-
96
-
97
-
98
-
 99
99 -
 100
100 -
 101
101 -
 102
102 -
 103
103 -
 104
104 -
 105
105 -
 106
106 -
 107
107 -
 108
108 -
 109
109 -
110
-
111
-
112
-
113
-
114
-
115
-
116
-
117
-
118
-
119
-
120
-
121
-
122
-
123
-
124
-
125
-
126
-
127
-
128
-
129
-
130
-
131
-
132
-
133
-
134
-
135
-
136
-
137
-
138
-
139
-
140
-
141
-
142
-
143
-
144
-
145
-
146
-
147
-
148
-
149
-
150
-
151
-
152
-
153
-
154
-
155
-
156
-
157
-
158
-
159
-
160
-
161
-
162
-
163
-
164
-
165
-
166
-
167
-
168
-
169
-
170
-
171
-
172
-
173
-
174
-
175
-
176
-
177
-
178
-
179
-
180
-
181
-
182
-
183
-
184
-
185
 |
 |