HP Z210 HP Z210 CMT Workstation Maintenance and Service Guide - Page 140
Using Vision Creator, Accessing HP Vision Diagnostics Utilities, Creating and using a bootable USB key
 |
View all HP Z210 manuals
Add to My Manuals
Save this manual to your list of manuals |
Page 140 highlights
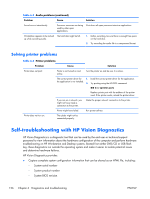
Using Vision Creator HP Vision Creator is pre-installed on your workstation and makes it easy to burn HP Vision Diagnostics onto a CD or DVD: 1. To initiate Vision Creator, select: Start > All Programs > PC Help & Tools > HP Vision Diagnostics Disc Creation. 2. Follow the prompts to burn HP Vision Diagnostics onto optical media. Accessing HP Vision Diagnostics Utilities These procedures describe how to access the HP Vision Diagnostics utilities that are included in the computer software. Creating and using a bootable USB key This section describes how to use a USB key to access the HP Vision Diagnostics. NOTE: Using a USB key is the most convenient method to access HP Vision Diagnostics. 1. In the C:\VisionDiagnostics\ directory, double-click on VisionDiagUSB.exe. A setup menu appears. 2. Follow the setup prompts to create a bootable ISO image of the diagnostic utilities on a USB key. 3. Turn off the computer and restart it with the USB key installed. The computer will boot to the USB key and initiate the HP Vision Diagnostics utility. 4. Follow the HP Vision Diagnostic prompts to troubleshoot the computer. Creating and using a bootable DVD/CD This section describes how to use a DVD/CD to run the HP Vision Diagnostics. 1. In the C:\VisionDiagnostics\ directory, double-click on the VisionDiagISO.exe file. A setup menu appears. 2. Follow the setup prompts to create a bootable ISO image of the diagnostic utilities on a DVD/CD. 3. Enable the computer to boot from DVD/CD. 4. Turn off the computer and restart it with the DVD/CD installed in the optical drive. The computer will boot from the DVD/CD and initiate the HP Vision Diagnostics utility. 5. Follow the HP Vision Diagnostic prompts to troubleshoot the computer. Using the HP Memory Test utility This section describes how to access the HP Memory Test utility. 128 Chapter 6 Diagnostics and troubleshooting ENWW
-
 1
1 -
2
-
3
-
4
-
5
-
6
-
7
-
8
-
9
-
10
-
11
-
12
-
13
-
14
-
15
-
16
-
17
-
18
-
19
-
20
-
21
-
22
-
23
-
24
-
25
-
26
-
27
-
28
-
29
-
30
-
31
-
32
-
33
-
34
-
35
-
36
-
37
-
38
-
39
-
40
-
41
-
42
-
43
-
44
-
45
-
46
-
47
-
48
-
49
-
50
-
51
-
52
-
53
-
54
-
55
-
56
-
57
-
58
-
59
-
60
-
61
-
62
-
63
-
64
-
65
-
66
-
67
-
68
-
69
-
70
-
71
-
72
-
73
-
74
-
75
-
76
-
77
-
78
-
79
-
80
-
81
-
82
-
83
-
84
-
85
-
86
-
87
-
88
-
89
-
90
-
91
-
92
-
93
-
94
-
95
-
96
-
97
-
98
-
99
-
100
-
101
-
102
-
103
-
104
-
105
-
106
-
107
-
108
-
109
-
110
-
111
-
112
-
113
-
114
-
115
-
116
-
117
-
118
-
119
-
120
-
121
-
122
-
123
-
124
-
125
-
126
-
127
-
128
-
129
-
130
-
131
-
132
-
133
-
134
-
 135
135 -
 136
136 -
 137
137 -
 138
138 -
 139
139 -
 140
140 -
 141
141 -
 142
142 -
 143
143 -
 144
144 -
 145
145 -
146
-
147
-
148
-
149
-
150
-
151
-
152
-
153
-
154
-
155
-
156
-
157
-
158
-
159
-
160
-
161
-
162
-
163
-
164
-
165
-
166
-
167
-
168
-
169
-
170
-
171
-
172
-
173
-
174
-
175
-
176
-
177
-
178
-
179
-
180
-
181
-
182
-
183
-
184
-
185
 |
 |