HP Z210 HP Z210 CMT Workstation Maintenance and Service Guide - Page 116
Installing the system board,
 |
View all HP Z210 manuals
Add to My Manuals
Save this manual to your list of manuals |
Page 116 highlights
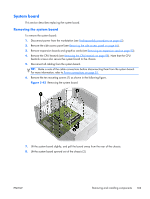
Installing the system board To install the system board: 1. Carefully insert the system board into the chassis so that mounting holes align with the screw holes in the chassis (2). You may have to slide the system board toward the rear of the chassis. Figure 5-44 Inserting and aligning the system board 2. Replace the mounting screws (2). 3. Reinstall all removed components and cables. (See Power connections on page 81 to identify power cables.) 104 Chapter 5 Replacing components ENWW
-
 1
1 -
2
-
3
-
4
-
5
-
6
-
7
-
8
-
9
-
10
-
11
-
12
-
13
-
14
-
15
-
16
-
17
-
18
-
19
-
20
-
21
-
22
-
23
-
24
-
25
-
26
-
27
-
28
-
29
-
30
-
31
-
32
-
33
-
34
-
35
-
36
-
37
-
38
-
39
-
40
-
41
-
42
-
43
-
44
-
45
-
46
-
47
-
48
-
49
-
50
-
51
-
52
-
53
-
54
-
55
-
56
-
57
-
58
-
59
-
60
-
61
-
62
-
63
-
64
-
65
-
66
-
67
-
68
-
69
-
70
-
71
-
72
-
73
-
74
-
75
-
76
-
77
-
78
-
79
-
80
-
81
-
82
-
83
-
84
-
85
-
86
-
87
-
88
-
89
-
90
-
91
-
92
-
93
-
94
-
95
-
96
-
97
-
98
-
99
-
100
-
101
-
102
-
103
-
104
-
105
-
106
-
107
-
108
-
109
-
110
-
 111
111 -
 112
112 -
 113
113 -
 114
114 -
 115
115 -
 116
116 -
 117
117 -
 118
118 -
 119
119 -
 120
120 -
 121
121 -
122
-
123
-
124
-
125
-
126
-
127
-
128
-
129
-
130
-
131
-
132
-
133
-
134
-
135
-
136
-
137
-
138
-
139
-
140
-
141
-
142
-
143
-
144
-
145
-
146
-
147
-
148
-
149
-
150
-
151
-
152
-
153
-
154
-
155
-
156
-
157
-
158
-
159
-
160
-
161
-
162
-
163
-
164
-
165
-
166
-
167
-
168
-
169
-
170
-
171
-
172
-
173
-
174
-
175
-
176
-
177
-
178
-
179
-
180
-
181
-
182
-
183
-
184
-
185
 |
 |

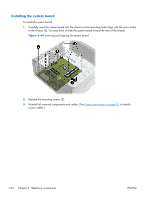
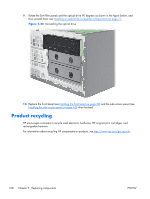
Installing the system board
To install the system board:
1.
Carefully insert the system board into the chassis so that mounting holes align with the screw holes
in the chassis (2). You may have to slide the system board toward the rear of the chassis.
Figure 5-44
Inserting and aligning the system board
2.
Replace the mounting screws (2).
3.
Reinstall all removed components and cables. (See
Power connections
on page
81
to identify
power cables.)
104
Chapter 5
Replacing components
ENWW