HP Z210 HP Z210 CMT Workstation Maintenance and Service Guide - Page 107
Installing hard disk drives, Installation guidelines,
 |
View all HP Z210 manuals
Add to My Manuals
Save this manual to your list of manuals |
Page 107 highlights
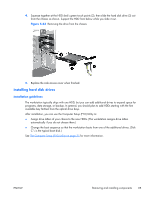
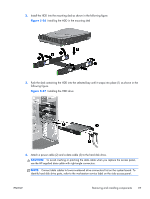
4. Squeeze together at the HDD sled's green touch points (2), then slide the hard disk drive (3) out from the chassis as shown. Support the HDD from below while you slide it out. Figure 5-33 Removing the drive from the chassis 5. Replace the side access cover when finished. Installing hard disk drives Installation guidelines The workstation typically ships with one HDD, but you can add additional drives to expand space for programs, data storage, or backup. In general, you should plan to add HDDs starting with the first available bay farthest from the optical drive bays. After installation, you can use the Computer Setup (F10) Utility to: ● Assign drive letters of your choice to the new HDDs. (The workstation assigns drive letters automatically if you do not choose them.) ● Change the boot sequence so that the workstation boots from one of the additional drives. (Disk C:\ is the typical boot disk.) See The Computer Setup (F10) Utility on page 25 for more information. ENWW Removing and installing components 95
-
 1
1 -
2
-
3
-
4
-
5
-
6
-
7
-
8
-
9
-
10
-
11
-
12
-
13
-
14
-
15
-
16
-
17
-
18
-
19
-
20
-
21
-
22
-
23
-
24
-
25
-
26
-
27
-
28
-
29
-
30
-
31
-
32
-
33
-
34
-
35
-
36
-
37
-
38
-
39
-
40
-
41
-
42
-
43
-
44
-
45
-
46
-
47
-
48
-
49
-
50
-
51
-
52
-
53
-
54
-
55
-
56
-
57
-
58
-
59
-
60
-
61
-
62
-
63
-
64
-
65
-
66
-
67
-
68
-
69
-
70
-
71
-
72
-
73
-
74
-
75
-
76
-
77
-
78
-
79
-
80
-
81
-
82
-
83
-
84
-
85
-
86
-
87
-
88
-
89
-
90
-
91
-
92
-
93
-
94
-
95
-
96
-
97
-
98
-
99
-
100
-
101
-
 102
102 -
 103
103 -
 104
104 -
 105
105 -
 106
106 -
 107
107 -
 108
108 -
 109
109 -
 110
110 -
 111
111 -
 112
112 -
113
-
114
-
115
-
116
-
117
-
118
-
119
-
120
-
121
-
122
-
123
-
124
-
125
-
126
-
127
-
128
-
129
-
130
-
131
-
132
-
133
-
134
-
135
-
136
-
137
-
138
-
139
-
140
-
141
-
142
-
143
-
144
-
145
-
146
-
147
-
148
-
149
-
150
-
151
-
152
-
153
-
154
-
155
-
156
-
157
-
158
-
159
-
160
-
161
-
162
-
163
-
164
-
165
-
166
-
167
-
168
-
169
-
170
-
171
-
172
-
173
-
174
-
175
-
176
-
177
-
178
-
179
-
180
-
181
-
182
-
183
-
184
-
185
 |
 |
