HP Z210 HP Z210 CMT Workstation Maintenance and Service Guide - Page 79
Side access panel solenoid lock
 |
View all HP Z210 manuals
Add to My Manuals
Save this manual to your list of manuals |
Page 79 highlights
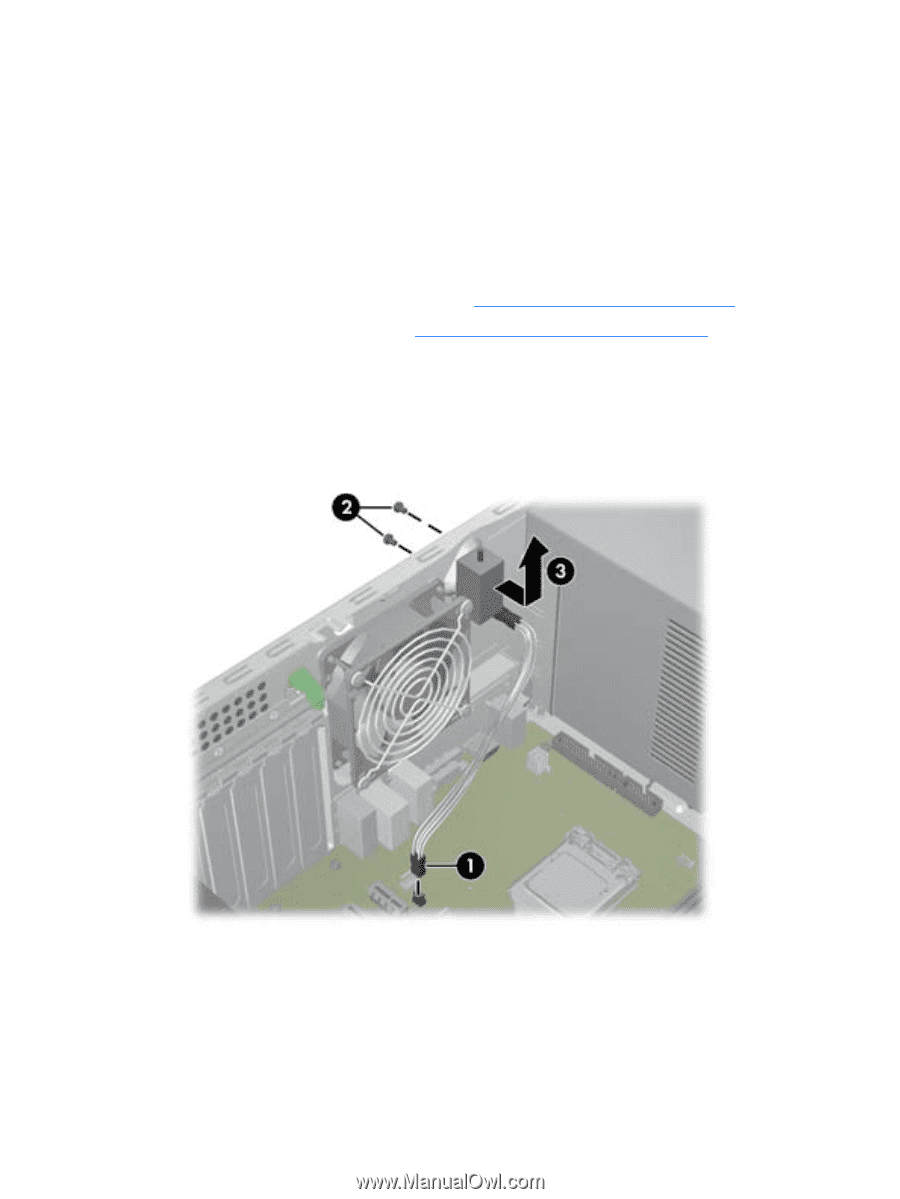
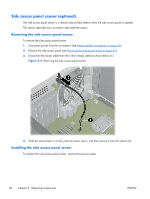
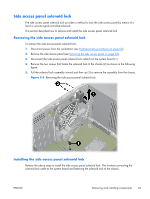
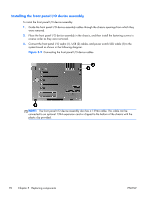
Side access panel solenoid lock The side access panel solenoid lock provides a method to lock the side access panel by means of a local or remote signal-controlled solenoid. This section describes how to remove and install the side access panel solenoid lock. Removing the side access panel solenoid lock To remove the side access panel solenoid lock: 1. Disconnect power from the workstation (see Predisassembly procedures on page 62). 2. Remove the side access panel (see Removing the side access panel on page 65). 3. Disconnect the side access panel solenoid lock cable from the system board (1). 4. Remove the two screws that fasten the solenoid lock to the chassis (2) as shown in the following figure. 5. Pull the solenoid lock assembly inward and then up (3) to remove the assembly from the chassis. Figure 5-5 Removing the side access panel solenoid lock Installing the side access panel solenoid lock Reverse the above steps to install the side access panel solenoid lock. This involves connecting the solenoid lock cable to the system board and fastening the solenoid lock to the chassis. ENWW Removing and installing components 67
-
 1
1 -
2
-
3
-
4
-
5
-
6
-
7
-
8
-
9
-
10
-
11
-
12
-
13
-
14
-
15
-
16
-
17
-
18
-
19
-
20
-
21
-
22
-
23
-
24
-
25
-
26
-
27
-
28
-
29
-
30
-
31
-
32
-
33
-
34
-
35
-
36
-
37
-
38
-
39
-
40
-
41
-
42
-
43
-
44
-
45
-
46
-
47
-
48
-
49
-
50
-
51
-
52
-
53
-
54
-
55
-
56
-
57
-
58
-
59
-
60
-
61
-
62
-
63
-
64
-
65
-
66
-
67
-
68
-
69
-
70
-
71
-
72
-
73
-
 74
74 -
 75
75 -
 76
76 -
 77
77 -
 78
78 -
 79
79 -
 80
80 -
 81
81 -
 82
82 -
 83
83 -
 84
84 -
85
-
86
-
87
-
88
-
89
-
90
-
91
-
92
-
93
-
94
-
95
-
96
-
97
-
98
-
99
-
100
-
101
-
102
-
103
-
104
-
105
-
106
-
107
-
108
-
109
-
110
-
111
-
112
-
113
-
114
-
115
-
116
-
117
-
118
-
119
-
120
-
121
-
122
-
123
-
124
-
125
-
126
-
127
-
128
-
129
-
130
-
131
-
132
-
133
-
134
-
135
-
136
-
137
-
138
-
139
-
140
-
141
-
142
-
143
-
144
-
145
-
146
-
147
-
148
-
149
-
150
-
151
-
152
-
153
-
154
-
155
-
156
-
157
-
158
-
159
-
160
-
161
-
162
-
163
-
164
-
165
-
166
-
167
-
168
-
169
-
170
-
171
-
172
-
173
-
174
-
175
-
176
-
177
-
178
-
179
-
180
-
181
-
182
-
183
-
184
-
185
 |
 |