Pioneer AVIC-5000NEX Owner's Manual - Page 130
SiriusXM tuner operations, Using the touch panel keys, Using the SiriusXM, tuner
 |
View all Pioneer AVIC-5000NEX manuals
Add to My Manuals
Save this manual to your list of manuals |
Page 130 highlights
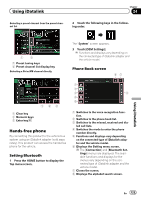
Chapter 26 Using the SiriusXM® tuner SiriusXM tuner operations You can use this product to control a SiriusXM Connect Vehicle Tuner (sold separately). For information on how to install the SiriusXM Connect Vehicle Tuner, consult the installation guide included with the tuner. Everything worth listening to is on SiriusXM, getting over 130 channels, including the most commercial‐free music, plus the best sports, news, talk and entertainment. A SiriusXM Vehicle Tuner and Subscription are required. For more information, visit www.siriusxm.com. Subscribing to the SiriusXM Satellite Radio service 1 Select SiriusXM as the source. You should be able to tune in to Channel 1. If you cannot get Channel 1, ensure that your SiriusXM Connect Vehicle Tuner is installed correctly as described in the tuner installation guide. 2 Switch to Channel 0 and check the Radio ID. The SiriusXM Radio ID can be found by tuning in to Channel 0. The Radio ID can also be found at the bottom of the SiriusXM Connect Vehicle Tuner screen. Note that the SiriusXM Radio ID does not include the letters I, O, S or F. You will need this number to activate your subscription. 3 Activate the service either online or by phone. ! The service can be activated from the website below. www.siriusxm.com/activatenow ! Call SiriusXM Listener Care at 1-866-6352349 to activate. ! To service for SiriusXM Canada, go to www.xmradio.ca and click on "ACTIVATE RADIO" at the top right corner of the page, or call 1-877-438-9677. # The SiriusXM satellites will send an activation message to your tuner. When the tuner has received the message, "Subscription Updated" is displayed. Once you have subscribed, SiriusXM satellites will send an activation message to your tuner. The activation process usually takes 10 to 15 minutes but may take up to an hour in some cases. Do not turn off this product while the activation message is displayed. Using the touch panel keys Current channel display 12 34 5 6 e 7 8 d c b a9 Time bar display h g f 1 Displays the source list. = For details, refer to Selecting a front source on the source list on page 21. 2 Selects a band. 3 Displays the Time and date setting screen. = For details, refer to Setting the time and date on page 189. 4 Displays the Setting menu screen. 5 Recalls equalizer curves. 130 En
-
 1
1 -
2
-
3
-
4
-
5
-
6
-
7
-
8
-
9
-
10
-
11
-
12
-
13
-
14
-
15
-
16
-
17
-
18
-
19
-
20
-
21
-
22
-
23
-
24
-
25
-
26
-
27
-
28
-
29
-
30
-
31
-
32
-
33
-
34
-
35
-
36
-
37
-
38
-
39
-
40
-
41
-
42
-
43
-
44
-
45
-
46
-
47
-
48
-
49
-
50
-
51
-
52
-
53
-
54
-
55
-
56
-
57
-
58
-
59
-
60
-
61
-
62
-
63
-
64
-
65
-
66
-
67
-
68
-
69
-
70
-
71
-
72
-
73
-
74
-
75
-
76
-
77
-
78
-
79
-
80
-
81
-
82
-
83
-
84
-
85
-
86
-
87
-
88
-
89
-
90
-
91
-
92
-
93
-
94
-
95
-
96
-
97
-
98
-
99
-
100
-
101
-
102
-
103
-
104
-
105
-
106
-
107
-
108
-
109
-
110
-
111
-
112
-
113
-
114
-
115
-
116
-
117
-
118
-
119
-
120
-
121
-
122
-
123
-
124
-
 125
125 -
 126
126 -
 127
127 -
 128
128 -
 129
129 -
 130
130 -
 131
131 -
 132
132 -
 133
133 -
 134
134 -
 135
135 -
136
-
137
-
138
-
139
-
140
-
141
-
142
-
143
-
144
-
145
-
146
-
147
-
148
-
149
-
150
-
151
-
152
-
153
-
154
-
155
-
156
-
157
-
158
-
159
-
160
-
161
-
162
-
163
-
164
-
165
-
166
-
167
-
168
-
169
-
170
-
171
-
172
-
173
-
174
-
175
-
176
-
177
-
178
-
179
-
180
-
181
-
182
-
183
-
184
-
185
-
186
-
187
-
188
-
189
-
190
-
191
-
192
-
193
-
194
-
195
-
196
-
197
-
198
-
199
-
200
-
201
-
202
-
203
-
204
-
205
-
206
-
207
-
208
-
209
-
210
-
211
-
212
-
213
-
214
-
215
-
216
-
217
-
218
-
219
-
220
-
221
-
222
-
223
-
224
-
225
-
226
-
227
-
228
 |
 |
