Pioneer AVIC-5000NEX Owner's Manual - Page 30
How to use the map
 |
View all Pioneer AVIC-5000NEX manuals
Add to My Manuals
Save this manual to your list of manuals |
Page 30 highlights
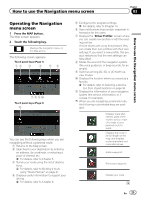
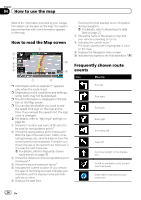
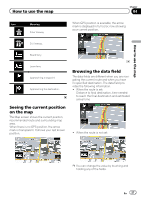
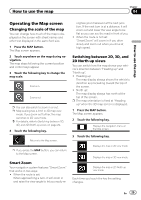
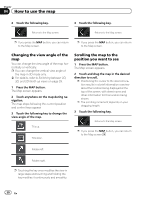
Chapter 04 How to use the map 4 Touch the following key. 4 Touch the following key. Returns to the Map screen. Returns to the Map screen. p If you press the MAP button, you can return to the Map screen. p If you press the MAP button, you can return to the Map screen. Changing the view angle of the map You can change the view angle of the map horizontally or vertically. p You can change the vertical view angle of the map in 3D mode only. = For details, refer to Switching between 2D, 3D, and 2D North up views on page 29. 1 Press the MAP button. The Map screen appears. 2 Touch anywhere on the map during navigation. The map stops following the current position and control keys appear. 3 Touch the following key to change the view angle of the map. Tilts up. Tilts down. Scrolling the map to the position you want to see 1 Press the MAP button. The Map screen appears. 2 Touch and drag the map in the desired direction to scroll. p Positioning the cursor to the desired location results in a brief information overview about the location being displayed at the top of the screen, with street name and other information for this location being shown. p The scrolling increment depends on your dragging length. 3 Touch the following key. Returns to the Map screen. p If you press the MAP button, you can return to the Map screen. Rotates left. Rotates right. p Touching the key once modifies the view in large steps and touching and holding the key modifies it continuously and smoothly. 30 En
-
 1
1 -
2
-
3
-
4
-
5
-
6
-
7
-
8
-
9
-
10
-
11
-
12
-
13
-
14
-
15
-
16
-
17
-
18
-
19
-
20
-
21
-
22
-
23
-
24
-
 25
25 -
 26
26 -
 27
27 -
 28
28 -
 29
29 -
 30
30 -
 31
31 -
 32
32 -
 33
33 -
 34
34 -
 35
35 -
36
-
37
-
38
-
39
-
40
-
41
-
42
-
43
-
44
-
45
-
46
-
47
-
48
-
49
-
50
-
51
-
52
-
53
-
54
-
55
-
56
-
57
-
58
-
59
-
60
-
61
-
62
-
63
-
64
-
65
-
66
-
67
-
68
-
69
-
70
-
71
-
72
-
73
-
74
-
75
-
76
-
77
-
78
-
79
-
80
-
81
-
82
-
83
-
84
-
85
-
86
-
87
-
88
-
89
-
90
-
91
-
92
-
93
-
94
-
95
-
96
-
97
-
98
-
99
-
100
-
101
-
102
-
103
-
104
-
105
-
106
-
107
-
108
-
109
-
110
-
111
-
112
-
113
-
114
-
115
-
116
-
117
-
118
-
119
-
120
-
121
-
122
-
123
-
124
-
125
-
126
-
127
-
128
-
129
-
130
-
131
-
132
-
133
-
134
-
135
-
136
-
137
-
138
-
139
-
140
-
141
-
142
-
143
-
144
-
145
-
146
-
147
-
148
-
149
-
150
-
151
-
152
-
153
-
154
-
155
-
156
-
157
-
158
-
159
-
160
-
161
-
162
-
163
-
164
-
165
-
166
-
167
-
168
-
169
-
170
-
171
-
172
-
173
-
174
-
175
-
176
-
177
-
178
-
179
-
180
-
181
-
182
-
183
-
184
-
185
-
186
-
187
-
188
-
189
-
190
-
191
-
192
-
193
-
194
-
195
-
196
-
197
-
198
-
199
-
200
-
201
-
202
-
203
-
204
-
205
-
206
-
207
-
208
-
209
-
210
-
211
-
212
-
213
-
214
-
215
-
216
-
217
-
218
-
219
-
220
-
221
-
222
-
223
-
224
-
225
-
226
-
227
-
228
 |
 |
