Pioneer AVIC-5000NEX Owner's Manual - Page 172
Before operating the Auto EQ, function, Performing Auto EQ
 |
View all Pioneer AVIC-5000NEX manuals
Add to My Manuals
Save this manual to your list of manuals |
Page 172 highlights
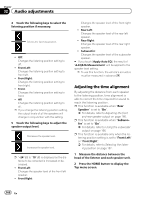
Chapter 32 Audio adjustments - When a speaker is connected to a power amp delivering output higher than the speaker's maximum input power capability. ! If a microphone for acoustical measurement (sold separately) is not placed in an appropriate location, the measurement tone may become loud and measurement may take a long time, resulting in battery drainage. Be sure to place the microphone in the specified location. Before operating the Auto EQ function ! Perform Auto EQ in as quiet a place as possible, with the vehicle engine and air conditioning switched off. Also, cut power to car phones or cellular phones in the vehicle, or remove them from the vehicle before performing Auto EQ. Sounds other than the measurement tone (surrounding sounds, engine sound, telephones ringing, etc.) may prevent correct measurement of the vehicle's acoustics. ! Be sure to perform Auto EQ using the microphone for acoustical measurement (sold separately). Using another microphone may prevent measurement, or result in incorrect measurement of the vehicle's acoustics. ! To perform Auto EQ, the front speakers must be connected. ! When this product is connected to a power amp with input level control, Auto EQ may be impossible if the power amp's input level is set below the standard level. ! When this product is connected to a power amp with an LPF (low pass filter), turn the LPF off before performing Auto EQ. Also, set the cut-off frequency for the built-in LPF of an active subwoofer to the highest frequency. ! The distance has been calculated by a computer to provide optimum delay to en- sure accurate results. Do not change this value. - The reflected sound within the vehicle is strong and delays occur. - The LPF on active subwoofers or exter- nal amps delay the lower sounds. ! If an error occurs during measurement, a message appears and measurement is canceled. Check the following before measuring the vehicle's acoustics. - Front speakers (left/right) - Rear speakers (left/right) - Noise - Microphone for acoustical measure- ment (sold separately) - Low battery Performing Auto EQ p Auto EQ changes the audio settings as follows: - "Auto EQ&TA" is set to "On". = For details, refer to Using the auto-adjusted equalizer on page 171. - The fader/balance settings return to the center position. = For details, refer to Using balance adjustment on page 162. - The equalizer curve switches to "Flat". = For details, refer to Using the equalizer on page 170. - The front and rear speakers will automatically be adjusted to a high pass filter setting. p Previous settings for Auto EQ will be overwritten. p For AVIC-8000NEX and AVIC-7000NEX users Do not press the h button to open or close the panel when you are using the microphone. CAUTION Do not turn off the engine while the measurement is in progress. 172 En
-
 1
1 -
2
-
3
-
4
-
5
-
6
-
7
-
8
-
9
-
10
-
11
-
12
-
13
-
14
-
15
-
16
-
17
-
18
-
19
-
20
-
21
-
22
-
23
-
24
-
25
-
26
-
27
-
28
-
29
-
30
-
31
-
32
-
33
-
34
-
35
-
36
-
37
-
38
-
39
-
40
-
41
-
42
-
43
-
44
-
45
-
46
-
47
-
48
-
49
-
50
-
51
-
52
-
53
-
54
-
55
-
56
-
57
-
58
-
59
-
60
-
61
-
62
-
63
-
64
-
65
-
66
-
67
-
68
-
69
-
70
-
71
-
72
-
73
-
74
-
75
-
76
-
77
-
78
-
79
-
80
-
81
-
82
-
83
-
84
-
85
-
86
-
87
-
88
-
89
-
90
-
91
-
92
-
93
-
94
-
95
-
96
-
97
-
98
-
99
-
100
-
101
-
102
-
103
-
104
-
105
-
106
-
107
-
108
-
109
-
110
-
111
-
112
-
113
-
114
-
115
-
116
-
117
-
118
-
119
-
120
-
121
-
122
-
123
-
124
-
125
-
126
-
127
-
128
-
129
-
130
-
131
-
132
-
133
-
134
-
135
-
136
-
137
-
138
-
139
-
140
-
141
-
142
-
143
-
144
-
145
-
146
-
147
-
148
-
149
-
150
-
151
-
152
-
153
-
154
-
155
-
156
-
157
-
158
-
159
-
160
-
161
-
162
-
163
-
164
-
165
-
166
-
 167
167 -
 168
168 -
 169
169 -
 170
170 -
 171
171 -
 172
172 -
 173
173 -
 174
174 -
 175
175 -
 176
176 -
 177
177 -
178
-
179
-
180
-
181
-
182
-
183
-
184
-
185
-
186
-
187
-
188
-
189
-
190
-
191
-
192
-
193
-
194
-
195
-
196
-
197
-
198
-
199
-
200
-
201
-
202
-
203
-
204
-
205
-
206
-
207
-
208
-
209
-
210
-
211
-
212
-
213
-
214
-
215
-
216
-
217
-
218
-
219
-
220
-
221
-
222
-
223
-
224
-
225
-
226
-
227
-
228
 |
 |
