Pioneer AVIC-5000NEX Owner's Manual - Page 74
Using the touch panel keys, Reading the screen, Using the radio
 |
View all Pioneer AVIC-5000NEX manuals
Add to My Manuals
Save this manual to your list of manuals |
Page 74 highlights
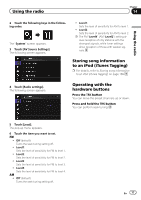
Chapter 14 Using the radio 5000NEX X8610BS You can listen to the radio using this product. This section describes operations for the radio. Using the touch panel keys 12 34 5 a 6 7 = For details, refer to Selecting a preset channel from the preset channel list on page 76. a Recalls the preset channel stored to a key from memory with a single touch of the key. Stores the current broadcast frequency to a key for later recall by continuing to touch the key. = For details, refer to Storing broadcast frequencies on page 76. Reading the screen 1 2 9 8 1 Displays the source list. = For details, refer to Selecting a front source on the source list on page 21. 2 Selects a band. = For details, refer to Selecting a band on page 75. 3 Displays the Time and date setting screen. = For details, refer to Setting the time and date on page 189. 4 Displays the Setting menu screen. 5 Recalls equalizer curves. = For details, refer to Using the equalizer on page 170. 6 Stores song information to an iPod. = For details, refer to Storing song information to an iPod (iTunes Tagging) on page 189. 7 Displays the Phone menu screen. = For details, refer to Displaying the phone menu on page 61. 8 Performs manual tuning or seek tuning. = For details, refer to Manual tuning on page 75. = For details, refer to Seek tuning on page 75. 9 Displays the preset channels. 3 8 4 5 76 1 Band indicator Shows the tuned band: FM1, FM2, FM3 or AM. 2 Current time and date 3 Program service name indicator Shows the program service name (station name) of the current station. 4 Song title Shows the title of the current song (when available). 5 Artist name Shows the artist name for the current song (when available). 6 iTunes® tagging song status indicator Shows the status of the song information stored in this product. p The icon is displayed on all operation screens of AV sources. 74 En
-
 1
1 -
2
-
3
-
4
-
5
-
6
-
7
-
8
-
9
-
10
-
11
-
12
-
13
-
14
-
15
-
16
-
17
-
18
-
19
-
20
-
21
-
22
-
23
-
24
-
25
-
26
-
27
-
28
-
29
-
30
-
31
-
32
-
33
-
34
-
35
-
36
-
37
-
38
-
39
-
40
-
41
-
42
-
43
-
44
-
45
-
46
-
47
-
48
-
49
-
50
-
51
-
52
-
53
-
54
-
55
-
56
-
57
-
58
-
59
-
60
-
61
-
62
-
63
-
64
-
65
-
66
-
67
-
68
-
 69
69 -
 70
70 -
 71
71 -
 72
72 -
 73
73 -
 74
74 -
 75
75 -
 76
76 -
 77
77 -
 78
78 -
 79
79 -
80
-
81
-
82
-
83
-
84
-
85
-
86
-
87
-
88
-
89
-
90
-
91
-
92
-
93
-
94
-
95
-
96
-
97
-
98
-
99
-
100
-
101
-
102
-
103
-
104
-
105
-
106
-
107
-
108
-
109
-
110
-
111
-
112
-
113
-
114
-
115
-
116
-
117
-
118
-
119
-
120
-
121
-
122
-
123
-
124
-
125
-
126
-
127
-
128
-
129
-
130
-
131
-
132
-
133
-
134
-
135
-
136
-
137
-
138
-
139
-
140
-
141
-
142
-
143
-
144
-
145
-
146
-
147
-
148
-
149
-
150
-
151
-
152
-
153
-
154
-
155
-
156
-
157
-
158
-
159
-
160
-
161
-
162
-
163
-
164
-
165
-
166
-
167
-
168
-
169
-
170
-
171
-
172
-
173
-
174
-
175
-
176
-
177
-
178
-
179
-
180
-
181
-
182
-
183
-
184
-
185
-
186
-
187
-
188
-
189
-
190
-
191
-
192
-
193
-
194
-
195
-
196
-
197
-
198
-
199
-
200
-
201
-
202
-
203
-
204
-
205
-
206
-
207
-
208
-
209
-
210
-
211
-
212
-
213
-
214
-
215
-
216
-
217
-
218
-
219
-
220
-
221
-
222
-
223
-
224
-
225
-
226
-
227
-
228
 |
 |
