Pioneer AVIC-5000NEX Owner's Manual - Page 141
Using the touch panel keys, Reading the screen, Starting procedure, Using an HDMI source
 |
View all Pioneer AVIC-5000NEX manuals
Add to My Manuals
Save this manual to your list of manuals |
Page 141 highlights
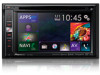
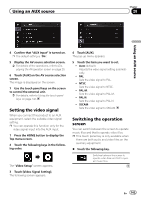
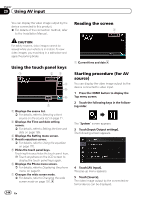
Using an HDMI source Chapter 27 Using an HDMI source 8000NEX 7000NEX 6000NEX You can display the video image output by the device connected to this product. This section describes operations for an HDMI source. p A High Speed HDMI® Cable (sold sepa- rately) is required for connection. = For details of the connection method, refer to the Installation Manual. CAUTION For safety reasons, video images cannot be viewed while your vehicle is in motion. To view video images, you must stop in a safe place and apply the parking brake. = For details, refer to Displaying the phone menu on page 61. 7 Changes the wide screen mode. = For details, refer to Changing the wide screen mode on page 191. Reading the screen 1 Using the touch panel keys 1 23 4 5 6 7 1 Displays the source list. = For details, refer to Selecting a front source on the source list on page 21. 2 Displays the Time and date setting screen. = For details, refer to Setting the time and date on page 189. 3 Displays the Setting menu screen. 4 Recalls equalizer curves. = For details, refer to Using the equalizer on page 170. 5 Hides the touch panel keys. Touching this area hides the touch panel keys. p Touch anywhere on the LCD screen to display the touch panel keys again. 6 Displays the Phone menu screen. 1 Current time and date Starting procedure 1 Display the AV source selection screen. = For details of the operations, refer to Displaying the AV operation screen on page 20. 2 Touch [HDMI] on the AV source selection screen. The image is displayed on the screen. 3 Use the touch panel keys on the screen to control the external unit. = For details, refer to Using the touch panel keys on page 141. En 141
-
 1
1 -
2
-
3
-
4
-
5
-
6
-
7
-
8
-
9
-
10
-
11
-
12
-
13
-
14
-
15
-
16
-
17
-
18
-
19
-
20
-
21
-
22
-
23
-
24
-
25
-
26
-
27
-
28
-
29
-
30
-
31
-
32
-
33
-
34
-
35
-
36
-
37
-
38
-
39
-
40
-
41
-
42
-
43
-
44
-
45
-
46
-
47
-
48
-
49
-
50
-
51
-
52
-
53
-
54
-
55
-
56
-
57
-
58
-
59
-
60
-
61
-
62
-
63
-
64
-
65
-
66
-
67
-
68
-
69
-
70
-
71
-
72
-
73
-
74
-
75
-
76
-
77
-
78
-
79
-
80
-
81
-
82
-
83
-
84
-
85
-
86
-
87
-
88
-
89
-
90
-
91
-
92
-
93
-
94
-
95
-
96
-
97
-
98
-
99
-
100
-
101
-
102
-
103
-
104
-
105
-
106
-
107
-
108
-
109
-
110
-
111
-
112
-
113
-
114
-
115
-
116
-
117
-
118
-
119
-
120
-
121
-
122
-
123
-
124
-
125
-
126
-
127
-
128
-
129
-
130
-
131
-
132
-
133
-
134
-
135
-
 136
136 -
 137
137 -
 138
138 -
 139
139 -
 140
140 -
 141
141 -
 142
142 -
 143
143 -
 144
144 -
 145
145 -
 146
146 -
147
-
148
-
149
-
150
-
151
-
152
-
153
-
154
-
155
-
156
-
157
-
158
-
159
-
160
-
161
-
162
-
163
-
164
-
165
-
166
-
167
-
168
-
169
-
170
-
171
-
172
-
173
-
174
-
175
-
176
-
177
-
178
-
179
-
180
-
181
-
182
-
183
-
184
-
185
-
186
-
187
-
188
-
189
-
190
-
191
-
192
-
193
-
194
-
195
-
196
-
197
-
198
-
199
-
200
-
201
-
202
-
203
-
204
-
205
-
206
-
207
-
208
-
209
-
210
-
211
-
212
-
213
-
214
-
215
-
216
-
217
-
218
-
219
-
220
-
221
-
222
-
223
-
224
-
225
-
226
-
227
-
228
 |
 |
