Pioneer AVIC-5000NEX Owner's Manual - Page 80
Starting procedure, Selecting a band, Manual tuning, Seek tuning, HD Radio, reception
 |
View all Pioneer AVIC-5000NEX manuals
Add to My Manuals
Save this manual to your list of manuals |
Page 80 highlights
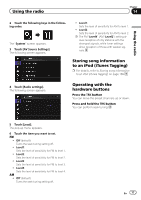
Chapter 15 HD Radio™ reception 7 Signal type indicator Shows the type of signal currently being received. If a digital broadcast is being received, appears. Otherwise, appears. 8 HD Radio indicator Shows that HD Radio station information is being received. 9 Multicasting indicator Shows the number of multicast channels in the current frequency. a Frequency indicator b Preset number indicator Shows the selected preset item. Starting procedure 1 Display the AV source selection screen. = For details of the operations, refer to Displaying the AV operation screen on page 20. 2 Touch [HD Radio] on the AV source selection screen. The "HD Radio" screen appears. 3 Use the touch panel keys on the screen to control the radio. = For details, refer to Using the touch panel keys on page 78. Selecting a band % Touch the following key repeatedly until the desired band appears. Switches between the following FM bands: FM1, FM2 and FM3. Switches to AM band. p This function is convenient for preparing different preset lists for each band. Manual tuning % Touch the following keys to tune manually. Moves down one step at a time. Moves up one step at a time. p This function is convenient for preparing different preset lists for each band. Seek tuning % Touch and hold one of the following keys for about one second and then release. Scans frequencies until it finds a broadcast strong enough for good reception. You can cancel seek tuning by touching either key briefly. If you keep holding either key, you can skip broadcasting frequencies. Seek tuning will start when you release the key. p When an analog station is being received, only analog broadcasts can be tuned up or down. If a digital broadcast is not being received yet, tuning up or down seeks the next or previous analog station. Analog FM Analog FM Digital FM-1ch Digital FM-2ch Analog FM Digital FM-3ch 80 En
-
 1
1 -
2
-
3
-
4
-
5
-
6
-
7
-
8
-
9
-
10
-
11
-
12
-
13
-
14
-
15
-
16
-
17
-
18
-
19
-
20
-
21
-
22
-
23
-
24
-
25
-
26
-
27
-
28
-
29
-
30
-
31
-
32
-
33
-
34
-
35
-
36
-
37
-
38
-
39
-
40
-
41
-
42
-
43
-
44
-
45
-
46
-
47
-
48
-
49
-
50
-
51
-
52
-
53
-
54
-
55
-
56
-
57
-
58
-
59
-
60
-
61
-
62
-
63
-
64
-
65
-
66
-
67
-
68
-
69
-
70
-
71
-
72
-
73
-
74
-
 75
75 -
 76
76 -
 77
77 -
 78
78 -
 79
79 -
 80
80 -
 81
81 -
 82
82 -
 83
83 -
 84
84 -
 85
85 -
86
-
87
-
88
-
89
-
90
-
91
-
92
-
93
-
94
-
95
-
96
-
97
-
98
-
99
-
100
-
101
-
102
-
103
-
104
-
105
-
106
-
107
-
108
-
109
-
110
-
111
-
112
-
113
-
114
-
115
-
116
-
117
-
118
-
119
-
120
-
121
-
122
-
123
-
124
-
125
-
126
-
127
-
128
-
129
-
130
-
131
-
132
-
133
-
134
-
135
-
136
-
137
-
138
-
139
-
140
-
141
-
142
-
143
-
144
-
145
-
146
-
147
-
148
-
149
-
150
-
151
-
152
-
153
-
154
-
155
-
156
-
157
-
158
-
159
-
160
-
161
-
162
-
163
-
164
-
165
-
166
-
167
-
168
-
169
-
170
-
171
-
172
-
173
-
174
-
175
-
176
-
177
-
178
-
179
-
180
-
181
-
182
-
183
-
184
-
185
-
186
-
187
-
188
-
189
-
190
-
191
-
192
-
193
-
194
-
195
-
196
-
197
-
198
-
199
-
200
-
201
-
202
-
203
-
204
-
205
-
206
-
207
-
208
-
209
-
210
-
211
-
212
-
213
-
214
-
215
-
216
-
217
-
218
-
219
-
220
-
221
-
222
-
223
-
224
-
225
-
226
-
227
-
228
 |
 |
