Pioneer AVIC-5000NEX Owner's Manual - Page 169
Touch [Time Alignment].
 |
View all Pioneer AVIC-5000NEX manuals
Add to My Manuals
Save this manual to your list of manuals |
Page 169 highlights
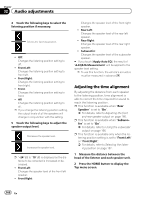
Audio adjustments Chapter 32 Audio adjustments 3 Touch the following keys in the following order. The "Audio" screen appears. 4 Touch [Time Alignment]. The "Time Alignment" screen appears. 5 Touch the following keys to select the listening position if necessary. Selects the listening position. ! Off: Changes the listening position setting to off. ! Front Left: Changes the listening position setting to front left. ! Front Right: Changes the listening position setting to front right. ! Front: Changes the listening position setting to front. ! All: Changes the listening position setting to all. p If you change the listening position setting, the output levels of all the speakers will change in conjunction with the setting. 6 Touch the following keys to input the distance between the selected speaker and the listening position. Decreases the distance between the selected speaker and the selected listening position. Increases the distance between the selected speaker and the selected listening position. p "0.0" inch to "200.0" inch is displayed as the distance to be corrected is increased or decreased. ! Front Left: Changes the distance between the front left speaker and the selected listening position. ! Front Right: Changes the distance between the front right speaker and the selected listening position. ! Rear Left: Changes the distance between the rear left speaker and the selected listening position. ! Rear Right: Changes the distance between the rear right speaker and the selected listening position. ! Subwoofer: Changes the distance between the subwoofer speaker and the selected listening position. # If you touch [TA On], the time alignment is turned off mandatorily. p This function is available only when the listening position setting is set to "Front Left" or "Front Right". # If you touch [Apply Auto EQ], the result of "A-EQ&TA Measurement" will be applied to the time alignment setting. p To use this function, the vehicle's acoustics must be measured in advance. En 169
-
 1
1 -
2
-
3
-
4
-
5
-
6
-
7
-
8
-
9
-
10
-
11
-
12
-
13
-
14
-
15
-
16
-
17
-
18
-
19
-
20
-
21
-
22
-
23
-
24
-
25
-
26
-
27
-
28
-
29
-
30
-
31
-
32
-
33
-
34
-
35
-
36
-
37
-
38
-
39
-
40
-
41
-
42
-
43
-
44
-
45
-
46
-
47
-
48
-
49
-
50
-
51
-
52
-
53
-
54
-
55
-
56
-
57
-
58
-
59
-
60
-
61
-
62
-
63
-
64
-
65
-
66
-
67
-
68
-
69
-
70
-
71
-
72
-
73
-
74
-
75
-
76
-
77
-
78
-
79
-
80
-
81
-
82
-
83
-
84
-
85
-
86
-
87
-
88
-
89
-
90
-
91
-
92
-
93
-
94
-
95
-
96
-
97
-
98
-
99
-
100
-
101
-
102
-
103
-
104
-
105
-
106
-
107
-
108
-
109
-
110
-
111
-
112
-
113
-
114
-
115
-
116
-
117
-
118
-
119
-
120
-
121
-
122
-
123
-
124
-
125
-
126
-
127
-
128
-
129
-
130
-
131
-
132
-
133
-
134
-
135
-
136
-
137
-
138
-
139
-
140
-
141
-
142
-
143
-
144
-
145
-
146
-
147
-
148
-
149
-
150
-
151
-
152
-
153
-
154
-
155
-
156
-
157
-
158
-
159
-
160
-
161
-
162
-
163
-
 164
164 -
 165
165 -
 166
166 -
 167
167 -
 168
168 -
 169
169 -
 170
170 -
 171
171 -
 172
172 -
 173
173 -
 174
174 -
175
-
176
-
177
-
178
-
179
-
180
-
181
-
182
-
183
-
184
-
185
-
186
-
187
-
188
-
189
-
190
-
191
-
192
-
193
-
194
-
195
-
196
-
197
-
198
-
199
-
200
-
201
-
202
-
203
-
204
-
205
-
206
-
207
-
208
-
209
-
210
-
211
-
212
-
213
-
214
-
215
-
216
-
217
-
218
-
219
-
220
-
221
-
222
-
223
-
224
-
225
-
226
-
227
-
228
 |
 |
