Pioneer AVIC-5000NEX Owner's Manual - Page 152
Setting the camera for, Camera View mode, Displaying the parking, assist guidelines, System settings
 |
View all Pioneer AVIC-5000NEX manuals
Add to My Manuals
Save this manual to your list of manuals |
Page 152 highlights
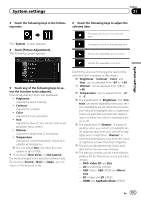
Chapter 31 System settings 4 Touch [Camera Polarity] repeatedly until the desired setting appears. ! Battery (default): When the polarity of the connected lead is positive while the shift lever is in the REVERSE (R) position. ! Ground: When the polarity of the connected lead is negative while the shift lever is in the REVERSE (R) position. When the shift lever is moved to the REVERSE (R) position after setting the rear view camera, the rear view image appears. Setting the camera for Camera View mode To display Camera View at all times, "Camera View" needs to be set to "On". p To set the rear view camera for Camera View mode, "Back Camera Input" needs to be set to "On". = For details, refer to Setting rear view camera activation on page 151. p To set the 2nd camera for Camera View mode, "AV Input" needs to be set to "Camera". = For details, refer to Setting AV input on page 150. 1 Press the HOME button to display the Top menu screen. 2 Touch the following keys in the following order. 4 Touch [Camera View] repeatedly until the desired setting appears. ! Off (default): Turns the camera view setting off. ! On: Turns the camera view setting on. If no operations are performed for seven seconds after the AV operation screen is displayed, the camera view will appear automatically. p If you touch the screen while the camera view is displayed, the displayed image will turn off temporarily. When the camera view of both rear view camera and 2nd camera are available, the key to switch the display appears. 1 1 Switches the display between rear view image and 2nd camera image. The "System" screen appears. 3 Touch [Camera settings]. The following screen appears. Displaying the parking assist guidelines 1 Press the HOME button to display the Top menu screen. 152 En
-
 1
1 -
2
-
3
-
4
-
5
-
6
-
7
-
8
-
9
-
10
-
11
-
12
-
13
-
14
-
15
-
16
-
17
-
18
-
19
-
20
-
21
-
22
-
23
-
24
-
25
-
26
-
27
-
28
-
29
-
30
-
31
-
32
-
33
-
34
-
35
-
36
-
37
-
38
-
39
-
40
-
41
-
42
-
43
-
44
-
45
-
46
-
47
-
48
-
49
-
50
-
51
-
52
-
53
-
54
-
55
-
56
-
57
-
58
-
59
-
60
-
61
-
62
-
63
-
64
-
65
-
66
-
67
-
68
-
69
-
70
-
71
-
72
-
73
-
74
-
75
-
76
-
77
-
78
-
79
-
80
-
81
-
82
-
83
-
84
-
85
-
86
-
87
-
88
-
89
-
90
-
91
-
92
-
93
-
94
-
95
-
96
-
97
-
98
-
99
-
100
-
101
-
102
-
103
-
104
-
105
-
106
-
107
-
108
-
109
-
110
-
111
-
112
-
113
-
114
-
115
-
116
-
117
-
118
-
119
-
120
-
121
-
122
-
123
-
124
-
125
-
126
-
127
-
128
-
129
-
130
-
131
-
132
-
133
-
134
-
135
-
136
-
137
-
138
-
139
-
140
-
141
-
142
-
143
-
144
-
145
-
146
-
 147
147 -
 148
148 -
 149
149 -
 150
150 -
 151
151 -
 152
152 -
 153
153 -
 154
154 -
 155
155 -
 156
156 -
 157
157 -
158
-
159
-
160
-
161
-
162
-
163
-
164
-
165
-
166
-
167
-
168
-
169
-
170
-
171
-
172
-
173
-
174
-
175
-
176
-
177
-
178
-
179
-
180
-
181
-
182
-
183
-
184
-
185
-
186
-
187
-
188
-
189
-
190
-
191
-
192
-
193
-
194
-
195
-
196
-
197
-
198
-
199
-
200
-
201
-
202
-
203
-
204
-
205
-
206
-
207
-
208
-
209
-
210
-
211
-
212
-
213
-
214
-
215
-
216
-
217
-
218
-
219
-
220
-
221
-
222
-
223
-
224
-
225
-
226
-
227
-
228
 |
 |
