Ricoh SP C252SF Operating Instructions - Page 186
Configuring the storing conditions, Printing Out Faxes Stored in Memory
 |
View all Ricoh SP C252SF manuals
Add to My Manuals
Save this manual to your list of manuals |
Page 186 highlights
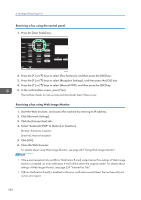
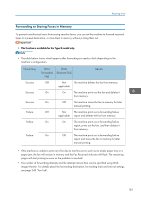
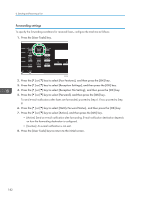
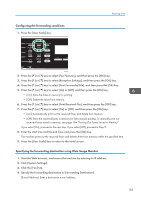
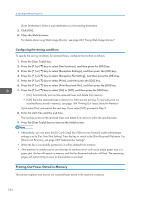
6. Sending and Receiving a Fax [Scan Destination]: Select a scan destination as a forwarding destination. 5. Click [OK]. 6. Close the Web browser. For details about using Web Image Monitor, see page 233 "Using Web Image Monitor". Configuring the storing conditions To specify the storing conditions for received faxes, configure the machine as follows: 1. Press the [User Tools] key. 2. Press the [ ] or [ ] key to select [Fax Features], and then press the [OK] key. 3. Press the [ ] or [ ] key to select [Reception Settings], and then press the [OK] key. 4. Press the [ ] or [ ] key to select [Reception File Setting], and then press the [OK] key. 5. Press the [ ] or [ ] key to select [Print], and then press the [OK] key. 6. Press the [ ] or [ ] key to select [Print Received File], and then press the [OK] key. 7. Press the [ ] or [ ] key to select [On] or [Off], and then press the [OK] key. • [On]: Automatically print out the received faxes and delete from memory. • [Off]: Store the received faxes in memory for later manual printing. To manually print out received faxes stored in memory, see page 184 "Printing Out Faxes Stored in Memory". If you select [On], proceed to the next step. If you select [Off], proceed to Step 9. 8. Enter the start time and the end time. The machine prints out the received faxes and delete from memory within the specified time. 9. Press the [User Tools] key to return to the initial screen. • Alternatively, you can press the [ID Card Copy] key if [Shortcut to Function] under administrator settings is set to [Fax Auto Print Setting]. Press the key to switch to the [Print Received File] menu. For [Shortcut to Function], see page 228 "Administrator Settings". • When the fax is successfully printed out, it will be deleted from memory. • If the machine is unable to print out a fax due to machine errors such as an empty paper tray or a paper jam, the fax will remain in memory and the Fax Received indicator will flash. The remaining pages will start printing as soon as the problem is resolved. Printing Out Faxes Stored in Memory This section explains how to print out received faxes stored in the machine's memory. 184
-
 1
1 -
2
-
3
-
4
-
5
-
6
-
7
-
8
-
9
-
10
-
11
-
12
-
13
-
14
-
15
-
16
-
17
-
18
-
19
-
20
-
21
-
22
-
23
-
24
-
25
-
26
-
27
-
28
-
29
-
30
-
31
-
32
-
33
-
34
-
35
-
36
-
37
-
38
-
39
-
40
-
41
-
42
-
43
-
44
-
45
-
46
-
47
-
48
-
49
-
50
-
51
-
52
-
53
-
54
-
55
-
56
-
57
-
58
-
59
-
60
-
61
-
62
-
63
-
64
-
65
-
66
-
67
-
68
-
69
-
70
-
71
-
72
-
73
-
74
-
75
-
76
-
77
-
78
-
79
-
80
-
81
-
82
-
83
-
84
-
85
-
86
-
87
-
88
-
89
-
90
-
91
-
92
-
93
-
94
-
95
-
96
-
97
-
98
-
99
-
100
-
101
-
102
-
103
-
104
-
105
-
106
-
107
-
108
-
109
-
110
-
111
-
112
-
113
-
114
-
115
-
116
-
117
-
118
-
119
-
120
-
121
-
122
-
123
-
124
-
125
-
126
-
127
-
128
-
129
-
130
-
131
-
132
-
133
-
134
-
135
-
136
-
137
-
138
-
139
-
140
-
141
-
142
-
143
-
144
-
145
-
146
-
147
-
148
-
149
-
150
-
151
-
152
-
153
-
154
-
155
-
156
-
157
-
158
-
159
-
160
-
161
-
162
-
163
-
164
-
165
-
166
-
167
-
168
-
169
-
170
-
171
-
172
-
173
-
174
-
175
-
176
-
177
-
178
-
179
-
180
-
 181
181 -
 182
182 -
 183
183 -
 184
184 -
 185
185 -
 186
186 -
 187
187 -
 188
188 -
 189
189 -
 190
190 -
 191
191 -
192
-
193
-
194
-
195
-
196
-
197
-
198
-
199
-
200
-
201
-
202
-
203
-
204
-
205
-
206
-
207
-
208
-
209
-
210
-
211
-
212
-
213
-
214
-
215
-
216
-
217
-
218
-
219
-
220
-
221
-
222
-
223
-
224
-
225
-
226
-
227
-
228
-
229
-
230
-
231
-
232
-
233
-
234
-
235
-
236
-
237
-
238
-
239
-
240
-
241
-
242
-
243
-
244
-
245
-
246
-
247
-
248
-
249
-
250
-
251
-
252
-
253
-
254
-
255
-
256
-
257
-
258
-
259
-
260
-
261
-
262
-
263
-
264
-
265
-
266
-
267
-
268
-
269
-
270
-
271
-
272
-
273
-
274
-
275
-
276
-
277
-
278
-
279
-
280
-
281
-
282
-
283
-
284
-
285
-
286
-
287
-
288
-
289
-
290
-
291
-
292
-
293
-
294
-
295
-
296
-
297
-
298
-
299
-
300
-
301
-
302
-
303
-
304
-
305
-
306
-
307
-
308
-
309
-
310
-
311
-
312
-
313
-
314
-
315
-
316
-
317
-
318
-
319
-
320
-
321
-
322
-
323
-
324
-
325
-
326
-
327
-
328
-
329
-
330
-
331
-
332
-
333
-
334
-
335
-
336
-
337
-
338
-
339
-
340
-
341
-
342
-
343
-
344
-
345
-
346
-
347
-
348
-
349
-
350
-
351
-
352
-
353
-
354
-
355
-
356
-
357
-
358
-
359
-
360
-
361
-
362
-
363
-
364
-
365
-
366
-
367
-
368
-
369
-
370
-
371
-
372
-
373
-
374
-
375
-
376
-
377
-
378
-
379
-
380
 |
 |