Ricoh SP C252SF Operating Instructions - Page 48
Sharing the Printer on a Network, Click [OK].
 |
View all Ricoh SP C252SF manuals
Add to My Manuals
Save this manual to your list of manuals |
Page 48 highlights
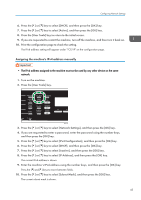
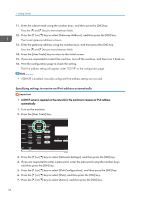
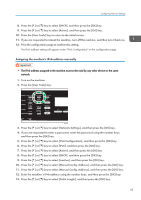
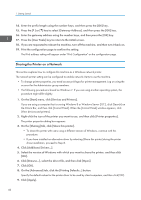
1. Getting Started 14. Enter the prefix length using the number keys, and then press the [OK] key. 15. Press the [ ] or [ ] key to select [Gateway Address], and then press the [OK] key. 16. Enter the gateway address using the number keys, and then press the [OK] key. 17. Press the [User Tools] key to return to the initial screen. 18. If you are requested to reboot the machine, turn off the machine, and then turn it back on. 19. Print the configuration page to confirm the setting. The IPv6 address setting will appear under "IPv6 Configuration" on the configuration page. Sharing the Printer on a Network This section explains how to configure this machine as a Windows network printer. The network printer setting can be configured to enable network clients to use the machine. • To change printer properties, you need access privileges for printer management. Log on using the account for the Administrator group members. • The following procedure is based on Windows 7. If you are using another operating system, the procedure might differ slightly. 1. On the [Start] menu, click [Devices and Printers]. If you are using a computer that is running Windows 8 or Windows Server 2012, click [Search] on the Charm Bar, and then click [Control Panel]. When the [Control Panel] window appears, click [View devices and printers]. 2. Right-click the icon of the printer you want to use, and then click [Printer properties]. The printer properties dialog box appears. 3. On the [Sharing] tab, click [Share this printer]. • To share this printer with users using a different version of Windows, continue with this procedure. • If you have installed an alternative driver by selecting [Share this printer] during the printer driver installation, proceed to Step 8. 4. Click [Additional Drivers...]. 5. Select the version of Windows with which you want to share the printer, and then click [OK]. 6. Click [Browse...], select the driver file, and then click [Open]. 7. Click [OK]. 8. On the [Advanced] tab, click the [Printing Defaults...] button. Specify the default values for the printer driver to be used by client computers, and then click [OK]. 9. Click [Apply]. 46
-
 1
1 -
2
-
3
-
4
-
5
-
6
-
7
-
8
-
9
-
10
-
11
-
12
-
13
-
14
-
15
-
16
-
17
-
18
-
19
-
20
-
21
-
22
-
23
-
24
-
25
-
26
-
27
-
28
-
29
-
30
-
31
-
32
-
33
-
34
-
35
-
36
-
37
-
38
-
39
-
40
-
41
-
42
-
 43
43 -
 44
44 -
 45
45 -
 46
46 -
 47
47 -
 48
48 -
 49
49 -
 50
50 -
 51
51 -
 52
52 -
 53
53 -
54
-
55
-
56
-
57
-
58
-
59
-
60
-
61
-
62
-
63
-
64
-
65
-
66
-
67
-
68
-
69
-
70
-
71
-
72
-
73
-
74
-
75
-
76
-
77
-
78
-
79
-
80
-
81
-
82
-
83
-
84
-
85
-
86
-
87
-
88
-
89
-
90
-
91
-
92
-
93
-
94
-
95
-
96
-
97
-
98
-
99
-
100
-
101
-
102
-
103
-
104
-
105
-
106
-
107
-
108
-
109
-
110
-
111
-
112
-
113
-
114
-
115
-
116
-
117
-
118
-
119
-
120
-
121
-
122
-
123
-
124
-
125
-
126
-
127
-
128
-
129
-
130
-
131
-
132
-
133
-
134
-
135
-
136
-
137
-
138
-
139
-
140
-
141
-
142
-
143
-
144
-
145
-
146
-
147
-
148
-
149
-
150
-
151
-
152
-
153
-
154
-
155
-
156
-
157
-
158
-
159
-
160
-
161
-
162
-
163
-
164
-
165
-
166
-
167
-
168
-
169
-
170
-
171
-
172
-
173
-
174
-
175
-
176
-
177
-
178
-
179
-
180
-
181
-
182
-
183
-
184
-
185
-
186
-
187
-
188
-
189
-
190
-
191
-
192
-
193
-
194
-
195
-
196
-
197
-
198
-
199
-
200
-
201
-
202
-
203
-
204
-
205
-
206
-
207
-
208
-
209
-
210
-
211
-
212
-
213
-
214
-
215
-
216
-
217
-
218
-
219
-
220
-
221
-
222
-
223
-
224
-
225
-
226
-
227
-
228
-
229
-
230
-
231
-
232
-
233
-
234
-
235
-
236
-
237
-
238
-
239
-
240
-
241
-
242
-
243
-
244
-
245
-
246
-
247
-
248
-
249
-
250
-
251
-
252
-
253
-
254
-
255
-
256
-
257
-
258
-
259
-
260
-
261
-
262
-
263
-
264
-
265
-
266
-
267
-
268
-
269
-
270
-
271
-
272
-
273
-
274
-
275
-
276
-
277
-
278
-
279
-
280
-
281
-
282
-
283
-
284
-
285
-
286
-
287
-
288
-
289
-
290
-
291
-
292
-
293
-
294
-
295
-
296
-
297
-
298
-
299
-
300
-
301
-
302
-
303
-
304
-
305
-
306
-
307
-
308
-
309
-
310
-
311
-
312
-
313
-
314
-
315
-
316
-
317
-
318
-
319
-
320
-
321
-
322
-
323
-
324
-
325
-
326
-
327
-
328
-
329
-
330
-
331
-
332
-
333
-
334
-
335
-
336
-
337
-
338
-
339
-
340
-
341
-
342
-
343
-
344
-
345
-
346
-
347
-
348
-
349
-
350
-
351
-
352
-
353
-
354
-
355
-
356
-
357
-
358
-
359
-
360
-
361
-
362
-
363
-
364
-
365
-
366
-
367
-
368
-
369
-
370
-
371
-
372
-
373
-
374
-
375
-
376
-
377
-
378
-
379
-
380
 |
 |