Ricoh SP C252SF Operating Instructions - Page 49
Wireless LAN Setup, Infrastructure mode
 |
View all Ricoh SP C252SF manuals
Add to My Manuals
Save this manual to your list of manuals |
Page 49 highlights
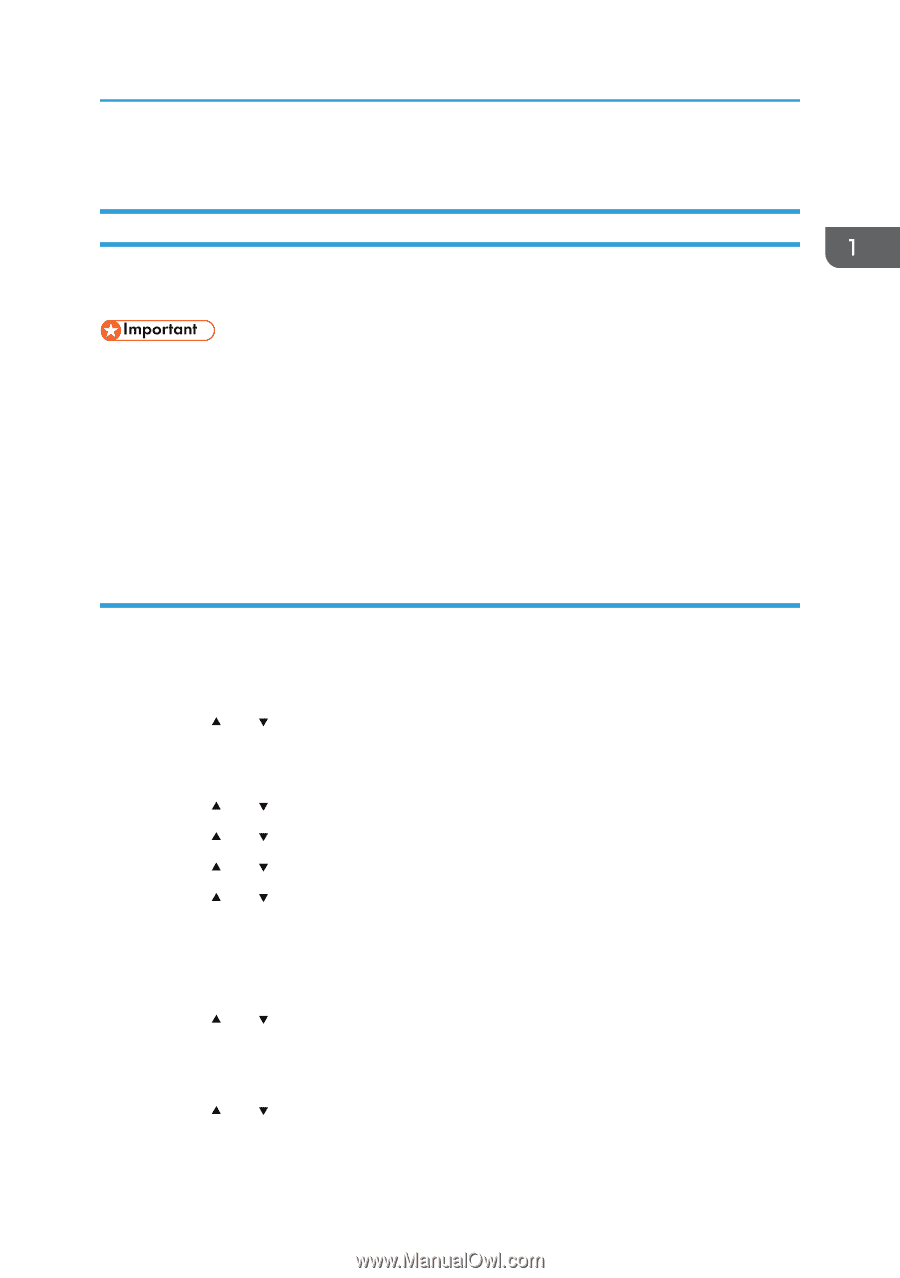
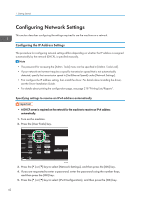
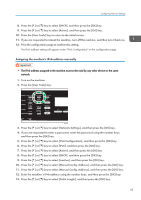
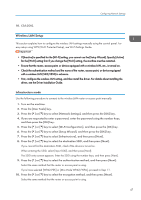
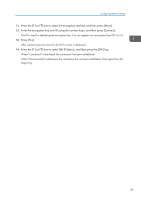
Configuring Network Settings 10. Click [OK]. Wireless LAN Setup This section explains how to configure the wireless LAN settings manually using the control panel. For easy setup using WPS (Wi-Fi Protected Setup), see Wi-Fi Settings Guide. • If [Inactive] is specified for the [Wi-Fi] setting, you cannot use the [Setup Wizard]. Specify [Active] for the [Wi-Fi] setting first. If you change the [Wi-Fi] setting, the machine must be restarted. • Ensure that the router, access point, or device equipped with a wireless LAN, etc., is turned on. • Check the authentication method and the name of the router, access point, or device equipped with a wireless LAN (SSID/IBSS) in advance. • First, configure the wireless LAN setting, and then install the driver. For details about installing the driver, see the Driver Installation Guide. Infrastructure mode Use the following procedure to connect to the wireless LAN router or access point manually. 1. Turn on the machine. 2. Press the [User Tools] key. 3. Press the [ ] or [ ] key to select [Network Settings], and then press the [OK] key. 4. If you are requested to enter a password, enter the password using the number keys, and then press the [OK] key. 5. Press the [ ] or [ ] key to select [Wi-Fi Configuration], and then press the [OK] key. 6. Press the [ ] or [ ] key to select [Setup Wizard], and then press the [OK] key. 7. Press the [ ] or [ ] key to select [Infrastructure], and then press [Next]. 8. Press the [ ] or [ ] key to select the destination SSID, and then press [Next]. If you cannot find the destination SSID, check if the device is turned on. When entering the SSID, select [Input SSID], and then press [Next]. The SSID entry screen appears. Enter the SSID using the number keys, and then press [Next]. 9. Press the [ ] or [ ] key to select the authentication method, and then press [Next]. Select the same method that the router or access point is using. If you have selected [WPA2-PSK] or [Mix Mode WPA2/WPA], proceed to Step 11. 10. Press the [ ] or [ ] key to select the encryption method, and then press [Next]. Select the same method that the router or access point is using. 47
-
 1
1 -
2
-
3
-
4
-
5
-
6
-
7
-
8
-
9
-
10
-
11
-
12
-
13
-
14
-
15
-
16
-
17
-
18
-
19
-
20
-
21
-
22
-
23
-
24
-
25
-
26
-
27
-
28
-
29
-
30
-
31
-
32
-
33
-
34
-
35
-
36
-
37
-
38
-
39
-
40
-
41
-
42
-
43
-
 44
44 -
 45
45 -
 46
46 -
 47
47 -
 48
48 -
 49
49 -
 50
50 -
 51
51 -
 52
52 -
 53
53 -
 54
54 -
55
-
56
-
57
-
58
-
59
-
60
-
61
-
62
-
63
-
64
-
65
-
66
-
67
-
68
-
69
-
70
-
71
-
72
-
73
-
74
-
75
-
76
-
77
-
78
-
79
-
80
-
81
-
82
-
83
-
84
-
85
-
86
-
87
-
88
-
89
-
90
-
91
-
92
-
93
-
94
-
95
-
96
-
97
-
98
-
99
-
100
-
101
-
102
-
103
-
104
-
105
-
106
-
107
-
108
-
109
-
110
-
111
-
112
-
113
-
114
-
115
-
116
-
117
-
118
-
119
-
120
-
121
-
122
-
123
-
124
-
125
-
126
-
127
-
128
-
129
-
130
-
131
-
132
-
133
-
134
-
135
-
136
-
137
-
138
-
139
-
140
-
141
-
142
-
143
-
144
-
145
-
146
-
147
-
148
-
149
-
150
-
151
-
152
-
153
-
154
-
155
-
156
-
157
-
158
-
159
-
160
-
161
-
162
-
163
-
164
-
165
-
166
-
167
-
168
-
169
-
170
-
171
-
172
-
173
-
174
-
175
-
176
-
177
-
178
-
179
-
180
-
181
-
182
-
183
-
184
-
185
-
186
-
187
-
188
-
189
-
190
-
191
-
192
-
193
-
194
-
195
-
196
-
197
-
198
-
199
-
200
-
201
-
202
-
203
-
204
-
205
-
206
-
207
-
208
-
209
-
210
-
211
-
212
-
213
-
214
-
215
-
216
-
217
-
218
-
219
-
220
-
221
-
222
-
223
-
224
-
225
-
226
-
227
-
228
-
229
-
230
-
231
-
232
-
233
-
234
-
235
-
236
-
237
-
238
-
239
-
240
-
241
-
242
-
243
-
244
-
245
-
246
-
247
-
248
-
249
-
250
-
251
-
252
-
253
-
254
-
255
-
256
-
257
-
258
-
259
-
260
-
261
-
262
-
263
-
264
-
265
-
266
-
267
-
268
-
269
-
270
-
271
-
272
-
273
-
274
-
275
-
276
-
277
-
278
-
279
-
280
-
281
-
282
-
283
-
284
-
285
-
286
-
287
-
288
-
289
-
290
-
291
-
292
-
293
-
294
-
295
-
296
-
297
-
298
-
299
-
300
-
301
-
302
-
303
-
304
-
305
-
306
-
307
-
308
-
309
-
310
-
311
-
312
-
313
-
314
-
315
-
316
-
317
-
318
-
319
-
320
-
321
-
322
-
323
-
324
-
325
-
326
-
327
-
328
-
329
-
330
-
331
-
332
-
333
-
334
-
335
-
336
-
337
-
338
-
339
-
340
-
341
-
342
-
343
-
344
-
345
-
346
-
347
-
348
-
349
-
350
-
351
-
352
-
353
-
354
-
355
-
356
-
357
-
358
-
359
-
360
-
361
-
362
-
363
-
364
-
365
-
366
-
367
-
368
-
369
-
370
-
371
-
372
-
373
-
374
-
375
-
376
-
377
-
378
-
379
-
380
 |
 |