Sony STR-DN1080 Help Guide Printable PDF - Page 141
to select [Start].
 |
View all Sony STR-DN1080 manuals
Add to My Manuals
Save this manual to your list of manuals |
Page 141 highlights
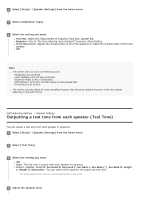
next screen. 5 Make sure that the calibration microphone is connected to the receiver, and then select [Proceed to the next step]. 6 Confirm the instructions on the screen, then press to select [Start]. The measurement starts in 5 seconds. The measurement process takes approximately 30 seconds. A test tone is output from each speaker in sequence. When the measurement ends, a beep sounds and the screen switches. 7 Select the item you want. Save: Saves the measurement results and exits the setting process. Retry: Performs the Auto Calibration again. Discard: Exits the setting process without saving the measurement results. For details on the measurement results, see "6. Checking Auto Calibration results." 8 Save the measurement results. Select [Save] in step 7. Note If the measurement fails, follow the message, then select [Retry]. For details on the error code and warning message, see "List of messages after Auto Calibration measurements." This setting is not available when headphones are connected. Hint The Auto Calibration measurement will be canceled if you perform the following during the measurement process: Press . Press the input buttons on the remote control or turn INPUT SELECTOR on the receiver. Press HOME, AMP MENU, HDMI OUT or on the remote control. Press SPEAKERS on the receiver. Change the volume level. Connect headphones. Press MUSIC on the remote control or the receiver. [154] Adjusting Settings Performing Auto Calibration 6. Checking Auto Calibration results
-
 1
1 -
2
-
3
-
4
-
5
-
6
-
7
-
8
-
9
-
10
-
11
-
12
-
13
-
14
-
15
-
16
-
17
-
18
-
19
-
20
-
21
-
22
-
23
-
24
-
25
-
26
-
27
-
28
-
29
-
30
-
31
-
32
-
33
-
34
-
35
-
36
-
37
-
38
-
39
-
40
-
41
-
42
-
43
-
44
-
45
-
46
-
47
-
48
-
49
-
50
-
51
-
52
-
53
-
54
-
55
-
56
-
57
-
58
-
59
-
60
-
61
-
62
-
63
-
64
-
65
-
66
-
67
-
68
-
69
-
70
-
71
-
72
-
73
-
74
-
75
-
76
-
77
-
78
-
79
-
80
-
81
-
82
-
83
-
84
-
85
-
86
-
87
-
88
-
89
-
90
-
91
-
92
-
93
-
94
-
95
-
96
-
97
-
98
-
99
-
100
-
101
-
102
-
103
-
104
-
105
-
106
-
107
-
108
-
109
-
110
-
111
-
112
-
113
-
114
-
115
-
116
-
117
-
118
-
119
-
120
-
121
-
122
-
123
-
124
-
125
-
126
-
127
-
128
-
129
-
130
-
131
-
132
-
133
-
134
-
135
-
 136
136 -
 137
137 -
 138
138 -
 139
139 -
 140
140 -
 141
141 -
 142
142 -
 143
143 -
 144
144 -
 145
145 -
 146
146 -
147
-
148
-
149
-
150
-
151
-
152
-
153
-
154
-
155
-
156
-
157
-
158
-
159
-
160
-
161
-
162
-
163
-
164
-
165
-
166
-
167
-
168
-
169
-
170
-
171
-
172
-
173
-
174
-
175
-
176
-
177
-
178
-
179
-
180
-
181
-
182
-
183
-
184
-
185
-
186
-
187
-
188
-
189
-
190
-
191
-
192
-
193
-
194
-
195
-
196
-
197
-
198
-
199
-
200
-
201
-
202
-
203
-
204
-
205
-
206
-
207
-
208
-
209
-
210
-
211
-
212
-
213
-
214
-
215
-
216
-
217
-
218
 |
 |
