Sony STR-DN1080 Help Guide Printable PDF - Page 211
Confirming active subwoofer setup
 |
View all Sony STR-DN1080 manuals
Add to My Manuals
Save this manual to your list of manuals |
Page 211 highlights
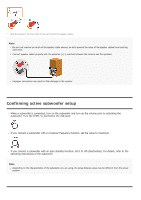
* Strip the jacket to 10 mm (13/32 in) at each end of the speaker cables. Note Be sure not remove too much of the speaker cable sleeves, so as to prevent the wires of the speaker cables from touching each other. Connect speaker cables properly with the polarities (+/-) matched between the receiver and the speakers. Improper connection may result in fatal damage to the receiver. Confirming active subwoofer setup When a subwoofer is connected, turn on the subwoofer and turn up the volume prior to activating the subwoofer. Turn the LEVEL to just before the mid-point. If you connect a subwoofer with a crossover frequency function, set the value to maximum. If you connect a subwoofer with an auto standby function, set it to off (deactivated). For details, refer to the operating instructions of the subwoofer. Note Depending on the characteristics of the subwoofer you are using, the setup distance value may be different from the actual position.
-
 1
1 -
2
-
3
-
4
-
5
-
6
-
7
-
8
-
9
-
10
-
11
-
12
-
13
-
14
-
15
-
16
-
17
-
18
-
19
-
20
-
21
-
22
-
23
-
24
-
25
-
26
-
27
-
28
-
29
-
30
-
31
-
32
-
33
-
34
-
35
-
36
-
37
-
38
-
39
-
40
-
41
-
42
-
43
-
44
-
45
-
46
-
47
-
48
-
49
-
50
-
51
-
52
-
53
-
54
-
55
-
56
-
57
-
58
-
59
-
60
-
61
-
62
-
63
-
64
-
65
-
66
-
67
-
68
-
69
-
70
-
71
-
72
-
73
-
74
-
75
-
76
-
77
-
78
-
79
-
80
-
81
-
82
-
83
-
84
-
85
-
86
-
87
-
88
-
89
-
90
-
91
-
92
-
93
-
94
-
95
-
96
-
97
-
98
-
99
-
100
-
101
-
102
-
103
-
104
-
105
-
106
-
107
-
108
-
109
-
110
-
111
-
112
-
113
-
114
-
115
-
116
-
117
-
118
-
119
-
120
-
121
-
122
-
123
-
124
-
125
-
126
-
127
-
128
-
129
-
130
-
131
-
132
-
133
-
134
-
135
-
136
-
137
-
138
-
139
-
140
-
141
-
142
-
143
-
144
-
145
-
146
-
147
-
148
-
149
-
150
-
151
-
152
-
153
-
154
-
155
-
156
-
157
-
158
-
159
-
160
-
161
-
162
-
163
-
164
-
165
-
166
-
167
-
168
-
169
-
170
-
171
-
172
-
173
-
174
-
175
-
176
-
177
-
178
-
179
-
180
-
181
-
182
-
183
-
184
-
185
-
186
-
187
-
188
-
189
-
190
-
191
-
192
-
193
-
194
-
195
-
196
-
197
-
198
-
199
-
200
-
201
-
202
-
203
-
204
-
205
-
 206
206 -
 207
207 -
 208
208 -
 209
209 -
 210
210 -
 211
211 -
 212
212 -
 213
213 -
 214
214 -
 215
215 -
 216
216 -
217
-
218
 |
 |
