Vonage VDV21-VD User Guide - Page 2
Vonage V-Portal User Guide, Rear Panel - adapter
 |
UPC - 094922750785
View all Vonage VDV21-VD manuals
Add to My Manuals
Save this manual to your list of manuals |
Page 2 highlights
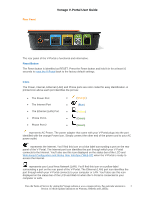
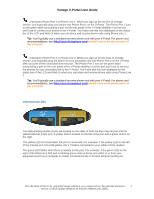
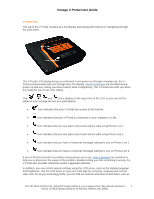
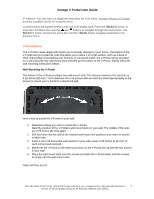
Rear Panel Vonage V-Portal User Guide The rear panel of the V-Portal is functional and informative. Reset Button The Reset button is identified as RESET. Press the Reset button and hold it in for at least 10 seconds to reset the V-Portal back to the factory default settings. Icons The Power, Internet, Ethernet (LAN) and Phone ports are color coded for easy identification. A printed icon above each port identifies the port as: • The Power Port • • The Internet Port • • The Ethernet (LAN) Port • • Phone Port 1 • • Phone Port 2 • (Orange) (Blue) (Yellow) (Green) (Green) represents AC Power. The power adapter that came with your V-Portal plugs into the port identified with the orange Power icon. Simply connect the other end of the power cord to your AC power outlet. represents the Internet. You'll find this icon on a blue label surrounding a port on the rear panel of the V-Portal. The Internet port icon identifies the port through which your V-Portal connects to the Internet. You'll also see this icon displayed on the status bar of the LCD and Web-based Configuration and Status User Interface ("Web UI") when the V-Portal is ready to access the Internet. represents your Local Area Network (LAN). You'll find this icon on a yellow label surrounding a port on the rear panel of the V-Portal. The Ethernet (LAN) port icon identifies the port through which your V-Portal connects to your computer or LAN. You'll also see this icon displayed on the status bar of the LCD and Web UI when the V-Portal is connected to your computer or LAN. View the Terms of Service by visiting the Vonage website at www.vonage.com/tos. Pay particular attention to 2 Section 11 which explains limitations on Warranty, Remedy and Liability.
-
 1
1 -
 2
2 -
 3
3 -
 4
4 -
 5
5 -
 6
6 -
 7
7 -
 8
8 -
9
-
10
-
11
-
12
-
13
-
14
-
15
-
16
-
17
-
18
-
19
-
20
-
21
-
22
-
23
-
24
-
25
-
26
-
27
-
28
-
29
-
30
-
31
-
32
-
33
-
34
-
35
-
36
-
37
-
38
-
39
-
40
-
41
-
42
-
43
-
44
-
45
-
46
-
47
-
48
-
49
-
50
-
51
-
52
-
53
-
54
-
55
-
56
-
57
-
58
-
59
-
60
-
61
-
62
-
63
-
64
-
65
-
66
-
67
-
68
-
69
-
70
-
71
-
72
-
73
-
74
-
75
-
76
-
77
-
78
-
79
-
80
-
81
-
82
-
83
-
84
-
85
-
86
-
87
-
88
-
89
-
90
-
91
-
92
-
93
-
94
-
95
-
96
-
97
-
98
-
99
-
100
-
101
-
102
-
103
-
104
-
105
-
106
-
107
-
108
-
109
-
110
-
111
-
112
 |
 |
