Vonage VDV21-VD User Guide - Page 49
Basic Setup, Local Network Setup, DHCP Server, networking knowledge. - installation instructions
 |
UPC - 094922750785
View all Vonage VDV21-VD manuals
Add to My Manuals
Save this manual to your list of manuals |
Page 49 highlights
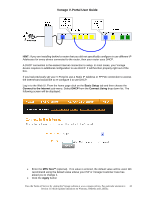
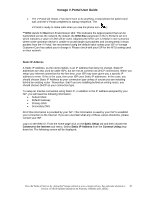
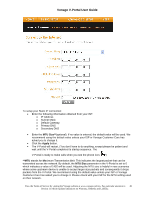
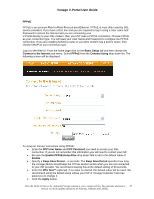
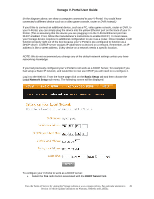
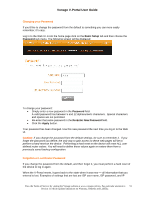
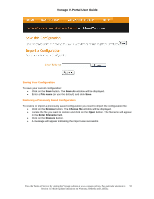
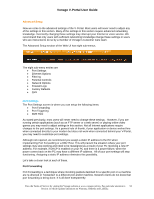
Vonage V-Portal User Guide (In the diagram above, we show a computer connected to your V-Portal. You could have connected a different device such as a video game console, router or DVR instead.) If you'd like to connect an additional device, such as a PC, video game console, router or DVR, to your V-Portal, you can simply plug the device into the yellow Ethernet port on the back of your VPortal. (This is assuming that the device you are plugging in to the V-Portal Ethernet port has DHCP enabled. If not, follow the manufacturer's instructions to enable DHCP.) In most cases, your Vonage device requires no additional configuration to use it as a router. Once installed, it will function properly right out of the box because your V-Portal is pre-configured to function as a DHCP server. A DHCP server assigns IP addresses to devices on a network. Remember, an IP address is like a street address. Every device on a network needs a specific location. NOTE: We do not recommend you change any of the default network settings unless you have networking knowledge. If you had previously configured your V-Portal to not work as a DHCP Server, for example if you had setup a Static IP network, and would like to now use DHCP you will need to re-configure it. Log in to the Web UI. From the home page click on the Basic Setup tab and then choose the Local Network Setup sub-menu. The following screen will be displayed: To configure your V-Portal to work as a DHCP server: • Select the Yes radio button associated with the DHCP Server field. View the Terms of Service by visiting the Vonage website at www.vonage.com/tos. Pay particular attention to 49 Section 11 which explains limitations on Warranty, Remedy and Liability.
-
 1
1 -
2
-
3
-
4
-
5
-
6
-
7
-
8
-
9
-
10
-
11
-
12
-
13
-
14
-
15
-
16
-
17
-
18
-
19
-
20
-
21
-
22
-
23
-
24
-
25
-
26
-
27
-
28
-
29
-
30
-
31
-
32
-
33
-
34
-
35
-
36
-
37
-
38
-
39
-
40
-
41
-
42
-
43
-
 44
44 -
 45
45 -
 46
46 -
 47
47 -
 48
48 -
 49
49 -
 50
50 -
 51
51 -
 52
52 -
 53
53 -
 54
54 -
55
-
56
-
57
-
58
-
59
-
60
-
61
-
62
-
63
-
64
-
65
-
66
-
67
-
68
-
69
-
70
-
71
-
72
-
73
-
74
-
75
-
76
-
77
-
78
-
79
-
80
-
81
-
82
-
83
-
84
-
85
-
86
-
87
-
88
-
89
-
90
-
91
-
92
-
93
-
94
-
95
-
96
-
97
-
98
-
99
-
100
-
101
-
102
-
103
-
104
-
105
-
106
-
107
-
108
-
109
-
110
-
111
-
112
 |
 |
