Vonage VDV21-VD User Guide - Page 5
V-Portal Bottom, Wall Mounting the V-Portal - instructions
 |
UPC - 094922750785
View all Vonage VDV21-VD manuals
Add to My Manuals
Save this manual to your list of manuals |
Page 5 highlights
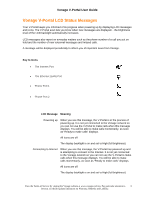
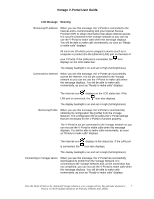
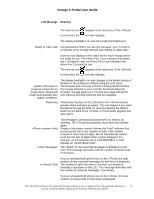
Vonage V-Portal User Guide IP Address. You can even run diagnostic tests from the LCD menu. Vonage V-Portal LCD Menu provides complete details for using the menu. Control buttons are located directly under the LCD display area. Press the SELECT> button to enter the LCD Menu then use the and buttons to navigate through the menu items. The SELECT> button chooses the menu item and the
-
 1
1 -
 2
2 -
 3
3 -
 4
4 -
 5
5 -
 6
6 -
 7
7 -
 8
8 -
 9
9 -
 10
10 -
 11
11 -
12
-
13
-
14
-
15
-
16
-
17
-
18
-
19
-
20
-
21
-
22
-
23
-
24
-
25
-
26
-
27
-
28
-
29
-
30
-
31
-
32
-
33
-
34
-
35
-
36
-
37
-
38
-
39
-
40
-
41
-
42
-
43
-
44
-
45
-
46
-
47
-
48
-
49
-
50
-
51
-
52
-
53
-
54
-
55
-
56
-
57
-
58
-
59
-
60
-
61
-
62
-
63
-
64
-
65
-
66
-
67
-
68
-
69
-
70
-
71
-
72
-
73
-
74
-
75
-
76
-
77
-
78
-
79
-
80
-
81
-
82
-
83
-
84
-
85
-
86
-
87
-
88
-
89
-
90
-
91
-
92
-
93
-
94
-
95
-
96
-
97
-
98
-
99
-
100
-
101
-
102
-
103
-
104
-
105
-
106
-
107
-
108
-
109
-
110
-
111
-
112
 |
 |

Vonage V-Portal User Guide
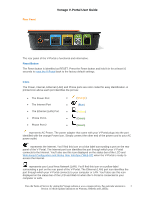
IP Address. You can even run diagnostic tests from the LCD menu.
Vonage V-Portal LCD Menu
provides complete details for using the menu.
Control buttons are located directly under the LCD display area. Press the
SELECT>
button to
enter the LCD Menu then use the
and
buttons to navigate through the menu items. The
SELECT>
button chooses the menu item and the
<BACK
button navigates backward to the
previous menu.
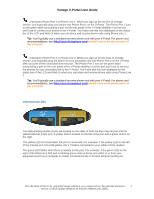
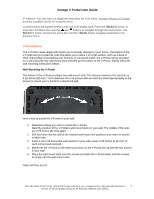
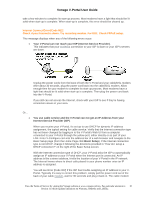
V-Portal Bottom
The V-Portal’s sleek design will inspire you to proudly display it in your home. The bottom of the
V-Portal has four protective nubs that allow you to place it on a flat surface, such as a desk or
shelf, without fear of scratching your furniture. If you would prefer, the V-Portal can be mounted
on a wall using the two wall-mount slots included on the bottom of the V-Portal. Simply follow the
wall mounting instructions below.
Wall Mounting the V-Portal
The bottom of the V-Portal includes two wall-mount slots. The distance between the two slots is
3.25 inches (82 mm). You’ll need two #4 or #6 screws with two anchors sized appropriately to the
screws to mount your V-Portal to a sheetrock wall.
Here’s how to mount the V-Portal on your wall:
1.
Determine where you want to mount the V-Portal.
Mark the position of the V-Portal’s wall-mount slots on your wall. The middle of the slots
are 3.25 inches (82 mm) apart.
2.
Drill two holes into the wall at the marked wall-mount slot positions and insert an anchor
in each hole.
3.
Insert a #4 or #6 screw into each anchor in your wall. Leave 0.25 inches (6.35 mm) of
each screw head exposed.
4.
Maneuver the V-Portal so the wall-mount slots on the V-Portal line up with the two screws
in your wall.
5.
Place the wall-mount slots over the screws and slide the V-Portal down until the screws
fit snugly into the wall-mount slots.
That’s all there is to it!
View the Terms of Service by visiting the Vonage website at www.vonage.com/tos. Pay particular attention to
Section 11 which explains limitations on Warranty, Remedy and Liability.
5