Bernina Artista 730E User Guide - Page 117
Height Compensating Plates for Buttonholes optional accessory
 |
View all Bernina Artista 730E manuals
Add to My Manuals
Save this manual to your list of manuals |
Page 117 highlights
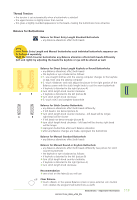
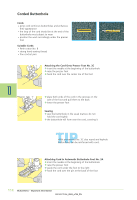
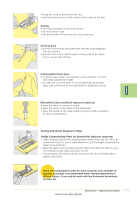
™ bring the cords to the front of the foot ™ pull each end into one of the notches at the front of the foot Sewing ™ sew the buttonhole in the usual manner ™ do not hold the cord ™ the buttonhole will form over the cord, covering it Securing Cord ™ pull the cord through the buttonhole until the loop disappears into the end of it ™ pull the ends of the cord through to wrong side of the fabric, knot or secure with stitches Cutting Buttonholes Open ™ using the seam ripper or buttonhole cutter and block, cut from both ends towards the middle ™ in order not to cut the ends of short buttonholes by mistake, place a pin at the end of the buttonhole for additional security Buttonhole Cutter and Block (optional accessory) ™ place the fabric on a piece of wood ™ place the cutter in the center of the buttonhole ™ press the handle of the cutter (either by hand or with a hammer) to open the buttonhole Sewing Buttonhole Diagonal to Edge Height Compensating Plates for Buttonholes (optional accessory) • when sewing a buttonhole using Automatic buttonhole foot No. 3A on an uneven area (such as over a seam allowance), use the height compensating plates for buttonholes ™ place the plates from the back between fabric and slide foot bottom up to the thick part of the fabric and push to front • this accessory will create a smooth surface for the foot and help make a perfect buttonhole Using the compensation plate (in some countries only available as optional accessory) is recommended when sewing buttonholes in difficult fabrics. It can only be used with the Automatic buttonhole foot No. 3A. 115 Buttonholes - Important Information
-
 1
1 -
2
-
3
-
4
-
5
-
6
-
7
-
8
-
9
-
10
-
11
-
12
-
13
-
14
-
15
-
16
-
17
-
18
-
19
-
20
-
21
-
22
-
23
-
24
-
25
-
26
-
27
-
28
-
29
-
30
-
31
-
32
-
33
-
34
-
35
-
36
-
37
-
38
-
39
-
40
-
41
-
42
-
43
-
44
-
45
-
46
-
47
-
48
-
49
-
50
-
51
-
52
-
53
-
54
-
55
-
56
-
57
-
58
-
59
-
60
-
61
-
62
-
63
-
64
-
65
-
66
-
67
-
68
-
69
-
70
-
71
-
72
-
73
-
74
-
75
-
76
-
77
-
78
-
79
-
80
-
81
-
82
-
83
-
84
-
85
-
86
-
87
-
88
-
89
-
90
-
91
-
92
-
93
-
94
-
95
-
96
-
97
-
98
-
99
-
100
-
101
-
102
-
103
-
104
-
105
-
106
-
107
-
108
-
109
-
110
-
111
-
 112
112 -
 113
113 -
 114
114 -
 115
115 -
 116
116 -
 117
117 -
 118
118 -
 119
119 -
 120
120 -
 121
121 -
 122
122 -
123
-
124
-
125
-
126
-
127
-
128
-
129
-
130
-
131
-
132
-
133
-
134
-
135
-
136
-
137
-
138
-
139
-
140
-
141
-
142
-
143
-
144
-
145
-
146
-
147
-
148
-
149
-
150
-
151
-
152
-
153
-
154
-
155
-
156
-
157
-
158
-
159
-
160
-
161
-
162
-
163
-
164
-
165
-
166
-
167
-
168
-
169
-
170
-
171
-
172
-
173
-
174
-
175
-
176
-
177
-
178
-
179
-
180
-
181
-
182
-
183
-
184
-
185
-
186
-
187
-
188
-
189
-
190
-
191
-
192
-
193
-
194
-
195
-
196
-
197
-
198
-
199
-
200
-
201
-
202
-
203
-
204
-
205
-
206
-
207
-
208
-
209
-
210
-
211
-
212
-
213
-
214
-
215
-
216
-
217
-
218
-
219
-
220
-
221
-
222
-
223
-
224
-
225
-
226
-
227
-
228
-
229
-
230
-
231
-
232
-
233
-
234
-
235
-
236
-
237
-
238
-
239
-
240
-
241
-
242
-
243
-
244
-
245
-
246
-
247
-
248
-
249
-
250
-
251
-
252
-
253
-
254
-
255
-
256
-
257
-
258
-
259
-
260
-
261
-
262
-
263
-
264
-
265
-
266
-
267
-
268
-
269
-
270
-
271
-
272
-
273
-
274
-
275
-
276
-
277
-
278
-
279
-
280
-
281
-
282
-
283
-
284
-
285
 |
 |
