Bernina Artista 730E User Guide - Page 88
Seam guide, Stitching Corners, Shaped Pintucks, Combining Decorative Stitches and Pintucks
 |
View all Bernina Artista 730E manuals
Add to My Manuals
Save this manual to your list of manuals |
Page 88 highlights
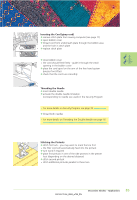
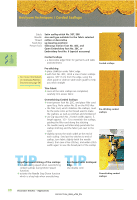
Stitching Corners • with a double needle the fabric cannot simply be pivoted at corners. Corners must therefore be sewn in several steps: ™ with the double needle in the fabric, turn the handwheel until the needles are just above the fabric (the eye appears, but the point is still in the fabric) ™ pivot the fabric halfway into the corner (45°), make one stitch, bring the needle back to the same position (just above the fabric) ™ pivot the fabric another 45° and continue stitching • for a pointed corner, simply repeat the steps until the desired angle is reached Shaped Pintucks • in addition to straight lines, pintucks may also be stitched in wavy lines as desired Combining Decorative Stitches and Pintucks ™ if you wish to place rows of decorative stitching directly between pintucks, use Reverse pattern foot No. 1C to stitch them before sewing the pintucks ™ use a removable stabilizer under the work and remove it after the decorative stitching is completed ™ stitch pintucks on the left and right of the decorative stitching as required and as described above TIP Seam guide Use the seam guide for evenly spaced pintucks, especially for more widely spaced ones. 86 Decorative Stitches - Applications
-
 1
1 -
2
-
3
-
4
-
5
-
6
-
7
-
8
-
9
-
10
-
11
-
12
-
13
-
14
-
15
-
16
-
17
-
18
-
19
-
20
-
21
-
22
-
23
-
24
-
25
-
26
-
27
-
28
-
29
-
30
-
31
-
32
-
33
-
34
-
35
-
36
-
37
-
38
-
39
-
40
-
41
-
42
-
43
-
44
-
45
-
46
-
47
-
48
-
49
-
50
-
51
-
52
-
53
-
54
-
55
-
56
-
57
-
58
-
59
-
60
-
61
-
62
-
63
-
64
-
65
-
66
-
67
-
68
-
69
-
70
-
71
-
72
-
73
-
74
-
75
-
76
-
77
-
78
-
79
-
80
-
81
-
82
-
 83
83 -
 84
84 -
 85
85 -
 86
86 -
 87
87 -
 88
88 -
 89
89 -
 90
90 -
 91
91 -
 92
92 -
 93
93 -
94
-
95
-
96
-
97
-
98
-
99
-
100
-
101
-
102
-
103
-
104
-
105
-
106
-
107
-
108
-
109
-
110
-
111
-
112
-
113
-
114
-
115
-
116
-
117
-
118
-
119
-
120
-
121
-
122
-
123
-
124
-
125
-
126
-
127
-
128
-
129
-
130
-
131
-
132
-
133
-
134
-
135
-
136
-
137
-
138
-
139
-
140
-
141
-
142
-
143
-
144
-
145
-
146
-
147
-
148
-
149
-
150
-
151
-
152
-
153
-
154
-
155
-
156
-
157
-
158
-
159
-
160
-
161
-
162
-
163
-
164
-
165
-
166
-
167
-
168
-
169
-
170
-
171
-
172
-
173
-
174
-
175
-
176
-
177
-
178
-
179
-
180
-
181
-
182
-
183
-
184
-
185
-
186
-
187
-
188
-
189
-
190
-
191
-
192
-
193
-
194
-
195
-
196
-
197
-
198
-
199
-
200
-
201
-
202
-
203
-
204
-
205
-
206
-
207
-
208
-
209
-
210
-
211
-
212
-
213
-
214
-
215
-
216
-
217
-
218
-
219
-
220
-
221
-
222
-
223
-
224
-
225
-
226
-
227
-
228
-
229
-
230
-
231
-
232
-
233
-
234
-
235
-
236
-
237
-
238
-
239
-
240
-
241
-
242
-
243
-
244
-
245
-
246
-
247
-
248
-
249
-
250
-
251
-
252
-
253
-
254
-
255
-
256
-
257
-
258
-
259
-
260
-
261
-
262
-
263
-
264
-
265
-
266
-
267
-
268
-
269
-
270
-
271
-
272
-
273
-
274
-
275
-
276
-
277
-
278
-
279
-
280
-
281
-
282
-
283
-
284
-
285
 |
 |
