Bernina Artista 730E User Guide - Page 169
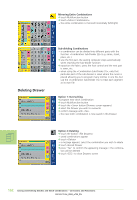
Embroidery Settings
 |
View all Bernina Artista 730E manuals
Add to My Manuals
Save this manual to your list of manuals |
Page 169 highlights
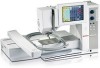
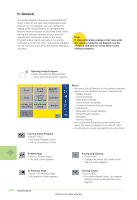
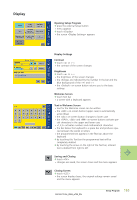
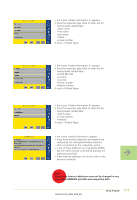
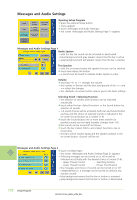
Embroidery Settings Opening Setup Program ™ press the external Setup button • menu appears ™ touch «Embroidery Settings» • the screen «Embroidery Settings 1» appears for adjusting the embroidery hoop Embroidery Settings 1 Embroidery Settings 2 «Adjust Reference Position» calibrates the needle to the center of the embroidery hoop. Adjusting can only be activated if the embroidery module and the oval embroidery hoop are attached. It is only necessary to adjust the Reference Position once as the same setting changes will apply to all the hoops. ™ insert the embroidery template into the hoop ™ touch «Check» • the hoop position is read and the needle positioned in the middle (the needle should now be positioned exactly over the center point of the template) ™ if it is not, adjust with the arrows ™ touch «OK» • the adjustment will be saved, the screen display closes and the menu appears ™ touch «To Next Page» • the screen «Embroidery Settings 2» appears Motor Speed • touching «+» or «-» changes the basic settings of the speed by 10 stitches • the number in the bar reflects the stitches per minute • any change of the speed affects all 4 speeds (1/4 - 4/4), i.e. slower or faster at all four levels Auto Thread Cutter • when the bar is active (blue) the upper thread and bobbin thread are automatically cut • when the bar is inactive (x) the Automatic Thread Cutter is off ™ touching the bar «Auto Thread Cutter» activates or deactivates the function Thread Tension Correction ™ touching «+» or «-» changes the basic setting (0) of the upper Thread Tension by plus or minus 20% 0 = basic settings (factory settings) 1 = + 10% 2 = + 20% -1 = - 10% -2 = - 20% • this correction fine tunes the basic tension setting on your sewing computer, which may be affected by variables such as thread weight, etc. • the number in the bar and the blue background of the «+» and «-» reflect the changes • the «Default» on-screen button returns you to the basic settings • the tension alteration affects all motifs and remains saved when the embroidery computer is turned off («0») 167 Setup Program
-
 1
1 -
2
-
3
-
4
-
5
-
6
-
7
-
8
-
9
-
10
-
11
-
12
-
13
-
14
-
15
-
16
-
17
-
18
-
19
-
20
-
21
-
22
-
23
-
24
-
25
-
26
-
27
-
28
-
29
-
30
-
31
-
32
-
33
-
34
-
35
-
36
-
37
-
38
-
39
-
40
-
41
-
42
-
43
-
44
-
45
-
46
-
47
-
48
-
49
-
50
-
51
-
52
-
53
-
54
-
55
-
56
-
57
-
58
-
59
-
60
-
61
-
62
-
63
-
64
-
65
-
66
-
67
-
68
-
69
-
70
-
71
-
72
-
73
-
74
-
75
-
76
-
77
-
78
-
79
-
80
-
81
-
82
-
83
-
84
-
85
-
86
-
87
-
88
-
89
-
90
-
91
-
92
-
93
-
94
-
95
-
96
-
97
-
98
-
99
-
100
-
101
-
102
-
103
-
104
-
105
-
106
-
107
-
108
-
109
-
110
-
111
-
112
-
113
-
114
-
115
-
116
-
117
-
118
-
119
-
120
-
121
-
122
-
123
-
124
-
125
-
126
-
127
-
128
-
129
-
130
-
131
-
132
-
133
-
134
-
135
-
136
-
137
-
138
-
139
-
140
-
141
-
142
-
143
-
144
-
145
-
146
-
147
-
148
-
149
-
150
-
151
-
152
-
153
-
154
-
155
-
156
-
157
-
158
-
159
-
160
-
161
-
162
-
163
-
 164
164 -
 165
165 -
 166
166 -
 167
167 -
 168
168 -
 169
169 -
 170
170 -
 171
171 -
 172
172 -
 173
173 -
 174
174 -
175
-
176
-
177
-
178
-
179
-
180
-
181
-
182
-
183
-
184
-
185
-
186
-
187
-
188
-
189
-
190
-
191
-
192
-
193
-
194
-
195
-
196
-
197
-
198
-
199
-
200
-
201
-
202
-
203
-
204
-
205
-
206
-
207
-
208
-
209
-
210
-
211
-
212
-
213
-
214
-
215
-
216
-
217
-
218
-
219
-
220
-
221
-
222
-
223
-
224
-
225
-
226
-
227
-
228
-
229
-
230
-
231
-
232
-
233
-
234
-
235
-
236
-
237
-
238
-
239
-
240
-
241
-
242
-
243
-
244
-
245
-
246
-
247
-
248
-
249
-
250
-
251
-
252
-
253
-
254
-
255
-
256
-
257
-
258
-
259
-
260
-
261
-
262
-
263
-
264
-
265
-
266
-
267
-
268
-
269
-
270
-
271
-
272
-
273
-
274
-
275
-
276
-
277
-
278
-
279
-
280
-
281
-
282
-
283
-
284
-
285
 |
 |
