Bernina Artista 730E User Guide - Page 268
BERNINA artista Embroidery Software, USB Sticks - artista 730 and memory usb stick
 |
View all Bernina Artista 730E manuals
Add to My Manuals
Save this manual to your list of manuals |
Page 268 highlights
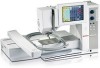
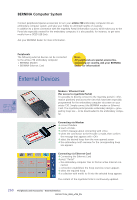
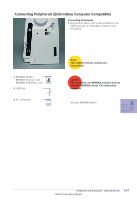
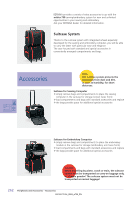
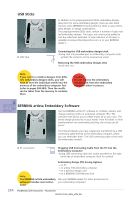
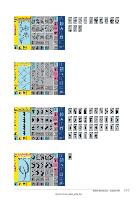
USB Sticks 2 In addition to the preprogrammed OESD embroidery designs data sticks for extra embroidery designs, there are also blank memory sticks (BERNINA Personal Memory Stick) to save embroidery designs or design combinations. The preprogrammed OESD sticks contain a number of topic-related embroidery designs. The topics are continuously added to and the collections extended. A large selection of all topics is available at www.embroideryonline.com or at your BERNINA dealer's. 2 USB Stick Connecting the USB embroidery designs stick ™ plug stick into provided port on embroidery computer (note symbol) the contents can be accessed via screen Removing the USB embroidery designs stick ™ pull stick out Note: If you want to combine designs from different embroidery designs sticks, you will have to save the individual motifs into the memory of the embroidery computer first (refer to pages 248-249). Then the motifs can be taken from the memory to combine them. Caution: Do not remove the embroidery designs stick from the embroidery computer when in process. BERNINA artista Embroidery Software Use the BERNINA artista PC software to combine, extend, and change existing motifs on a personal computer (PC). The software even allows you to create motifs all on your own. The whole design process lies in your hands: from first draft, to final 3 transformation into embroidery stitching, the choices are all yours! The finished designs you have created are transferred via a USB connecting cable directly to the embroidery computer, where you can embroider them. The USB connecting cable comes with the embroidery module. 3 PC connection Plugging USB Connecting Cable from the PC into the Embroidery Computer ™ plug USB connecting cable into socket provided on the right hand side of embroidery computer (look for symbol) 264 Note: The BERNINA artista embroidery software includes user instructions! Embroidery Design (PC) Saving Options • on PC • on artista 730 embroidery computer • on a personal design card • on a BERNINA USB Memory Stick Ask your BERNINA dealer for other accessories for your embroidery computer! Peripherals and Accessories - Accessories
-
 1
1 -
2
-
3
-
4
-
5
-
6
-
7
-
8
-
9
-
10
-
11
-
12
-
13
-
14
-
15
-
16
-
17
-
18
-
19
-
20
-
21
-
22
-
23
-
24
-
25
-
26
-
27
-
28
-
29
-
30
-
31
-
32
-
33
-
34
-
35
-
36
-
37
-
38
-
39
-
40
-
41
-
42
-
43
-
44
-
45
-
46
-
47
-
48
-
49
-
50
-
51
-
52
-
53
-
54
-
55
-
56
-
57
-
58
-
59
-
60
-
61
-
62
-
63
-
64
-
65
-
66
-
67
-
68
-
69
-
70
-
71
-
72
-
73
-
74
-
75
-
76
-
77
-
78
-
79
-
80
-
81
-
82
-
83
-
84
-
85
-
86
-
87
-
88
-
89
-
90
-
91
-
92
-
93
-
94
-
95
-
96
-
97
-
98
-
99
-
100
-
101
-
102
-
103
-
104
-
105
-
106
-
107
-
108
-
109
-
110
-
111
-
112
-
113
-
114
-
115
-
116
-
117
-
118
-
119
-
120
-
121
-
122
-
123
-
124
-
125
-
126
-
127
-
128
-
129
-
130
-
131
-
132
-
133
-
134
-
135
-
136
-
137
-
138
-
139
-
140
-
141
-
142
-
143
-
144
-
145
-
146
-
147
-
148
-
149
-
150
-
151
-
152
-
153
-
154
-
155
-
156
-
157
-
158
-
159
-
160
-
161
-
162
-
163
-
164
-
165
-
166
-
167
-
168
-
169
-
170
-
171
-
172
-
173
-
174
-
175
-
176
-
177
-
178
-
179
-
180
-
181
-
182
-
183
-
184
-
185
-
186
-
187
-
188
-
189
-
190
-
191
-
192
-
193
-
194
-
195
-
196
-
197
-
198
-
199
-
200
-
201
-
202
-
203
-
204
-
205
-
206
-
207
-
208
-
209
-
210
-
211
-
212
-
213
-
214
-
215
-
216
-
217
-
218
-
219
-
220
-
221
-
222
-
223
-
224
-
225
-
226
-
227
-
228
-
229
-
230
-
231
-
232
-
233
-
234
-
235
-
236
-
237
-
238
-
239
-
240
-
241
-
242
-
243
-
244
-
245
-
246
-
247
-
248
-
249
-
250
-
251
-
252
-
253
-
254
-
255
-
256
-
257
-
258
-
259
-
260
-
261
-
262
-
 263
263 -
 264
264 -
 265
265 -
 266
266 -
 267
267 -
 268
268 -
 269
269 -
 270
270 -
 271
271 -
 272
272 -
 273
273 -
274
-
275
-
276
-
277
-
278
-
279
-
280
-
281
-
282
-
283
-
284
-
285
 |
 |
