Dell Precision T3400 User's Guide - Page 188
About Metal Shields (Present in Some Drive Configurations)
 |
View all Dell Precision T3400 manuals
Add to My Manuals
Save this manual to your list of manuals |
Page 188 highlights
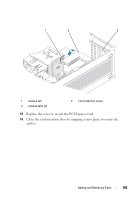
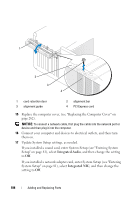
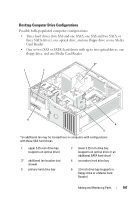
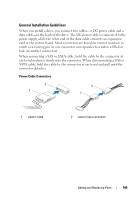
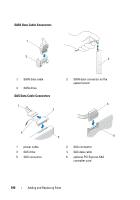
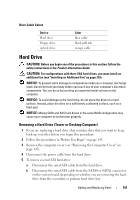
About Metal Shields (Present in Some Drive Configurations) NOTICE: If metal shields are present in your computer configuration, they must be installed at all times while your computer is in use or your computer may not function properly. In certain computer configurations, metal shields are present in the drive bays of your computer. If metal shields are present in your computer configuration, they are essential and must be installed in the appropriate bays at all times. NOTE: If a metal shield is installed over a hard drive in the lower 5.25-inch drive bay, and you install an optical drive in its place, a shield is not needed in that bay; however, the metal shield should be kept in case it is needed later. If you remove a hard drive, optical drive, media card reader, or floppy drive from your computer, install a metal shield in its place. If a metal shield is not installed in any of these cases, your computer may not function properly. Contact Dell if you need an extra shield (see "Contacting Dell" on page 269). Removing and Replacing the Metal Shield (Lower Drive Bays) TO REMOVE A METAL SHIELD FROM A LOWER DRIVE BAY: Slide the sliding-plate lever to the right and hold it in place as you pull to remove the vented metal insert from the drive bay. TO REPLACE A METAL SHIELD OVER A LOWER DRIVE BAY: 1 Align the metal insert's two upper screws and two lower screws with the corresponding slots inside the FlexBay. 2 Push the vented metal insert until it clicks into place and its metal tabs rest flush against the chassis surface. Removing and Replacing the Metal Shield (Upper Drive Bays) TO REMOVE A METAL SHIELD FROM AN UPPER DRIVE BAY: 1 Grasp tab located in the front-center of the metal shield. 2 Pull the shield out by the tab in a straight motion to avoid tearing the tab from the shield. TO REPLACE A METAL SHIELD OVER AN UPPER DRIVE BAY: Align the shield so that it fits snugly with the drive bay and press in gently until the shield is flush with the surface of the bay. 188 Adding and Replacing Parts
-
 1
1 -
2
-
3
-
4
-
5
-
6
-
7
-
8
-
9
-
10
-
11
-
12
-
13
-
14
-
15
-
16
-
17
-
18
-
19
-
20
-
21
-
22
-
23
-
24
-
25
-
26
-
27
-
28
-
29
-
30
-
31
-
32
-
33
-
34
-
35
-
36
-
37
-
38
-
39
-
40
-
41
-
42
-
43
-
44
-
45
-
46
-
47
-
48
-
49
-
50
-
51
-
52
-
53
-
54
-
55
-
56
-
57
-
58
-
59
-
60
-
61
-
62
-
63
-
64
-
65
-
66
-
67
-
68
-
69
-
70
-
71
-
72
-
73
-
74
-
75
-
76
-
77
-
78
-
79
-
80
-
81
-
82
-
83
-
84
-
85
-
86
-
87
-
88
-
89
-
90
-
91
-
92
-
93
-
94
-
95
-
96
-
97
-
98
-
99
-
100
-
101
-
102
-
103
-
104
-
105
-
106
-
107
-
108
-
109
-
110
-
111
-
112
-
113
-
114
-
115
-
116
-
117
-
118
-
119
-
120
-
121
-
122
-
123
-
124
-
125
-
126
-
127
-
128
-
129
-
130
-
131
-
132
-
133
-
134
-
135
-
136
-
137
-
138
-
139
-
140
-
141
-
142
-
143
-
144
-
145
-
146
-
147
-
148
-
149
-
150
-
151
-
152
-
153
-
154
-
155
-
156
-
157
-
158
-
159
-
160
-
161
-
162
-
163
-
164
-
165
-
166
-
167
-
168
-
169
-
170
-
171
-
172
-
173
-
174
-
175
-
176
-
177
-
178
-
179
-
180
-
181
-
182
-
 183
183 -
 184
184 -
 185
185 -
 186
186 -
 187
187 -
 188
188 -
 189
189 -
 190
190 -
 191
191 -
 192
192 -
 193
193 -
194
-
195
-
196
-
197
-
198
-
199
-
200
-
201
-
202
-
203
-
204
-
205
-
206
-
207
-
208
-
209
-
210
-
211
-
212
-
213
-
214
-
215
-
216
-
217
-
218
-
219
-
220
-
221
-
222
-
223
-
224
-
225
-
226
-
227
-
228
-
229
-
230
-
231
-
232
-
233
-
234
-
235
-
236
-
237
-
238
-
239
-
240
-
241
-
242
-
243
-
244
-
245
-
246
-
247
-
248
-
249
-
250
-
251
-
252
-
253
-
254
-
255
-
256
-
257
-
258
-
259
-
260
-
261
-
262
-
263
-
264
-
265
-
266
-
267
-
268
-
269
-
270
-
271
-
272
-
273
-
274
-
275
-
276
-
277
-
278
-
279
-
280
-
281
-
282
-
283
-
284
-
285
-
286
-
287
-
288
-
289
-
290
 |
 |
