Dell Precision T3400 User's Guide - Page 61
Setting Up Your Computer, Changing Between Tower and Desktop Orientations
 |
View all Dell Precision T3400 manuals
Add to My Manuals
Save this manual to your list of manuals |
Page 61 highlights
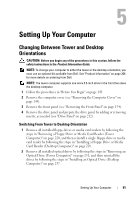
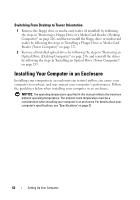
Setting Up Your Computer Changing Between Tower and Desktop Orientations CAUTION: Before you begin any of the procedures in this section, follow the safety instructions in the Product Information Guide. NOTE: To change your computer to either the tower or the desktop orientation, you must use an optional kit available from Dell. See "Product Information" on page 266 for more details on ordering from Dell. NOTE: The tower computer supports one more 3.5-inch drive in the front than does the desktop computer. 1 Follow the procedures in "Before You Begin" on page 143. 2 Remove the computer cover (see "Removing the Computer Cover" on page 145). 3 Remove the front panel (see "Removing the Front Panel" on page 154). 4 Remove the drive panel and prepare the drive panel by adding or removing inserts, as needed (see "Drive Panel" on page 212). Switching From Tower to Desktop Orientation 1 Remove all installed floppy drives or media card readers by following the steps in "Removing a Floppy Drive or Media Card Reader (Tower Computer)" on page 220, and then reinstall a single floppy drive or media card reader by following the steps in "Installing a Floppy Drive or Media Card Reader (Desktop Computer)" on page 228. 2 Remove all installed optical drives by following the steps in "Removing an Optical Drive (Tower Computer)" on page 231, and then reinstall the drives by following the steps in "Installing an Optical Drive (Desktop Computer)" on page 237. Setting Up Your Computer 61
-
 1
1 -
2
-
3
-
4
-
5
-
6
-
7
-
8
-
9
-
10
-
11
-
12
-
13
-
14
-
15
-
16
-
17
-
18
-
19
-
20
-
21
-
22
-
23
-
24
-
25
-
26
-
27
-
28
-
29
-
30
-
31
-
32
-
33
-
34
-
35
-
36
-
37
-
38
-
39
-
40
-
41
-
42
-
43
-
44
-
45
-
46
-
47
-
48
-
49
-
50
-
51
-
52
-
53
-
54
-
55
-
 56
56 -
 57
57 -
 58
58 -
 59
59 -
 60
60 -
 61
61 -
 62
62 -
 63
63 -
 64
64 -
 65
65 -
 66
66 -
67
-
68
-
69
-
70
-
71
-
72
-
73
-
74
-
75
-
76
-
77
-
78
-
79
-
80
-
81
-
82
-
83
-
84
-
85
-
86
-
87
-
88
-
89
-
90
-
91
-
92
-
93
-
94
-
95
-
96
-
97
-
98
-
99
-
100
-
101
-
102
-
103
-
104
-
105
-
106
-
107
-
108
-
109
-
110
-
111
-
112
-
113
-
114
-
115
-
116
-
117
-
118
-
119
-
120
-
121
-
122
-
123
-
124
-
125
-
126
-
127
-
128
-
129
-
130
-
131
-
132
-
133
-
134
-
135
-
136
-
137
-
138
-
139
-
140
-
141
-
142
-
143
-
144
-
145
-
146
-
147
-
148
-
149
-
150
-
151
-
152
-
153
-
154
-
155
-
156
-
157
-
158
-
159
-
160
-
161
-
162
-
163
-
164
-
165
-
166
-
167
-
168
-
169
-
170
-
171
-
172
-
173
-
174
-
175
-
176
-
177
-
178
-
179
-
180
-
181
-
182
-
183
-
184
-
185
-
186
-
187
-
188
-
189
-
190
-
191
-
192
-
193
-
194
-
195
-
196
-
197
-
198
-
199
-
200
-
201
-
202
-
203
-
204
-
205
-
206
-
207
-
208
-
209
-
210
-
211
-
212
-
213
-
214
-
215
-
216
-
217
-
218
-
219
-
220
-
221
-
222
-
223
-
224
-
225
-
226
-
227
-
228
-
229
-
230
-
231
-
232
-
233
-
234
-
235
-
236
-
237
-
238
-
239
-
240
-
241
-
242
-
243
-
244
-
245
-
246
-
247
-
248
-
249
-
250
-
251
-
252
-
253
-
254
-
255
-
256
-
257
-
258
-
259
-
260
-
261
-
262
-
263
-
264
-
265
-
266
-
267
-
268
-
269
-
270
-
271
-
272
-
273
-
274
-
275
-
276
-
277
-
278
-
279
-
280
-
281
-
282
-
283
-
284
-
285
-
286
-
287
-
288
-
289
-
290
 |
 |
