HP J5780 User Guide - Macintosh - Page 70
Load envelopes, Avoid paper jams - windows 10
 |
UPC - 882780940253
View all HP J5780 manuals
Add to My Manuals
Save this manual to your list of manuals |
Page 70 highlights
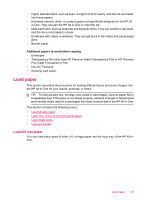
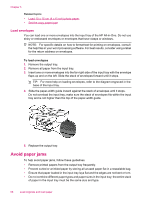
Chapter 5 Related topics • Load 10 x 15 cm (4 x 6 inch) photo paper • Set the copy paper type Load envelopes You can load one or more envelopes into the input tray of the HP All-in-One. Do not use shiny or embossed envelopes or envelopes that have clasps or windows. NOTE: For specific details on how to format text for printing on envelopes, consult the help files in your word processing software. For best results, consider using a label for the return address on envelopes. To load envelopes 1. Remove the output tray. 2. Remove all paper from the input tray. 3. Insert one or more envelopes into the far-right side of the input tray with the envelope flaps up and on the left. Slide the stack of envelopes forward until it stops. TIP: For more help on loading envelopes, refer to the diagram engraved in the base of the input tray. 4. Slide the paper-width guide inward against the stack of envelopes until it stops. Do not overload the input tray; make sure the stack of envelopes fits within the input tray and is not higher than the top of the paper-width guide. 5. Replace the output tray. Avoid paper jams To help avoid paper jams, follow these guidelines. • Remove printed papers from the output tray frequently. • Prevent curled or wrinkled paper by storing all unused paper flat in a resealable bag. • Ensure that paper loaded in the input tray lays flat and the edges are not bent or torn. • Do not combine different paper types and paper sizes in the input tray; the entire stack of paper in the input tray must be the same size and type. 68 Load originals and load paper
-
 1
1 -
2
-
3
-
4
-
5
-
6
-
7
-
8
-
9
-
10
-
11
-
12
-
13
-
14
-
15
-
16
-
17
-
18
-
19
-
20
-
21
-
22
-
23
-
24
-
25
-
26
-
27
-
28
-
29
-
30
-
31
-
32
-
33
-
34
-
35
-
36
-
37
-
38
-
39
-
40
-
41
-
42
-
43
-
44
-
45
-
46
-
47
-
48
-
49
-
50
-
51
-
52
-
53
-
54
-
55
-
56
-
57
-
58
-
59
-
60
-
61
-
62
-
63
-
64
-
 65
65 -
 66
66 -
 67
67 -
 68
68 -
 69
69 -
 70
70 -
 71
71 -
 72
72 -
 73
73 -
 74
74 -
 75
75 -
76
-
77
-
78
-
79
-
80
-
81
-
82
-
83
-
84
-
85
-
86
-
87
-
88
-
89
-
90
-
91
-
92
-
93
-
94
-
95
-
96
-
97
-
98
-
99
-
100
-
101
-
102
-
103
-
104
-
105
-
106
-
107
-
108
-
109
-
110
-
111
-
112
-
113
-
114
-
115
-
116
-
117
-
118
-
119
-
120
-
121
-
122
-
123
-
124
-
125
-
126
-
127
-
128
-
129
-
130
-
131
-
132
-
133
-
134
-
135
-
136
-
137
-
138
-
139
-
140
-
141
-
142
-
143
-
144
-
145
-
146
-
147
-
148
-
149
-
150
-
151
-
152
-
153
-
154
-
155
-
156
-
157
-
158
-
159
-
160
-
161
-
162
-
163
-
164
-
165
-
166
-
167
-
168
-
169
-
170
-
171
-
172
-
173
-
174
-
175
-
176
-
177
-
178
-
179
-
180
-
181
-
182
-
183
-
184
-
185
-
186
-
187
-
188
-
189
-
190
-
191
-
192
-
193
-
194
-
195
-
196
-
197
-
198
-
199
-
200
-
201
-
202
-
203
-
204
-
205
-
206
-
207
-
208
-
209
-
210
-
211
-
212
-
213
-
214
-
215
-
216
-
217
-
218
-
219
-
220
-
221
-
222
-
223
-
224
-
225
-
226
-
227
-
228
-
229
-
230
-
231
-
232
-
233
-
234
-
235
-
236
-
237
-
238
-
239
-
240
-
241
-
242
-
243
-
244
-
245
-
246
-
247
-
248
-
249
-
250
-
251
-
252
-
253
-
254
-
255
-
256
-
257
-
258
-
259
-
260
-
261
-
262
-
263
-
264
-
265
-
266
-
267
-
268
-
269
-
270
-
271
-
272
-
273
-
274
-
275
-
276
-
277
-
278
-
279
-
280
-
281
-
282
-
283
-
284
-
285
-
286
-
287
-
288
-
289
-
290
-
291
-
292
-
293
-
294
-
295
-
296
 |
 |