Samsung GT-P3113 User Manual Ver.ld3_f3 (English(north America)) - Page 68
Email, Exchange ActiveSync - review
 |
View all Samsung GT-P3113 manuals
Add to My Manuals
Save this manual to your list of manuals |
Page 68 highlights
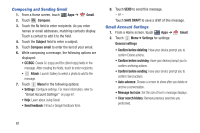
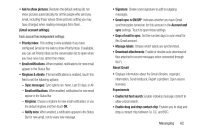
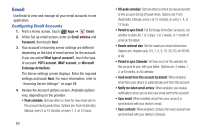
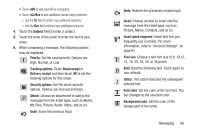
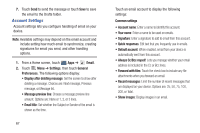
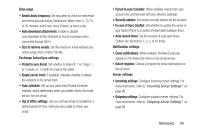
Email Use Email to view and manage all your email accounts in one application. Configuring Email Accounts 1. From a Home screen, touch Apps ➔ Email. 2. At the Set up email screen, enter an Email address and Password, then touch Next. 3. Your account's incoming server settings are different depending on the kind of email service for the account. If you are asked What type of account?, touch the type of account: POP3 account, IMAP account, or Microsoft Exchange ActiveSync. The Server settings screen displays. Enter the required settings and touch Next. For more information, refer to "Incoming Server Settings" on page 69. 4. Review the Account options screen. Available options vary, depending on the provider: • Peak schedule: Set how often to check for new email sent to this account during peak times. Options are: Push (Automatic), Manual, every 5 or 15 minutes, or every 1, 4, or 12 hours. 63 • Off-peak schedule: Set how often to check for new email sent to this account during off-peak times. Options are: Push (Automatic), Manual, every 5 or 15 minutes, or every 1, 4, or 12 hours. • Period to sync Email: For Exchange ActiveSync accounts, set whether to store All, 1 or 3 days, 1 or 2 weeks, or 1 month of email on the tablet. • Emails retrieval size: Set the maximum email retrieval size. Options are: Headers only, 0.5, 1, 2, 5, 10, 20, 50, or100 KB, or All. • Period to sync Calendar: Set how much of the calendar for this account to sync with your tablet. Options are: 2 weeks, 1, 3, or 6 months, or All calendar. • Send email from this account by default: When enabled, email from your device is automatically sent from this account. • Notify me when email arrives: When enabled, you receive notifications when you receive new email sent to this account. • Sync email: When enabled, email from your account is synchronized with your device's email. • Sync contacts: When enabled, contacts from your account are synchronized with your device's Contacts.
-
 1
1 -
2
-
3
-
4
-
5
-
6
-
7
-
8
-
9
-
10
-
11
-
12
-
13
-
14
-
15
-
16
-
17
-
18
-
19
-
20
-
21
-
22
-
23
-
24
-
25
-
26
-
27
-
28
-
29
-
30
-
31
-
32
-
33
-
34
-
35
-
36
-
37
-
38
-
39
-
40
-
41
-
42
-
43
-
44
-
45
-
46
-
47
-
48
-
49
-
50
-
51
-
52
-
53
-
54
-
55
-
56
-
57
-
58
-
59
-
60
-
61
-
62
-
 63
63 -
 64
64 -
 65
65 -
 66
66 -
 67
67 -
 68
68 -
 69
69 -
 70
70 -
 71
71 -
 72
72 -
 73
73 -
74
-
75
-
76
-
77
-
78
-
79
-
80
-
81
-
82
-
83
-
84
-
85
-
86
-
87
-
88
-
89
-
90
-
91
-
92
-
93
-
94
-
95
-
96
-
97
-
98
-
99
-
100
-
101
-
102
-
103
-
104
-
105
-
106
-
107
-
108
-
109
-
110
-
111
-
112
-
113
-
114
-
115
-
116
-
117
-
118
-
119
-
120
-
121
-
122
-
123
-
124
-
125
-
126
-
127
-
128
-
129
-
130
-
131
-
132
-
133
-
134
-
135
-
136
-
137
-
138
-
139
-
140
-
141
-
142
-
143
-
144
-
145
-
146
-
147
-
148
-
149
-
150
-
151
-
152
-
153
-
154
-
155
-
156
-
157
-
158
-
159
-
160
-
161
-
162
-
163
-
164
-
165
-
166
-
167
-
168
-
169
-
170
-
171
-
172
-
173
-
174
-
175
-
176
-
177
-
178
-
179
-
180
-
181
-
182
-
183
-
184
-
185
-
186
-
187
-
188
-
189
-
190
-
191
-
192
-
193
-
194
-
195
-
196
-
197
-
198
-
199
-
200
-
201
-
202
-
203
-
204
-
205
-
206
-
207
-
208
-
209
-
210
-
211
-
212
-
213
-
214
-
215
-
216
-
217
-
218
-
219
-
220
-
221
-
222
-
223
-
224
-
225
-
226
 |
 |