Dell PowerConnect W-IAP92 Dell Instant 6.2.0.0-3.2.0.0 User Guide - Page 129
Configuring External Captive Portal Authentication when Editing a Guest Network
 |
View all Dell PowerConnect W-IAP92 manuals
Add to My Manuals
Save this manual to your list of manuals |
Page 129 highlights
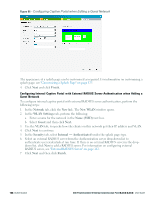
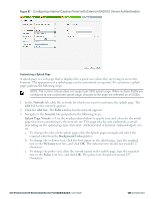
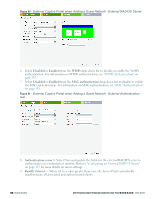
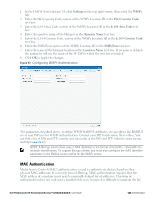
10. Blacklisting- Select Enabled to enable blacklisting of the clients with a specific number of authentication failures. 11. Max authentication failures- Users who fail to authenticate the number of times specified here are dynamically blacklisted. The maximum value for this entry is 10. Navigate to PEF > Blacklisting in the Dell W-Series Instant UI to specify the duration of the blacklisting on the Blacklisting tab of the PEF window. 12. Walled garden - Click on the link to open the Walled Garden window. The walled garden directs the user's navigation within particular areas to allow access to a selection of websites or prevent access to other websites. For more information, see "Walled Garden Access" on page 134. 13. Click Next to continue and then click Finish. Configuring External Captive Portal Authentication when Editing a Guest Network To configure external captive portal authentication when editing a guest network, perform the following steps: 1. In the Network tab, click the network for which you want to configure the external captive portal authentication. The edit link for the network appears. 2. Click the edit link. The Edit window for the network appears. 3. Navigate to the Security tab and perform the following steps: 4. Select External - RADIUS Server or External - Authentication Text from the Splash page type drop down list. 5. Use the fields below to specify/edit the server for this guest network's splash page. Splash page type - External - Authentication Text a. Reauth interval - When set to a value greater than zero, the Access Points periodically reauthenticate all associated and authenticated clients. b. Blacklisting-Select Enabled to enable blacklisting of the clients with a specific number of authentication failures. c. Max authentication failures- Users who fail to authenticate the number of times specified here are dynamically blacklisted. The maximum value for this entry is 10. Navigate to PEF > Blacklisting in the Dell W-Series Instant UI to specify the duration of the blacklisting on the Blacklisting tab of the PEF window. d. Walled Garden- Click on the link to open the Walled Garden window. The walled garden directs the user's navigation within particular areas to allow access to a selection of websites or prevent access to other websites. For more information, see "Walled Garden Access" on page 134. e. Encryption- Select Enabled from the drop-down list and perform the following steps (these steps are optional). Select the required key management option from the Key management drop-down list. Available options are: n WPA-2 Personal n WPA Personal n Both (WPA-2 & WPA) n Passphrase format - Specify either an alphanumeric or a hexadecimal string. Ensure that the hexadecimal string must be exactly 64 digits in length. n Passphrase - Enter a pre-shared key (PSK) passphrase. External splash page Dell PowerConnect W-Series Instant Access Point 6.2.0.0-3.2.0.0 | User Guide 129 | Authentication
-
 1
1 -
2
-
3
-
4
-
5
-
6
-
7
-
8
-
9
-
10
-
11
-
12
-
13
-
14
-
15
-
16
-
17
-
18
-
19
-
20
-
21
-
22
-
23
-
24
-
25
-
26
-
27
-
28
-
29
-
30
-
31
-
32
-
33
-
34
-
35
-
36
-
37
-
38
-
39
-
40
-
41
-
42
-
43
-
44
-
45
-
46
-
47
-
48
-
49
-
50
-
51
-
52
-
53
-
54
-
55
-
56
-
57
-
58
-
59
-
60
-
61
-
62
-
63
-
64
-
65
-
66
-
67
-
68
-
69
-
70
-
71
-
72
-
73
-
74
-
75
-
76
-
77
-
78
-
79
-
80
-
81
-
82
-
83
-
84
-
85
-
86
-
87
-
88
-
89
-
90
-
91
-
92
-
93
-
94
-
95
-
96
-
97
-
98
-
99
-
100
-
101
-
102
-
103
-
104
-
105
-
106
-
107
-
108
-
109
-
110
-
111
-
112
-
113
-
114
-
115
-
116
-
117
-
118
-
119
-
120
-
121
-
122
-
123
-
 124
124 -
 125
125 -
 126
126 -
 127
127 -
 128
128 -
 129
129 -
 130
130 -
 131
131 -
 132
132 -
 133
133 -
 134
134 -
135
-
136
-
137
-
138
-
139
-
140
-
141
-
142
-
143
-
144
-
145
-
146
-
147
-
148
-
149
-
150
-
151
-
152
-
153
-
154
-
155
-
156
-
157
-
158
-
159
-
160
-
161
-
162
-
163
-
164
-
165
-
166
-
167
-
168
-
169
-
170
-
171
-
172
-
173
-
174
-
175
-
176
-
177
-
178
-
179
-
180
-
181
-
182
-
183
-
184
-
185
-
186
-
187
-
188
-
189
-
190
-
191
-
192
-
193
-
194
-
195
-
196
-
197
-
198
-
199
-
200
-
201
-
202
-
203
-
204
-
205
-
206
-
207
-
208
-
209
-
210
-
211
-
212
-
213
-
214
-
215
-
216
-
217
-
218
-
219
-
220
-
221
-
222
-
223
-
224
-
225
-
226
-
227
-
228
-
229
-
230
-
231
-
232
-
233
-
234
-
235
-
236
-
237
-
238
-
239
-
240
-
241
-
242
-
243
-
244
-
245
-
246
-
247
-
248
-
249
-
250
-
251
-
252
-
253
-
254
-
255
-
256
-
257
-
258
-
259
-
260
-
261
-
262
-
263
-
264
-
265
-
266
-
267
-
268
-
269
-
270
-
271
-
272
-
273
-
274
-
275
-
276
-
277
-
278
-
279
-
280
-
281
-
282
-
283
-
284
-
285
-
286
-
287
-
288
-
289
-
290
-
291
-
292
-
293
-
294
-
295
-
296
 |
 |