Dell PowerConnect W-IAP92 Dell Instant 6.2.0.0-3.2.0.0 User Guide - Page 132
WISPr Authentication, Configuring WISPr Authentication
 |
View all Dell PowerConnect W-IAP92 manuals
Add to My Manuals
Save this manual to your list of manuals |
Page 132 highlights
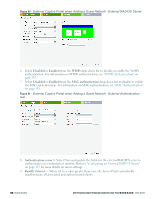
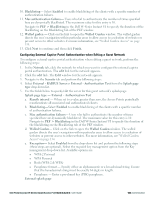
a. Enter the IP address of the ClearPass Guest server in the IP or hostname field. The IP address is 10.65.77.245. b. Enter /page_name.php in the URL field. This URL must correspond to the Page Name configured in the ClearPass Guest RADIUS Web Login page. For example, if the Page Name is Dell, then the URL should be /Dell.php in the Instant UI. c. Enter the Port number (generally should be 80). The ClearPass Guest server uses this port for HTTP services. d. To create an external RADIUS server, select New from the Authentication server 1 dropdown list. Refer to "Configuring an External RADIUS Server" on page 113 for information on the new RADIUS server parameters. 7. The new network appears in the Networks tab. Click the wireless network icon on your desktop and select the new network. 8. Open any browser and type any URL. Instant redirects the URL to ClearPass Guest login page. 9. Log in to the network with the username and password specified used while configuring the RADIUS server in Step d. WISPr Authentication Wireless Internet Service Provider roaming (WISPr) authentication allows a smart client to authenticate on the network when they roam between wireless Internet service providers, even if the wireless hotspot uses an Internet Service Provider (ISP) with whom the client may not have an account. If you are a hotspot operator using WISPr authentication and a client that has an account with your ISP attempts to access the Internet at your hotspot, then your ISP's WISPr AAA server authenticates that client directly and allows the client access on the network. If the client only has an account with a partner ISP, then your ISP's WISPr AAA server forwards that client's credentials to the partner ISP's WISPr AAA server for authentication. When the client is authenticated on the partner ISP, it is also authenticated on your hotspot's own ISP as per their service agreements. The W-IAP assigns the default WISPr user role to the client when your ISP sends an authentication message to the W-IAP. Instant supports the following smart clients: l iPass l Boingo These smart clients enable client authentication and roaming between hotspots by embedding iPass Generic Interface Specification (GIS) redirect, authentication, and logoff messages within HTML messages that are sent to the W-IAP. Configuring WISPr Authentication To configure WISPr authentication: NOTE: The following two types of WISPr authentication are supported: - Internal - Authenticated - External - RADIUS Server Select the Internal - Authenticated or the External - RADIUS Server option from the Splash page type drop down before you configure WISPr authentication. 132 | Authentication Dell PowerConnect W-Series Instant Access Point 6.2.0.0-3.2.0.0 | User Guide
-
 1
1 -
2
-
3
-
4
-
5
-
6
-
7
-
8
-
9
-
10
-
11
-
12
-
13
-
14
-
15
-
16
-
17
-
18
-
19
-
20
-
21
-
22
-
23
-
24
-
25
-
26
-
27
-
28
-
29
-
30
-
31
-
32
-
33
-
34
-
35
-
36
-
37
-
38
-
39
-
40
-
41
-
42
-
43
-
44
-
45
-
46
-
47
-
48
-
49
-
50
-
51
-
52
-
53
-
54
-
55
-
56
-
57
-
58
-
59
-
60
-
61
-
62
-
63
-
64
-
65
-
66
-
67
-
68
-
69
-
70
-
71
-
72
-
73
-
74
-
75
-
76
-
77
-
78
-
79
-
80
-
81
-
82
-
83
-
84
-
85
-
86
-
87
-
88
-
89
-
90
-
91
-
92
-
93
-
94
-
95
-
96
-
97
-
98
-
99
-
100
-
101
-
102
-
103
-
104
-
105
-
106
-
107
-
108
-
109
-
110
-
111
-
112
-
113
-
114
-
115
-
116
-
117
-
118
-
119
-
120
-
121
-
122
-
123
-
124
-
125
-
126
-
 127
127 -
 128
128 -
 129
129 -
 130
130 -
 131
131 -
 132
132 -
 133
133 -
 134
134 -
 135
135 -
 136
136 -
 137
137 -
138
-
139
-
140
-
141
-
142
-
143
-
144
-
145
-
146
-
147
-
148
-
149
-
150
-
151
-
152
-
153
-
154
-
155
-
156
-
157
-
158
-
159
-
160
-
161
-
162
-
163
-
164
-
165
-
166
-
167
-
168
-
169
-
170
-
171
-
172
-
173
-
174
-
175
-
176
-
177
-
178
-
179
-
180
-
181
-
182
-
183
-
184
-
185
-
186
-
187
-
188
-
189
-
190
-
191
-
192
-
193
-
194
-
195
-
196
-
197
-
198
-
199
-
200
-
201
-
202
-
203
-
204
-
205
-
206
-
207
-
208
-
209
-
210
-
211
-
212
-
213
-
214
-
215
-
216
-
217
-
218
-
219
-
220
-
221
-
222
-
223
-
224
-
225
-
226
-
227
-
228
-
229
-
230
-
231
-
232
-
233
-
234
-
235
-
236
-
237
-
238
-
239
-
240
-
241
-
242
-
243
-
244
-
245
-
246
-
247
-
248
-
249
-
250
-
251
-
252
-
253
-
254
-
255
-
256
-
257
-
258
-
259
-
260
-
261
-
262
-
263
-
264
-
265
-
266
-
267
-
268
-
269
-
270
-
271
-
272
-
273
-
274
-
275
-
276
-
277
-
278
-
279
-
280
-
281
-
282
-
283
-
284
-
285
-
286
-
287
-
288
-
289
-
290
-
291
-
292
-
293
-
294
-
295
-
296
 |
 |
