Dell PowerConnect W-IAP92 Dell Instant 6.2.0.0-3.2.0.0 User Guide - Page 286
VPN Configuration, Creating a W-IAP Whitelist, Controller Whitelist DB, External Whitelist DB
 |
View all Dell PowerConnect W-IAP92 manuals
Add to My Manuals
Save this manual to your list of manuals |
Page 286 highlights
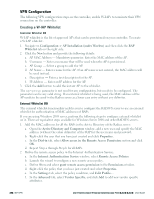
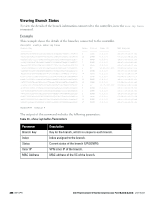
VPN Configuration The following VPN configuration steps on the controller, enable W-IAPs to terminate their VPN connection on the controller: Creating a W-IAP Whitelist Controller Whitelist DB W-IAP whitelist is the list of approved AP's that can be provisioned on your controller. To create a W-IAP whitelist: 1. Navigate to Configuration > AP Installation (under Wireless) and then click the RAP Whitelist tab on the right side. 2. Click the New button and provide the following details: a. AP MAC Address - Mandatory parameter. Enter the MAC address of the AP. b. Username - Enter a username that will be used when the AP is provisioned. c. AP Group - Select a group to add the AP. d. AP Name - Enter a name for the AP. If an AP name is not entered, the MAC address will be used instead. e. Description - Enter a text description for the AP. f. IP-Address - Enter an IP address for the AP. 3. Click the Add button to add the instant AP to the whitelist. The ap-group parameter is not used for any configuration, but needs to be configured. The parameter can be any valid string. If an external whitelist is being used, the MAC address of the AP needs to be saved in the Radius server as a lower case entry without any delimiter. External Whitelist DB The external whitelist functionality enables you to configure the RADIUS server to use an external whitelist for authentication of MAC addresses of RAPs. If you are using Windows 2003 server, perform the following steps to configure external whitelist on it. There are equivalent steps available for Windows Server 2008 and other RADIUS servers. 1. Add the MAC addresses for all the RAPs in the Active Directory of the Radius server: a. Open the Active Directory and Computers window, add a new user and specify the MAC address (without the colon delimiter) of the RAP for the user name and password. b. Right-click the user that you have just created and click Properties. c. In the Dial-in tab, select Allow access in the Remote Access Permission section and click OK. d. Repeat Step a through Step b for all RAPs. 2. Define the remote access policy in the Internet Authentication Service: a. In the Internet Authentication Service window, select Remote Access Policies. b. Launch the wizard to configure a new remote access policy. c. Define filters and select grant remote access permission in the Permissions window. d. Right-click the policy that you have just created and select Properties. e. In the Settings tab, select the policy condition, and Edit Profile.... f. In the Advanced tab, select Vendor Specific, and click Add to add new vendor specific attributes. 286 | IAP-VPN Dell PowerConnect W-Series Instant Access Point 6.2.0.0-3.2.0.0 | User Guide
-
 1
1 -
2
-
3
-
4
-
5
-
6
-
7
-
8
-
9
-
10
-
11
-
12
-
13
-
14
-
15
-
16
-
17
-
18
-
19
-
20
-
21
-
22
-
23
-
24
-
25
-
26
-
27
-
28
-
29
-
30
-
31
-
32
-
33
-
34
-
35
-
36
-
37
-
38
-
39
-
40
-
41
-
42
-
43
-
44
-
45
-
46
-
47
-
48
-
49
-
50
-
51
-
52
-
53
-
54
-
55
-
56
-
57
-
58
-
59
-
60
-
61
-
62
-
63
-
64
-
65
-
66
-
67
-
68
-
69
-
70
-
71
-
72
-
73
-
74
-
75
-
76
-
77
-
78
-
79
-
80
-
81
-
82
-
83
-
84
-
85
-
86
-
87
-
88
-
89
-
90
-
91
-
92
-
93
-
94
-
95
-
96
-
97
-
98
-
99
-
100
-
101
-
102
-
103
-
104
-
105
-
106
-
107
-
108
-
109
-
110
-
111
-
112
-
113
-
114
-
115
-
116
-
117
-
118
-
119
-
120
-
121
-
122
-
123
-
124
-
125
-
126
-
127
-
128
-
129
-
130
-
131
-
132
-
133
-
134
-
135
-
136
-
137
-
138
-
139
-
140
-
141
-
142
-
143
-
144
-
145
-
146
-
147
-
148
-
149
-
150
-
151
-
152
-
153
-
154
-
155
-
156
-
157
-
158
-
159
-
160
-
161
-
162
-
163
-
164
-
165
-
166
-
167
-
168
-
169
-
170
-
171
-
172
-
173
-
174
-
175
-
176
-
177
-
178
-
179
-
180
-
181
-
182
-
183
-
184
-
185
-
186
-
187
-
188
-
189
-
190
-
191
-
192
-
193
-
194
-
195
-
196
-
197
-
198
-
199
-
200
-
201
-
202
-
203
-
204
-
205
-
206
-
207
-
208
-
209
-
210
-
211
-
212
-
213
-
214
-
215
-
216
-
217
-
218
-
219
-
220
-
221
-
222
-
223
-
224
-
225
-
226
-
227
-
228
-
229
-
230
-
231
-
232
-
233
-
234
-
235
-
236
-
237
-
238
-
239
-
240
-
241
-
242
-
243
-
244
-
245
-
246
-
247
-
248
-
249
-
250
-
251
-
252
-
253
-
254
-
255
-
256
-
257
-
258
-
259
-
260
-
261
-
262
-
263
-
264
-
265
-
266
-
267
-
268
-
269
-
270
-
271
-
272
-
273
-
274
-
275
-
276
-
277
-
278
-
279
-
280
-
 281
281 -
 282
282 -
 283
283 -
 284
284 -
 285
285 -
 286
286 -
 287
287 -
 288
288 -
 289
289 -
 290
290 -
 291
291 -
292
-
293
-
294
-
295
-
296
 |
 |
