Dell PowerConnect W-IAP92 Dell Instant 6.2.0.0-3.2.0.0 User Guide - Page 146
Enforce Machine Authentication, Assign pre-authentication role
 |
View all Dell PowerConnect W-IAP92 manuals
Add to My Manuals
Save this manual to your list of manuals |
Page 146 highlights
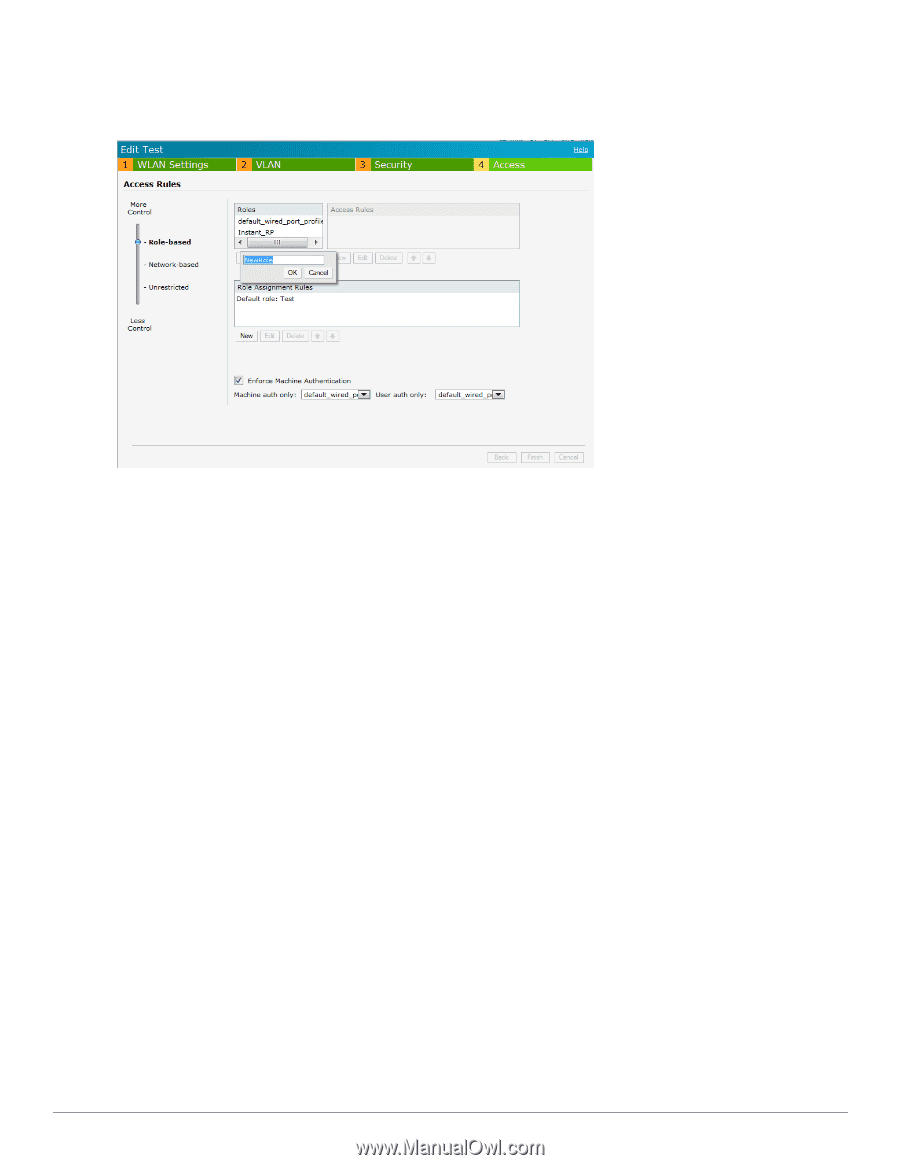
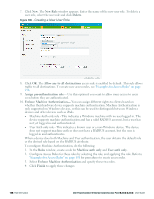
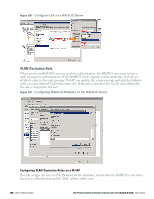
7. Click New. The New Rule window appears. Enter the name of the new user role. To delete a user role, select the user role and click Delete. Figure 106 - Creating a New User Role 8. Click OK. The Allow any to all destinations access rule is enabled by default. This rule allows traffic to all destinations. To create new access rules, see "Examples for Access Rules" on page 158. 9. Assign pre-authentication role- Use this option if you want to allow some access to users even before they are authenticated. 10. Enforce Machine Authentication- You can assign different rights to clients based on whether their hardware device supports machine authentication. Machine Authentication is only supported on Windows devices, so this can be used to distinguish between Windows devices and other devices such as iPads. n Machine Auth only role - This indicates a Windows machine with no user logged in. The device supports machine authentication and has a valid RADIUS account, but a user has not yet logged in and authenticated. n User Auth only role - This indicates a known user or a non-Windows device. The device does not support machine auth or does not have a RADIUS account, but the user is logged in and authenticates. When a device does both Machine and User authentication, the user obtains the default role or the derived role based on the RADIUS attribute. To configure Machine Authentication, do the following: 1. In the Roles window, create a role for Machine auth only and User auth only. 2. Configure Access Rules for these roles by selecting the role, and applying the rule. Refer to "Examples for Access Rules" on page 158 for procedures to create access rules. 3. Select Enforce Machine Authentication and specify these two roles. 4. Click Finish to apply these changes. 146 | Role Derivation Dell PowerConnect W-Series Instant Access Point 6.2.0.0-3.2.0.0 | User Guide
-
 1
1 -
2
-
3
-
4
-
5
-
6
-
7
-
8
-
9
-
10
-
11
-
12
-
13
-
14
-
15
-
16
-
17
-
18
-
19
-
20
-
21
-
22
-
23
-
24
-
25
-
26
-
27
-
28
-
29
-
30
-
31
-
32
-
33
-
34
-
35
-
36
-
37
-
38
-
39
-
40
-
41
-
42
-
43
-
44
-
45
-
46
-
47
-
48
-
49
-
50
-
51
-
52
-
53
-
54
-
55
-
56
-
57
-
58
-
59
-
60
-
61
-
62
-
63
-
64
-
65
-
66
-
67
-
68
-
69
-
70
-
71
-
72
-
73
-
74
-
75
-
76
-
77
-
78
-
79
-
80
-
81
-
82
-
83
-
84
-
85
-
86
-
87
-
88
-
89
-
90
-
91
-
92
-
93
-
94
-
95
-
96
-
97
-
98
-
99
-
100
-
101
-
102
-
103
-
104
-
105
-
106
-
107
-
108
-
109
-
110
-
111
-
112
-
113
-
114
-
115
-
116
-
117
-
118
-
119
-
120
-
121
-
122
-
123
-
124
-
125
-
126
-
127
-
128
-
129
-
130
-
131
-
132
-
133
-
134
-
135
-
136
-
137
-
138
-
139
-
140
-
 141
141 -
 142
142 -
 143
143 -
 144
144 -
 145
145 -
 146
146 -
 147
147 -
 148
148 -
 149
149 -
 150
150 -
 151
151 -
152
-
153
-
154
-
155
-
156
-
157
-
158
-
159
-
160
-
161
-
162
-
163
-
164
-
165
-
166
-
167
-
168
-
169
-
170
-
171
-
172
-
173
-
174
-
175
-
176
-
177
-
178
-
179
-
180
-
181
-
182
-
183
-
184
-
185
-
186
-
187
-
188
-
189
-
190
-
191
-
192
-
193
-
194
-
195
-
196
-
197
-
198
-
199
-
200
-
201
-
202
-
203
-
204
-
205
-
206
-
207
-
208
-
209
-
210
-
211
-
212
-
213
-
214
-
215
-
216
-
217
-
218
-
219
-
220
-
221
-
222
-
223
-
224
-
225
-
226
-
227
-
228
-
229
-
230
-
231
-
232
-
233
-
234
-
235
-
236
-
237
-
238
-
239
-
240
-
241
-
242
-
243
-
244
-
245
-
246
-
247
-
248
-
249
-
250
-
251
-
252
-
253
-
254
-
255
-
256
-
257
-
258
-
259
-
260
-
261
-
262
-
263
-
264
-
265
-
266
-
267
-
268
-
269
-
270
-
271
-
272
-
273
-
274
-
275
-
276
-
277
-
278
-
279
-
280
-
281
-
282
-
283
-
284
-
285
-
286
-
287
-
288
-
289
-
290
-
291
-
292
-
293
-
294
-
295
-
296
 |
 |