Epson DFX-8500 User Manual - Page 108
Skip over perforation, Print direction, length for front/ rear tractor, Auto tear off, Zero slash
 |
View all Epson DFX-8500 manuals
Add to My Manuals
Save this manual to your list of manuals |
Page 108 highlights
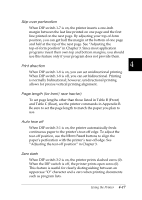
Skip over perforation When DIP switch 1-7 is on, the printer inserts a one-inch margin between the last line printed on one page and the first line printed on the next page. By adjusting your top-of-form position, you can get half the margin at the bottom of one page and half at the top of the next page. See "Adjusting the top-of-form position" in Chapter 3. Since most application programs insert their own top and bottom margins, you should use this feature only if your program does not provide them. Print direction 4 When DIP switch 1-8 is on, you can set unidirectional printing. When DIP switch 1-8 is off, you can set bidirectional. Printing is normally bidirectional; however, unidirectional printing allows for precise vertical printing alignment. Page length (for front/ rear tractor) To set page lengths other than those listed in Table B (Front) and Table C (Rear), see the printer commands in Appendix B. Be sure to set the page length to match the paper you plan to use. Auto tear off When DIP switch 3-1 is on, the printer automatically feeds continuous paper to the printer's tear-off edge. To adjust the tear-off position, use the Micro Feed buttons to align the paper's perforation with the printer's tear-off edge. See "Adjusting the tear-off position" in Chapter 3. Zero slash When DIP switch 3-2 is on, the printer prints slashed zeros (0). When the DIP switch is off, the printer prints open zeros (0). This feature is useful for clearly distinguishing between an uppercase "O" character and a zero when printing documents such as program lists. Using the Printer 4-17
-
 1
1 -
2
-
3
-
4
-
5
-
6
-
7
-
8
-
9
-
10
-
11
-
12
-
13
-
14
-
15
-
16
-
17
-
18
-
19
-
20
-
21
-
22
-
23
-
24
-
25
-
26
-
27
-
28
-
29
-
30
-
31
-
32
-
33
-
34
-
35
-
36
-
37
-
38
-
39
-
40
-
41
-
42
-
43
-
44
-
45
-
46
-
47
-
48
-
49
-
50
-
51
-
52
-
53
-
54
-
55
-
56
-
57
-
58
-
59
-
60
-
61
-
62
-
63
-
64
-
65
-
66
-
67
-
68
-
69
-
70
-
71
-
72
-
73
-
74
-
75
-
76
-
77
-
78
-
79
-
80
-
81
-
82
-
83
-
84
-
85
-
86
-
87
-
88
-
89
-
90
-
91
-
92
-
93
-
94
-
95
-
96
-
97
-
98
-
99
-
100
-
101
-
102
-
 103
103 -
 104
104 -
 105
105 -
 106
106 -
 107
107 -
 108
108 -
 109
109 -
 110
110 -
 111
111 -
 112
112 -
 113
113 -
114
-
115
-
116
-
117
-
118
-
119
-
120
-
121
-
122
-
123
-
124
-
125
-
126
-
127
-
128
-
129
-
130
-
131
-
132
-
133
-
134
-
135
-
136
-
137
-
138
-
139
-
140
-
141
-
142
-
143
-
144
-
145
-
146
-
147
-
148
-
149
-
150
-
151
-
152
-
153
-
154
-
155
-
156
-
157
-
158
-
159
-
160
-
161
-
162
-
163
-
164
-
165
-
166
-
167
-
168
-
169
-
170
-
171
-
172
-
173
-
174
-
175
-
176
-
177
-
178
-
179
-
180
-
181
-
182
-
183
-
184
-
185
-
186
-
187
-
188
-
189
-
190
-
191
-
192
-
193
-
194
-
195
-
196
-
197
-
198
-
199
-
200
-
201
-
202
-
203
-
204
-
205
-
206
-
207
-
208
-
209
-
210
-
211
-
212
-
213
-
214
-
215
-
216
-
217
-
218
-
219
-
220
-
221
-
222
-
223
-
224
-
225
-
226
-
227
-
228
-
229
-
230
-
231
-
232
-
233
-
234
-
235
-
236
-
237
-
238
-
239
-
240
-
241
-
242
-
243
-
244
-
245
-
246
-
247
-
248
-
249
-
250
-
251
 |
 |
