Epson DFX-8500 User Manual - Page 162
Micro Feed, Tear Off, with the cutting line. Then close the paper separator cover.
 |
View all Epson DFX-8500 manuals
Add to My Manuals
Save this manual to your list of manuals |
Page 162 highlights
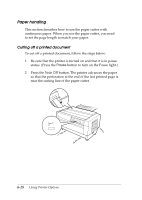
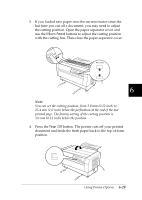
3. If you loaded new paper onto the current tractor since the last time you cut off a document, you may need to adjust the cutting position. Open the paper separator cover and use the Micro Feed buttons to adjust the cutting position with the cutting line. Then close the paper separator cover. 6 Note: You can set the cutting position, from 3.0 mm (0.12 inch) to 25.4 mm (1.0 inch) below the perforation at the end of the last printed page. The factory setting of the cutting position is 3.0 mm (0.12 inch) below the position. 4. Press the Tear Off button. The printer cuts off your printed document and feeds the fresh paper back to the top-of-form position. Using Printer Options 6-29
-
 1
1 -
2
-
3
-
4
-
5
-
6
-
7
-
8
-
9
-
10
-
11
-
12
-
13
-
14
-
15
-
16
-
17
-
18
-
19
-
20
-
21
-
22
-
23
-
24
-
25
-
26
-
27
-
28
-
29
-
30
-
31
-
32
-
33
-
34
-
35
-
36
-
37
-
38
-
39
-
40
-
41
-
42
-
43
-
44
-
45
-
46
-
47
-
48
-
49
-
50
-
51
-
52
-
53
-
54
-
55
-
56
-
57
-
58
-
59
-
60
-
61
-
62
-
63
-
64
-
65
-
66
-
67
-
68
-
69
-
70
-
71
-
72
-
73
-
74
-
75
-
76
-
77
-
78
-
79
-
80
-
81
-
82
-
83
-
84
-
85
-
86
-
87
-
88
-
89
-
90
-
91
-
92
-
93
-
94
-
95
-
96
-
97
-
98
-
99
-
100
-
101
-
102
-
103
-
104
-
105
-
106
-
107
-
108
-
109
-
110
-
111
-
112
-
113
-
114
-
115
-
116
-
117
-
118
-
119
-
120
-
121
-
122
-
123
-
124
-
125
-
126
-
127
-
128
-
129
-
130
-
131
-
132
-
133
-
134
-
135
-
136
-
137
-
138
-
139
-
140
-
141
-
142
-
143
-
144
-
145
-
146
-
147
-
148
-
149
-
150
-
151
-
152
-
153
-
154
-
155
-
156
-
 157
157 -
 158
158 -
 159
159 -
 160
160 -
 161
161 -
 162
162 -
 163
163 -
 164
164 -
 165
165 -
 166
166 -
 167
167 -
168
-
169
-
170
-
171
-
172
-
173
-
174
-
175
-
176
-
177
-
178
-
179
-
180
-
181
-
182
-
183
-
184
-
185
-
186
-
187
-
188
-
189
-
190
-
191
-
192
-
193
-
194
-
195
-
196
-
197
-
198
-
199
-
200
-
201
-
202
-
203
-
204
-
205
-
206
-
207
-
208
-
209
-
210
-
211
-
212
-
213
-
214
-
215
-
216
-
217
-
218
-
219
-
220
-
221
-
222
-
223
-
224
-
225
-
226
-
227
-
228
-
229
-
230
-
231
-
232
-
233
-
234
-
235
-
236
-
237
-
238
-
239
-
240
-
241
-
242
-
243
-
244
-
245
-
246
-
247
-
248
-
249
-
250
-
251
 |
 |

3.
If you loaded new paper onto the current tractor since the
last time you cut off a document, you may need to adjust
the cutting position. Open the paper separator cover and
use the
Micro Feed
buttons to adjust the cutting position
with the cutting line. Then close the paper separator cover.
Note:
You can set the cutting position, from 3.0 mm (0.12 inch) to
25.4 mm (1.0 inch) below the perforation at the end of the last
printed page. The factory setting of the cutting position is
3.0 mm (0.12 inch) below the position.
4.
Press the
Tear Off
button. The printer cuts off your printed
document and feeds the fresh paper back to the top-of-form
position.
6
Using Printer Options
6-29