Epson DFX-8500 User Manual - Page 111
Auto I/F interface wait time, I/F interface mode, Serial parity
 |
View all Epson DFX-8500 manuals
Add to My Manuals
Save this manual to your list of manuals |
Page 111 highlights
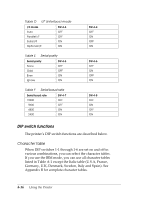
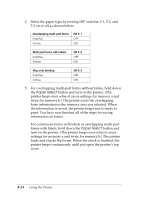
Auto I/F (interface) wait time When the printer is in the auto interface mode and it receives no data from the currently selected interface for the amount of time specified with this setting, it determines which interface is receiving data and switches to that interface. You can specify 10 seconds when DIP switch 4-2 is off. To specify 30 seconds, turn DIP switch 4-2 on. I/F (interface) mode You may need to change DIP switches 4-3 and 4-4 so that your printer and computer can communicate properly. These DIP switches control the interface mode. (You may also need to select a different serial baud rate. See the section below on serial baud rate.) Table D (page 4-16) lists the DIP switch settings for automatic, parallel, serial, and optional interface modes. When you select Auto, the printer automatically selects the interface that is receiving data, and uses that interface until the end of the print job. This setting allows you to share the printer among multiple computers without changing the interface mode. Serial parity If your computer is set up for serial communication, you need to change DIP switchs 4-5 and 4-6 so that your printer and computer can communicate properly. These DIP switches control the serial interface parity. Table E (page 4-16) lists the DIP switch settings for none, odd, even, and ignore parity. 4-20 Using the Printer
-
 1
1 -
2
-
3
-
4
-
5
-
6
-
7
-
8
-
9
-
10
-
11
-
12
-
13
-
14
-
15
-
16
-
17
-
18
-
19
-
20
-
21
-
22
-
23
-
24
-
25
-
26
-
27
-
28
-
29
-
30
-
31
-
32
-
33
-
34
-
35
-
36
-
37
-
38
-
39
-
40
-
41
-
42
-
43
-
44
-
45
-
46
-
47
-
48
-
49
-
50
-
51
-
52
-
53
-
54
-
55
-
56
-
57
-
58
-
59
-
60
-
61
-
62
-
63
-
64
-
65
-
66
-
67
-
68
-
69
-
70
-
71
-
72
-
73
-
74
-
75
-
76
-
77
-
78
-
79
-
80
-
81
-
82
-
83
-
84
-
85
-
86
-
87
-
88
-
89
-
90
-
91
-
92
-
93
-
94
-
95
-
96
-
97
-
98
-
99
-
100
-
101
-
102
-
103
-
104
-
105
-
 106
106 -
 107
107 -
 108
108 -
 109
109 -
 110
110 -
 111
111 -
 112
112 -
 113
113 -
 114
114 -
 115
115 -
 116
116 -
117
-
118
-
119
-
120
-
121
-
122
-
123
-
124
-
125
-
126
-
127
-
128
-
129
-
130
-
131
-
132
-
133
-
134
-
135
-
136
-
137
-
138
-
139
-
140
-
141
-
142
-
143
-
144
-
145
-
146
-
147
-
148
-
149
-
150
-
151
-
152
-
153
-
154
-
155
-
156
-
157
-
158
-
159
-
160
-
161
-
162
-
163
-
164
-
165
-
166
-
167
-
168
-
169
-
170
-
171
-
172
-
173
-
174
-
175
-
176
-
177
-
178
-
179
-
180
-
181
-
182
-
183
-
184
-
185
-
186
-
187
-
188
-
189
-
190
-
191
-
192
-
193
-
194
-
195
-
196
-
197
-
198
-
199
-
200
-
201
-
202
-
203
-
204
-
205
-
206
-
207
-
208
-
209
-
210
-
211
-
212
-
213
-
214
-
215
-
216
-
217
-
218
-
219
-
220
-
221
-
222
-
223
-
224
-
225
-
226
-
227
-
228
-
229
-
230
-
231
-
232
-
233
-
234
-
235
-
236
-
237
-
238
-
239
-
240
-
241
-
242
-
243
-
244
-
245
-
246
-
247
-
248
-
249
-
250
-
251
 |
 |
