Epson DFX-8500 User Manual - Page 98
Tear Off, Micro Feed, Pause, Tractor Select, Front/Rear, To reset the tear-off position, press
 |
View all Epson DFX-8500 manuals
Add to My Manuals
Save this manual to your list of manuals |
Page 98 highlights
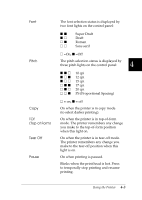
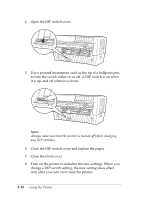
To reset the tear-off position, press the Tear Off button to enter tear-off mode and feed the paper to the tear-off position. Then use the Micro Feed buttons to move the paper to the desired position. See "Adjusting the tear-off position" in Chapter 3. To adjust the printing position, press either Micro Feed button to advance or reverse the paper to the desired position. See "Adjusting the printing position" in 4 Chapter 3. c Caution: When labels are loaded, use only the top Micro Feed button. Never feed labels backward through the printer. Pause Tractor Select Front/Rear Press to temporarily stop printing. Press again to resume printing. Hold down for at least 3 seconds to reset the printer's control panel settings. Selects the front or rear tractor. If you have been using paper loaded on one tractor, first remove the printed output before pressing this button to switch the tractor. When you switch between tractors, the paper already loaded in the printer is fed backward to the standby position, and the paper on the newly selected tractor is loaded. c Caution: Never use the Front/Rear button when labels are loaded in the printer. Always tear off any printed pages or excess paper so you don't feed more than one page backward through the printer. Using the Printer 4-7
-
 1
1 -
2
-
3
-
4
-
5
-
6
-
7
-
8
-
9
-
10
-
11
-
12
-
13
-
14
-
15
-
16
-
17
-
18
-
19
-
20
-
21
-
22
-
23
-
24
-
25
-
26
-
27
-
28
-
29
-
30
-
31
-
32
-
33
-
34
-
35
-
36
-
37
-
38
-
39
-
40
-
41
-
42
-
43
-
44
-
45
-
46
-
47
-
48
-
49
-
50
-
51
-
52
-
53
-
54
-
55
-
56
-
57
-
58
-
59
-
60
-
61
-
62
-
63
-
64
-
65
-
66
-
67
-
68
-
69
-
70
-
71
-
72
-
73
-
74
-
75
-
76
-
77
-
78
-
79
-
80
-
81
-
82
-
83
-
84
-
85
-
86
-
87
-
88
-
89
-
90
-
91
-
92
-
 93
93 -
 94
94 -
 95
95 -
 96
96 -
 97
97 -
 98
98 -
 99
99 -
 100
100 -
 101
101 -
 102
102 -
 103
103 -
104
-
105
-
106
-
107
-
108
-
109
-
110
-
111
-
112
-
113
-
114
-
115
-
116
-
117
-
118
-
119
-
120
-
121
-
122
-
123
-
124
-
125
-
126
-
127
-
128
-
129
-
130
-
131
-
132
-
133
-
134
-
135
-
136
-
137
-
138
-
139
-
140
-
141
-
142
-
143
-
144
-
145
-
146
-
147
-
148
-
149
-
150
-
151
-
152
-
153
-
154
-
155
-
156
-
157
-
158
-
159
-
160
-
161
-
162
-
163
-
164
-
165
-
166
-
167
-
168
-
169
-
170
-
171
-
172
-
173
-
174
-
175
-
176
-
177
-
178
-
179
-
180
-
181
-
182
-
183
-
184
-
185
-
186
-
187
-
188
-
189
-
190
-
191
-
192
-
193
-
194
-
195
-
196
-
197
-
198
-
199
-
200
-
201
-
202
-
203
-
204
-
205
-
206
-
207
-
208
-
209
-
210
-
211
-
212
-
213
-
214
-
215
-
216
-
217
-
218
-
219
-
220
-
221
-
222
-
223
-
224
-
225
-
226
-
227
-
228
-
229
-
230
-
231
-
232
-
233
-
234
-
235
-
236
-
237
-
238
-
239
-
240
-
241
-
242
-
243
-
244
-
245
-
246
-
247
-
248
-
249
-
250
-
251
 |
 |
