Epson DFX-8500 User Manual - Page 187
The printer does not load continuous paper., Appendix A.
 |
View all Epson DFX-8500 manuals
Add to My Manuals
Save this manual to your list of manuals |
Page 187 highlights
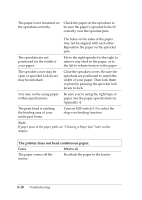
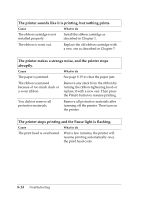
The paper is not mounted on Check the paper on the sprockets to the sprockets correctly. be sure the paper's sprocket holes fit correctly over the sprocket pins. The holes on the sides of the paper may not be aligned with each other. Reposition the paper on the sprocket pins. The sprockets are not positioned for the width of your paper. Move the right sprocket to the right to remove any slack in the paper, or to the left to release tension in the paper. The sprocket cover may be open or sprocket lock levers may be unlocked. Close the sprocket covers. Be sure the sprockets are positioned to match the width of your paper. Then lock them in place by pressing the sprocket lock levers to lock. You may not be using paper within specifications. Be sure you're using the right type of paper. See the paper specifications in Appendix A. The print head is catching the binding area of your multi-part forms. Turn on DIP switch 5-3 to select the skip over binding function. Note: If paper jams in the paper path, see "Clearing a Paper Jam" later in this chapter. The printer does not load continuous paper. Cause What to do The paper comes off the tractor. Re-attach the paper to the tractor. 8-10 Troubleshooting
-
 1
1 -
2
-
3
-
4
-
5
-
6
-
7
-
8
-
9
-
10
-
11
-
12
-
13
-
14
-
15
-
16
-
17
-
18
-
19
-
20
-
21
-
22
-
23
-
24
-
25
-
26
-
27
-
28
-
29
-
30
-
31
-
32
-
33
-
34
-
35
-
36
-
37
-
38
-
39
-
40
-
41
-
42
-
43
-
44
-
45
-
46
-
47
-
48
-
49
-
50
-
51
-
52
-
53
-
54
-
55
-
56
-
57
-
58
-
59
-
60
-
61
-
62
-
63
-
64
-
65
-
66
-
67
-
68
-
69
-
70
-
71
-
72
-
73
-
74
-
75
-
76
-
77
-
78
-
79
-
80
-
81
-
82
-
83
-
84
-
85
-
86
-
87
-
88
-
89
-
90
-
91
-
92
-
93
-
94
-
95
-
96
-
97
-
98
-
99
-
100
-
101
-
102
-
103
-
104
-
105
-
106
-
107
-
108
-
109
-
110
-
111
-
112
-
113
-
114
-
115
-
116
-
117
-
118
-
119
-
120
-
121
-
122
-
123
-
124
-
125
-
126
-
127
-
128
-
129
-
130
-
131
-
132
-
133
-
134
-
135
-
136
-
137
-
138
-
139
-
140
-
141
-
142
-
143
-
144
-
145
-
146
-
147
-
148
-
149
-
150
-
151
-
152
-
153
-
154
-
155
-
156
-
157
-
158
-
159
-
160
-
161
-
162
-
163
-
164
-
165
-
166
-
167
-
168
-
169
-
170
-
171
-
172
-
173
-
174
-
175
-
176
-
177
-
178
-
179
-
180
-
181
-
 182
182 -
 183
183 -
 184
184 -
 185
185 -
 186
186 -
 187
187 -
 188
188 -
 189
189 -
 190
190 -
 191
191 -
 192
192 -
193
-
194
-
195
-
196
-
197
-
198
-
199
-
200
-
201
-
202
-
203
-
204
-
205
-
206
-
207
-
208
-
209
-
210
-
211
-
212
-
213
-
214
-
215
-
216
-
217
-
218
-
219
-
220
-
221
-
222
-
223
-
224
-
225
-
226
-
227
-
228
-
229
-
230
-
231
-
232
-
233
-
234
-
235
-
236
-
237
-
238
-
239
-
240
-
241
-
242
-
243
-
244
-
245
-
246
-
247
-
248
-
249
-
250
-
251
 |
 |
