Epson DFX-8500 User Manual - Page 141
LF/FF Load, button to feed
 |
View all Epson DFX-8500 manuals
Add to My Manuals
Save this manual to your list of manuals |
Page 141 highlights
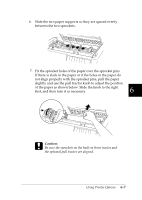
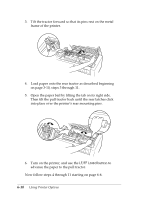
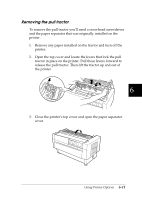
8. Close the sprocket covers. 9. Adjust the two sprockets until the paper is straight and smooth, and then lock the sprockets into place. c Caution: Be sure the sprockets are not too far apart. Your paper could jam if they pull the paper too tightly or tear the edges of the paper holes. To remove any excess tension in your paper, release the right sprocket and lock it again. 10. Adjust the top-of-form position as described in Chapter 3, if necessary. 11. Close the top cover. Press the LF/FF Load button to feed the paper out the back of the printer. Make sure the edge of the first sheet emerges below the paper separator. 6-8 Using Printer Options
-
 1
1 -
2
-
3
-
4
-
5
-
6
-
7
-
8
-
9
-
10
-
11
-
12
-
13
-
14
-
15
-
16
-
17
-
18
-
19
-
20
-
21
-
22
-
23
-
24
-
25
-
26
-
27
-
28
-
29
-
30
-
31
-
32
-
33
-
34
-
35
-
36
-
37
-
38
-
39
-
40
-
41
-
42
-
43
-
44
-
45
-
46
-
47
-
48
-
49
-
50
-
51
-
52
-
53
-
54
-
55
-
56
-
57
-
58
-
59
-
60
-
61
-
62
-
63
-
64
-
65
-
66
-
67
-
68
-
69
-
70
-
71
-
72
-
73
-
74
-
75
-
76
-
77
-
78
-
79
-
80
-
81
-
82
-
83
-
84
-
85
-
86
-
87
-
88
-
89
-
90
-
91
-
92
-
93
-
94
-
95
-
96
-
97
-
98
-
99
-
100
-
101
-
102
-
103
-
104
-
105
-
106
-
107
-
108
-
109
-
110
-
111
-
112
-
113
-
114
-
115
-
116
-
117
-
118
-
119
-
120
-
121
-
122
-
123
-
124
-
125
-
126
-
127
-
128
-
129
-
130
-
131
-
132
-
133
-
134
-
135
-
 136
136 -
 137
137 -
 138
138 -
 139
139 -
 140
140 -
 141
141 -
 142
142 -
 143
143 -
 144
144 -
 145
145 -
 146
146 -
147
-
148
-
149
-
150
-
151
-
152
-
153
-
154
-
155
-
156
-
157
-
158
-
159
-
160
-
161
-
162
-
163
-
164
-
165
-
166
-
167
-
168
-
169
-
170
-
171
-
172
-
173
-
174
-
175
-
176
-
177
-
178
-
179
-
180
-
181
-
182
-
183
-
184
-
185
-
186
-
187
-
188
-
189
-
190
-
191
-
192
-
193
-
194
-
195
-
196
-
197
-
198
-
199
-
200
-
201
-
202
-
203
-
204
-
205
-
206
-
207
-
208
-
209
-
210
-
211
-
212
-
213
-
214
-
215
-
216
-
217
-
218
-
219
-
220
-
221
-
222
-
223
-
224
-
225
-
226
-
227
-
228
-
229
-
230
-
231
-
232
-
233
-
234
-
235
-
236
-
237
-
238
-
239
-
240
-
241
-
242
-
243
-
244
-
245
-
246
-
247
-
248
-
249
-
250
-
251
 |
 |

8.
Close the sprocket covers.
9.
Adjust the two sprockets until the paper is straight and
smooth, and then lock the sprockets into place.
c
Caution:
Be sure the sprockets are not too far apart. Your paper
could jam if they pull the paper too tightly or tear the
edges of the paper holes. To remove any excess tension in
your paper, release the right sprocket and lock it again.
10.
Adjust the top-of-form position as described in Chapter 3,
if necessary.
11.
Close the top cover. Press the
LF/FF Load
button to feed
the paper out the back of the printer. Make sure the edge
of the first sheet emerges below the paper separator.
6-8
Using Printer Options