Epson Stylus Scan 2000 User Manual - Page 30
if your document includes, if you're copying a photograph.
 |
View all Epson Stylus Scan 2000 manuals
Add to My Manuals
Save this manual to your list of manuals |
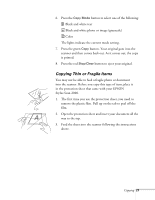
Page 30 highlights
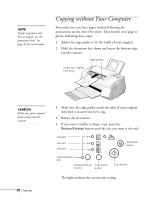
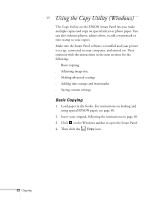
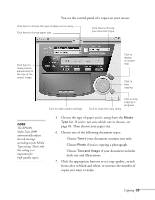
You see the control panel of a copier on your screen: . Click here to choose the type of paper you're using. Click here to choose paper size. Click here to choose your document type. Click here to make precise adjustments to the size of the output image. Click to display on-screen help. Click to start copying. Click to make custom settings. Click to close the Copy Utility. Click to stop copying in progress. note The EPSON Stylus Scan 2000 automatically adjusts the ink coverage according to your Media Type setting. That's why this setting is so important for high-quality copies. 5. Choose the type of paper you're using from the Media Type list. If you're not sure which one to choose, see page 49. Then choose your paper size. 6. Choose one of the following document types: s Choose Text if your document contains text only. s Choose Photo if you're copying a photograph. s Choose Text and Image if your document includes both text and illustrations. 7. Click the appropriate buttons to set copy quality, switch from color to black and white, or increase the number of copies you want to make. Copying 23
-
 1
1 -
2
-
3
-
4
-
5
-
6
-
7
-
8
-
9
-
10
-
11
-
12
-
13
-
14
-
15
-
16
-
17
-
18
-
19
-
20
-
21
-
22
-
23
-
24
-
 25
25 -
 26
26 -
 27
27 -
 28
28 -
 29
29 -
 30
30 -
 31
31 -
 32
32 -
 33
33 -
 34
34 -
 35
35 -
36
-
37
-
38
-
39
-
40
-
41
-
42
-
43
-
44
-
45
-
46
-
47
-
48
-
49
-
50
-
51
-
52
-
53
-
54
-
55
-
56
-
57
-
58
-
59
-
60
-
61
-
62
-
63
-
64
-
65
-
66
-
67
-
68
-
69
-
70
-
71
-
72
-
73
-
74
-
75
-
76
-
77
-
78
-
79
-
80
-
81
-
82
-
83
-
84
-
85
-
86
-
87
-
88
-
89
-
90
-
91
-
92
-
93
-
94
-
95
-
96
-
97
-
98
-
99
-
100
-
101
-
102
-
103
-
104
-
105
-
106
-
107
-
108
-
109
-
110
-
111
-
112
-
113
-
114
-
115
-
116
-
117
-
118
-
119
-
120
-
121
-
122
-
123
-
124
-
125
-
126
-
127
-
128
-
129
-
130
-
131
-
132
-
133
-
134
-
135
-
136
-
137
-
138
-
139
-
140
-
141
-
142
-
143
-
144
-
145
-
146
-
147
-
148
-
149
-
150
-
151
-
152
-
153
-
154
-
155
-
156
-
157
-
158
-
159
-
160
 |
 |
