Epson Stylus Scan 2000 User Manual - Page 86
Scanning to Application
 |
View all Epson Stylus Scan 2000 manuals
Add to My Manuals
Save this manual to your list of manuals |
Page 86 highlights
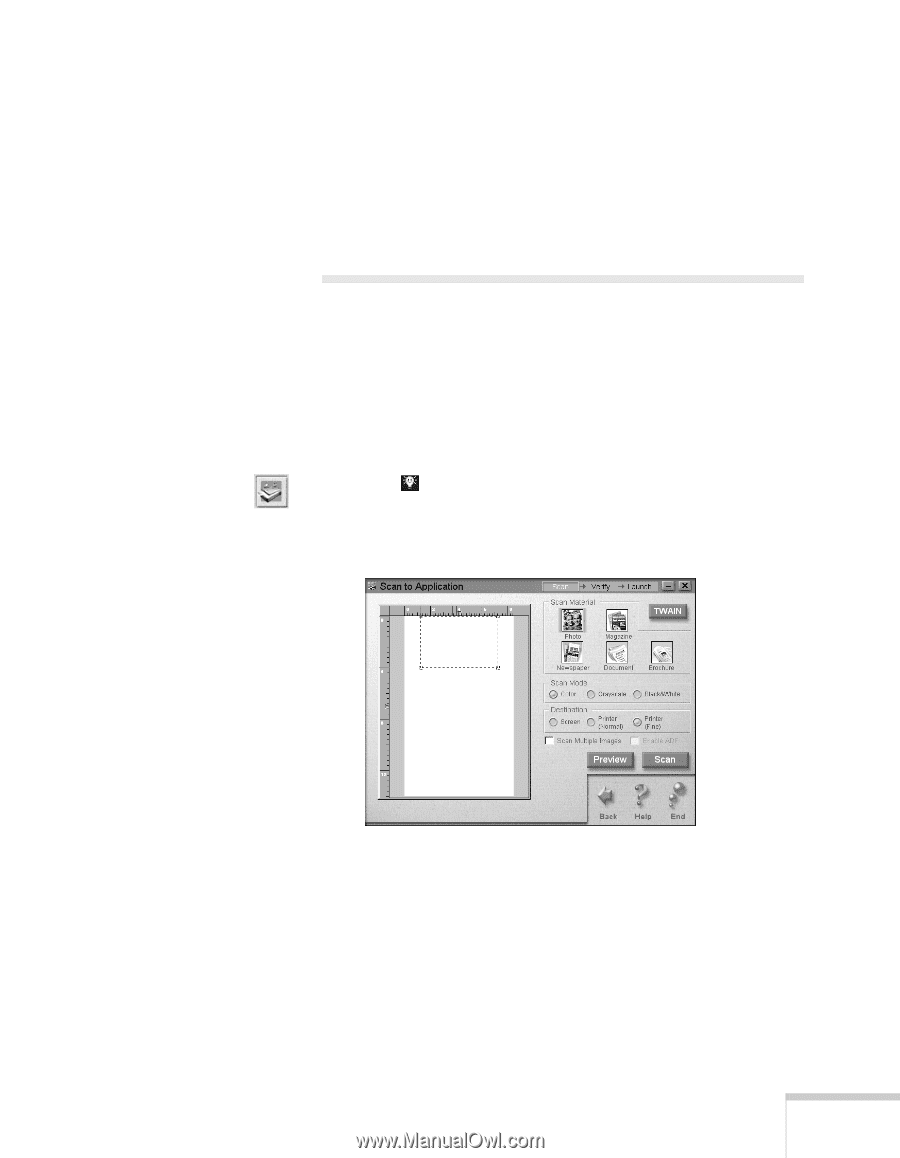
Make sure you have your PhotoDeluxe CD-ROM handy so you can insert it when requested. 8. When you're finished working and you exit PhotoDeluxe, click Exit to close Scan for Creativity, or click one of the other buttons to continue. Scanning to Application For complete flexibility, Smart Panel lets you scan and send your scanned files to any supported application program on your computer. 1. Feed your photo or page into the scanner as described on page 59. 2. Click to open the Smart Panel, then click the Scan to Application icon. You see the Application welcome. 3. Click Start. The Scan to Application window opens: 4. Follow the steps on pages 73 through 74 to choose settings, preview your image, and scan. Scanning with Windows 79
-
 1
1 -
2
-
3
-
4
-
5
-
6
-
7
-
8
-
9
-
10
-
11
-
12
-
13
-
14
-
15
-
16
-
17
-
18
-
19
-
20
-
21
-
22
-
23
-
24
-
25
-
26
-
27
-
28
-
29
-
30
-
31
-
32
-
33
-
34
-
35
-
36
-
37
-
38
-
39
-
40
-
41
-
42
-
43
-
44
-
45
-
46
-
47
-
48
-
49
-
50
-
51
-
52
-
53
-
54
-
55
-
56
-
57
-
58
-
59
-
60
-
61
-
62
-
63
-
64
-
65
-
66
-
67
-
68
-
69
-
70
-
71
-
72
-
73
-
74
-
75
-
76
-
77
-
78
-
79
-
80
-
 81
81 -
 82
82 -
 83
83 -
 84
84 -
 85
85 -
 86
86 -
 87
87 -
 88
88 -
 89
89 -
 90
90 -
 91
91 -
92
-
93
-
94
-
95
-
96
-
97
-
98
-
99
-
100
-
101
-
102
-
103
-
104
-
105
-
106
-
107
-
108
-
109
-
110
-
111
-
112
-
113
-
114
-
115
-
116
-
117
-
118
-
119
-
120
-
121
-
122
-
123
-
124
-
125
-
126
-
127
-
128
-
129
-
130
-
131
-
132
-
133
-
134
-
135
-
136
-
137
-
138
-
139
-
140
-
141
-
142
-
143
-
144
-
145
-
146
-
147
-
148
-
149
-
150
-
151
-
152
-
153
-
154
-
155
-
156
-
157
-
158
-
159
-
160
 |
 |
Scanning with Windows
79
Make sure you have your PhotoDeluxe CD-ROM handy
so you can insert it when requested.
8.
When you’re finished working and you exit PhotoDeluxe,
click
Exit
to close Scan for Creativity, or click one of the
other buttons to continue.
Scanning to Application
For complete flexibility, Smart Panel lets you scan and send
your scanned files to any supported application program on
your computer.
1.
Feed your photo or page into the scanner as described on
page 59.
2.
Click
to open the Smart Panel, then click the Scan to
Application icon. You see the Application welcome.
3.
Click
Start.
The Scan to Application window opens:
4.
Follow the steps on pages 73 through 74 to choose settings,
preview your image, and scan.