Epson Stylus Scan 2000 User Manual - Page 67
Starting Your Scan, See for more information about inserting
 |
View all Epson Stylus Scan 2000 manuals
Add to My Manuals
Save this manual to your list of manuals |
Page 67 highlights
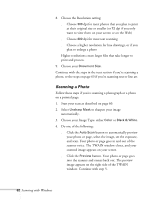
The first time you scan with your EPSON Stylus Scan 2000, you'll also need to select it as your TWAIN source. Starting Your Scan Before you scan, make sure your scanning software is installed and your EPSON Stylus Scan is set up, connected to your computer, and turned on. 1. Adjust the edge guides to fit the width of your page or photo. Feed it into the scanner until you feel a tug. edge guides Insert your photo face down, with the bottom edge going in first. Press this button to eject your photo after scanning. note If you're using Photo Deluxe, start by clicking GET AND FIX PHOTO, then click the arrow below the Scanners icon and select your input source. Click the Scanners icon to open the Scanning tab, then click Mode to open the EPSON TWAIN window. See page 20 for more information about inserting documents into the scanner (including fragile or thin documents). 2. Start your application, for example, Adobe Photoshop. 3. From the File menu, choose Import, then Select TWAIN 32 Source. 4. Select EPSON Stylus Scan SF (sheet-fed) and click Select. 60 Scanning with Windows
-
 1
1 -
2
-
3
-
4
-
5
-
6
-
7
-
8
-
9
-
10
-
11
-
12
-
13
-
14
-
15
-
16
-
17
-
18
-
19
-
20
-
21
-
22
-
23
-
24
-
25
-
26
-
27
-
28
-
29
-
30
-
31
-
32
-
33
-
34
-
35
-
36
-
37
-
38
-
39
-
40
-
41
-
42
-
43
-
44
-
45
-
46
-
47
-
48
-
49
-
50
-
51
-
52
-
53
-
54
-
55
-
56
-
57
-
58
-
59
-
60
-
61
-
 62
62 -
 63
63 -
 64
64 -
 65
65 -
 66
66 -
 67
67 -
 68
68 -
 69
69 -
 70
70 -
 71
71 -
 72
72 -
73
-
74
-
75
-
76
-
77
-
78
-
79
-
80
-
81
-
82
-
83
-
84
-
85
-
86
-
87
-
88
-
89
-
90
-
91
-
92
-
93
-
94
-
95
-
96
-
97
-
98
-
99
-
100
-
101
-
102
-
103
-
104
-
105
-
106
-
107
-
108
-
109
-
110
-
111
-
112
-
113
-
114
-
115
-
116
-
117
-
118
-
119
-
120
-
121
-
122
-
123
-
124
-
125
-
126
-
127
-
128
-
129
-
130
-
131
-
132
-
133
-
134
-
135
-
136
-
137
-
138
-
139
-
140
-
141
-
142
-
143
-
144
-
145
-
146
-
147
-
148
-
149
-
150
-
151
-
152
-
153
-
154
-
155
-
156
-
157
-
158
-
159
-
160
 |
 |
