Epson Stylus Scan 2000 User Manual - Page 70
Scanning Text, Or, Click
 |
View all Epson Stylus Scan 2000 manuals
Add to My Manuals
Save this manual to your list of manuals |
Page 70 highlights
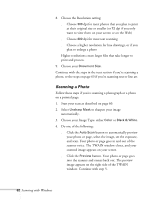
5. If you want to crop the image, or scan only one section, click and drag on the preview image to select the part you want. You see an outline around your selection, as shown on the left. You can click and drag the outline to move it around or change its size. Or, Click the Auto Locate button to automatically outline your photo and eliminate any white border around it. 6. Click the Auto Exposure button to automatically adjust scan settings for maximum enhancement of your photo. 7. Click the Scan button. Your photo or page goes into the scanner again and comes out slowly as it is scanned. Your image opens on your screen (behind the TWAIN window). 8. Click the Close button to close the TWAIN window. Scanning Text 1. Start your scan as described on page 60. 2. Click the Preview button. Your page goes into the scanner and comes back out. The preview image appears on the right side of the TWAIN window, as shown below: Click Threshold and move the slider to darken the image. Scanning with Windows 63
-
 1
1 -
2
-
3
-
4
-
5
-
6
-
7
-
8
-
9
-
10
-
11
-
12
-
13
-
14
-
15
-
16
-
17
-
18
-
19
-
20
-
21
-
22
-
23
-
24
-
25
-
26
-
27
-
28
-
29
-
30
-
31
-
32
-
33
-
34
-
35
-
36
-
37
-
38
-
39
-
40
-
41
-
42
-
43
-
44
-
45
-
46
-
47
-
48
-
49
-
50
-
51
-
52
-
53
-
54
-
55
-
56
-
57
-
58
-
59
-
60
-
61
-
62
-
63
-
64
-
 65
65 -
 66
66 -
 67
67 -
 68
68 -
 69
69 -
 70
70 -
 71
71 -
 72
72 -
 73
73 -
 74
74 -
 75
75 -
76
-
77
-
78
-
79
-
80
-
81
-
82
-
83
-
84
-
85
-
86
-
87
-
88
-
89
-
90
-
91
-
92
-
93
-
94
-
95
-
96
-
97
-
98
-
99
-
100
-
101
-
102
-
103
-
104
-
105
-
106
-
107
-
108
-
109
-
110
-
111
-
112
-
113
-
114
-
115
-
116
-
117
-
118
-
119
-
120
-
121
-
122
-
123
-
124
-
125
-
126
-
127
-
128
-
129
-
130
-
131
-
132
-
133
-
134
-
135
-
136
-
137
-
138
-
139
-
140
-
141
-
142
-
143
-
144
-
145
-
146
-
147
-
148
-
149
-
150
-
151
-
152
-
153
-
154
-
155
-
156
-
157
-
158
-
159
-
160
 |
 |
