Epson Stylus Scan 2000 User Manual - Page 41
Previewing Your Image and Adjusting Copy Settings, appears in the preview area, as shown above.
 |
View all Epson Stylus Scan 2000 manuals
Add to My Manuals
Save this manual to your list of manuals |
Page 41 highlights
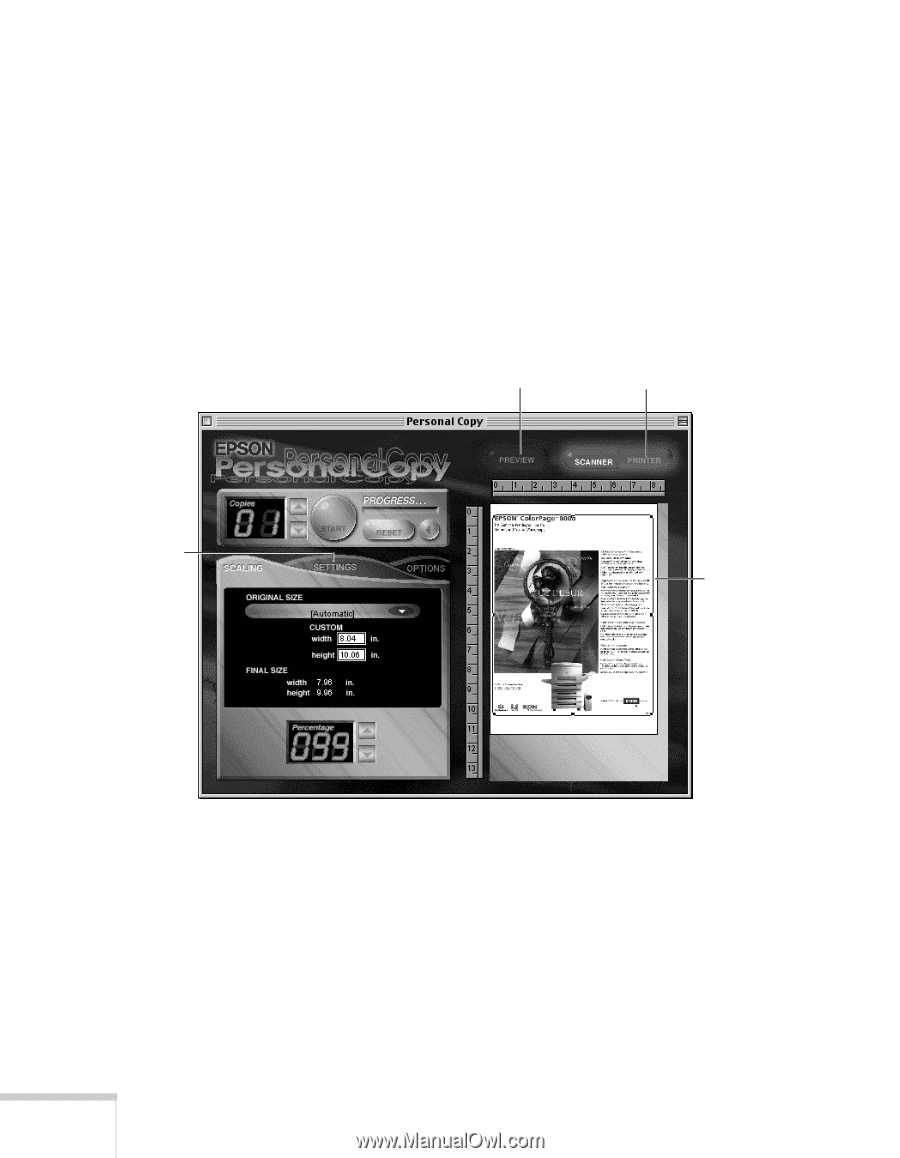
9. Click the START button to begin copying. Your original goes in and out of the scanner twice. Then the copy is printed. Previewing Your Image and Adjusting Copy Settings 1. Click the left arrow beside the RESET button. The screen expands to show a preview area: Click here to scan a preview of your image. Click here to see how your printed copy will look. Click here to display color settings. Click and drag this frame to select the copy area. 34 Copying 2. Click the PREVIEW button. Your original goes into the scanner and comes back out. A preview of your copy appears in the preview area, as shown above. 3. Click and drag the frame around the image to select a portion for copying. You can adjust the size of your copy by clicking the PRINTER button and then resizing the frame around the preview image.
-
 1
1 -
2
-
3
-
4
-
5
-
6
-
7
-
8
-
9
-
10
-
11
-
12
-
13
-
14
-
15
-
16
-
17
-
18
-
19
-
20
-
21
-
22
-
23
-
24
-
25
-
26
-
27
-
28
-
29
-
30
-
31
-
32
-
33
-
34
-
35
-
 36
36 -
 37
37 -
 38
38 -
 39
39 -
 40
40 -
 41
41 -
 42
42 -
 43
43 -
 44
44 -
 45
45 -
 46
46 -
47
-
48
-
49
-
50
-
51
-
52
-
53
-
54
-
55
-
56
-
57
-
58
-
59
-
60
-
61
-
62
-
63
-
64
-
65
-
66
-
67
-
68
-
69
-
70
-
71
-
72
-
73
-
74
-
75
-
76
-
77
-
78
-
79
-
80
-
81
-
82
-
83
-
84
-
85
-
86
-
87
-
88
-
89
-
90
-
91
-
92
-
93
-
94
-
95
-
96
-
97
-
98
-
99
-
100
-
101
-
102
-
103
-
104
-
105
-
106
-
107
-
108
-
109
-
110
-
111
-
112
-
113
-
114
-
115
-
116
-
117
-
118
-
119
-
120
-
121
-
122
-
123
-
124
-
125
-
126
-
127
-
128
-
129
-
130
-
131
-
132
-
133
-
134
-
135
-
136
-
137
-
138
-
139
-
140
-
141
-
142
-
143
-
144
-
145
-
146
-
147
-
148
-
149
-
150
-
151
-
152
-
153
-
154
-
155
-
156
-
157
-
158
-
159
-
160
 |
 |